3D Print Elephant Foot: What Causes It and How to Fix It
You’ve nailed your bed leveling, your first layer looks perfect, and everything seems great — until you notice the bottom edge of your print is slightly wider than the rest. That bulge at the base is called “elephant foot,” and it’s one of the most common 3D printing defects. While it might seem purely cosmetic, elephant foot can mess up dimensional accuracy, prevent parts from fitting together, and make flat bottoms uneven.
Let’s dig into what causes elephant foot and how to fix it once and for all.
What Is Elephant Foot?
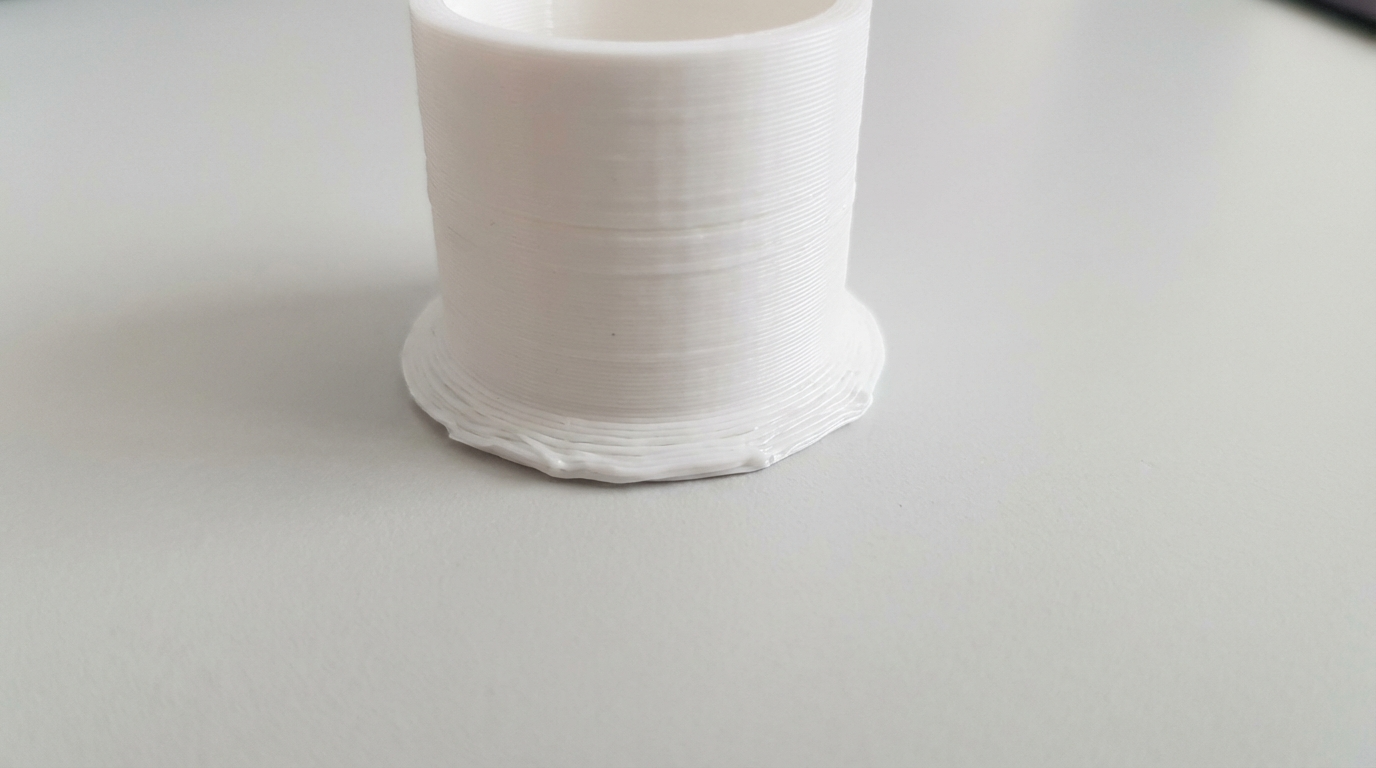
Elephant foot is when the first few layers of your print bulge outward, making the base wider than the rest of the part. The name comes from the shape — it looks like an elephant’s foot spreading under weight. In severe cases, the bulge can be a millimeter or more wider than the designed dimensions.
The defect typically affects the first 1-5 layers and gradually transitions to the correct dimensions higher up. It’s most noticeable on prints with flat vertical walls and critical on parts that need to fit precisely — like enclosures, boxes with lids, or mechanical assemblies.
What Causes Elephant Foot
1. Nozzle Too Close to the Bed
This is the number one cause. When your nozzle is even slightly too close to the build plate, the first layer gets squished. The filament has nowhere to go but outward, creating a wider-than-intended base. Even a 0.05mm difference in Z-offset can cause noticeable elephant foot.
How to check: print a single-layer square and measure its thickness. If your first layer height is set to 0.2mm but the printed layer measures 0.15mm, your nozzle is too close.
2. Bed Temperature Too High
A heated bed that’s too hot keeps the first layers soft for longer than necessary. While the layers above are cooling and solidifying at their correct dimensions, the bottom layers remain slightly molten and spread under the weight of the print above them.
This is especially common with PLA, which has a relatively low glass transition temperature. A bed at 70°C can keep PLA soft enough to deform, while 55-60°C provides adequate adhesion without excessive softening.
3. First Layer Settings
Many slicers have separate first layer settings — width, flow, speed — designed to improve bed adhesion. While these help your print stick, aggressive first layer settings can contribute to elephant foot:
- First layer width: Often set to 120-150% of normal line width. This wider line improves adhesion but makes the base wider by design.
- First layer flow: Set above 100% to ensure good squish. Extra material means extra width.
- First layer speed: Slower speeds give more time for the filament to spread.
4. Weight Compression
On tall, heavy prints, the sheer weight of the upper layers presses down on the still-warm bottom layers. This is more of an issue with large prints and higher bed temperatures. The bottom layers are essentially being compressed by everything above them while they’re still soft enough to deform.
5. Cooling Issues
Most slicers disable the part cooling fan for the first few layers to improve bed adhesion. Without active cooling, these layers stay soft longer and are more susceptible to deformation. The longer they stay warm, the more they spread.
How to Fix Elephant Foot
Method 1: Adjust Z-Offset
Start here because it’s the most common cause and the easiest fix. Raise your nozzle slightly — try 0.02-0.05mm increments. You want the first layer to adhere well without being overly squished. The sweet spot is where the first layer lines are touching each other with slight overlap, not pressed flat into a continuous sheet.
On printers with automatic bed leveling (BLTouch, CR Touch, inductive probe), adjust the Z-offset in your printer’s menu. On manually leveled beds, re-level with slightly more gap than usual — the paper test should feel like light friction, not tight grip.
Method 2: Lower Bed Temperature
Try reducing your bed temperature by 5°C increments. For PLA, most people over-heat their beds. Try these temperatures:
- PLA: 50-55°C (many people run 60-70°C, which is often too high)
- PETG: 70-75°C
- ABS: 95-100°C (ABS needs more heat, so elephant foot is harder to avoid)
You can also use the slicer’s “bed temperature for first layer” setting if available — run the first layer at your normal temperature for good adhesion, then drop 5-10°C for subsequent layers so the base cools and solidifies faster.
Method 3: Elephant Foot Compensation
This is the most direct fix. Most modern slicers have a built-in elephant foot compensation setting that slightly shrinks the first layer (or first few layers) inward to counteract the expected bulge.
In PrusaSlicer/OrcaSlicer: Go to Print Settings → Advanced → “Elephant foot compensation.” Start with 0.1-0.2mm and increase if needed. The slicer literally shrinks the first layer perimeter inward by this amount.
In Cura: The setting is called “Initial Layer Horizontal Expansion” and it should be set to a negative value. Try -0.1 to -0.2mm. Note the negative sign — positive values make the first layer bigger, which is the opposite of what you want.
This is my preferred method because it directly addresses the symptom without compromising bed adhesion. You keep your Z-offset and bed temperature where they work best for sticking, and let the slicer compensate for the expected spread.
Method 4: Reduce First Layer Flow
If your first layer flow is above 100%, try bringing it back to 95-100%. Extra flow means extra material, which means extra width. In Cura, this is “Initial Layer Flow” — try 95%. In PrusaSlicer, it’s “First layer extrusion width” — set it closer to your normal extrusion width rather than the default 120%.
Be careful here: reducing flow too much can cause adhesion problems. Make changes in small increments and watch that your first layer still sticks properly.
Method 5: Enable Fan Earlier
Most slicer profiles disable the part cooling fan for the first 1-4 layers. While this helps adhesion, it keeps the bottom layers softer for longer. Try enabling the fan starting at layer 2 at a reduced speed (30-50%), then ramping to full speed by layer 4-5. This helps the bottom layers solidify faster without completely killing adhesion.
In Cura: “Regular Fan Speed At Layer” — set to 2 or 3 instead of the default 4-5. In PrusaSlicer: “Disable fan for the first N layers” — set to 1.
Method 6: Use a Raft
If nothing else works and dimensional accuracy at the base is critical, print with a raft. The raft absorbs the elephant foot effect, and the actual print sits on top with correct dimensions. This is a last resort since rafts use extra material and can leave a rough bottom surface, but for parts that absolutely must be dimensionally accurate at the base, it’s effective.
Measuring and Verifying Your Fix
Don’t just eyeball it — measure your results. Print a 20mm calibration cube and measure the X and Y dimensions at the base (first 1-2mm) and at the middle (10mm up). A perfect print will measure the same at both points. If the base is still wider, increase your compensation or adjust your settings further.
Digital calipers are essential for this kind of work. You can’t see a 0.1mm difference with your eyes, but you can definitely feel it when two parts don’t fit together.
Elephant Foot in Different Materials
PLA
Most susceptible because people tend to over-heat the bed. PLA adheres well at 50-55°C on most surfaces — PEI, glass with glue, or textured sheets. There’s no need for 65-70°C unless your room is very cold or your bed has poor thermal contact.
PETG
PETG is less prone to elephant foot because it’s usually printed on beds at 70-80°C, which is closer to its optimal range. However, PETG sticks aggressively to some surfaces, so the first layer can spread more on glass or smooth PEI. A textured PEI sheet actually helps here because the texture limits how much the filament can spread.
ABS/ASA
ABS requires high bed temperatures (95-110°C) that keep the bottom layers soft. Combined with the enclosed environment needed to prevent warping, elephant foot is almost inevitable with ABS. Elephant foot compensation in the slicer (0.2-0.3mm) is usually the best approach since you can’t easily lower the bed temperature without risking adhesion failure and warping.
Nylon
Nylon presents similar challenges to ABS — high bed temperatures and tendency to warp mean you can’t just lower the bed temp. Use elephant foot compensation (0.2-0.3mm) and consider a raft for critical parts.
Prevention vs. Compensation
The best approach is a combination: get your Z-offset and bed temperature as close to optimal as possible (prevention), then use elephant foot compensation in the slicer to handle whatever slight bulge remains (compensation). This two-pronged approach gives you the best adhesion and the best dimensional accuracy.
Don’t rely solely on compensation. If your nozzle is way too close and you compensate with a large offset in the slicer, you’re basically fighting yourself — the first layer will be over-squished and then artificially shrunk, which can lead to weak adhesion and other issues.
Quick Reference Table
Here’s a summary of fixes ordered by effectiveness:
- Adjust Z-offset — raise nozzle by 0.02-0.05mm (free, immediate)
- Elephant foot compensation — 0.1-0.2mm in slicer (easy, effective)
- Lower bed temperature — reduce by 5°C (simple but test adhesion)
- Reduce first layer flow/width — bring closer to standard values (careful with adhesion)
- Enable fan earlier — fan on at layer 2-3 at reduced speed (minor risk to adhesion)
- Use a raft — last resort for critical dimensional accuracy
Final Thoughts
Elephant foot is one of those problems that many people just live with, either because they don’t know the fix or because they’re afraid of ruining their bed adhesion. But with the elephant foot compensation setting available in every major slicer, there’s really no reason to tolerate it. Dial in your Z-offset, set an appropriate bed temperature, add 0.1-0.2mm of compensation, and enjoy prints that are dimensionally accurate from the very first layer to the last.