3D Print Shifting Mid-Print on X or Y Axis – Causes and Fixes
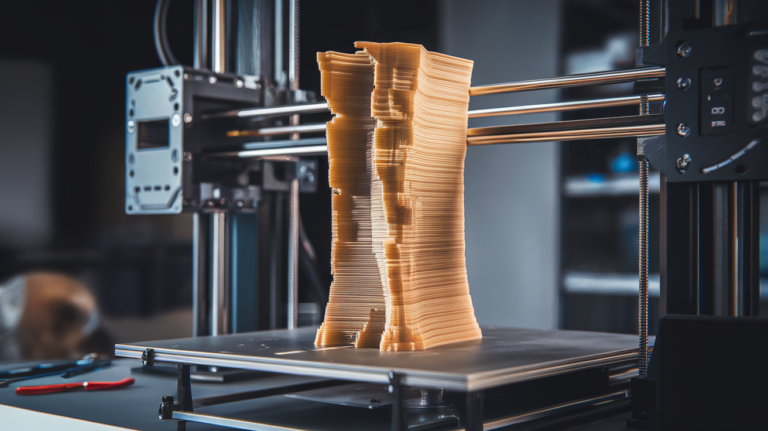
You’re hours into a print, everything looks great, and then suddenly — the layers shift. What was supposed to be a clean vertical wall now has a visible offset somewhere in the middle, as if the top half of your print decided to take a step sideways. This is layer shifting, and when it happens on the X or Y axis mid-print, it can ruin an otherwise flawless piece.
Layer shifting is a mechanical problem, not a slicing one. Your printer physically moved to the wrong position during the print and couldn’t recover. Let’s go through every cause and its fix so you can get back to clean prints.
What Causes Layer Shifting Mid-Print?
Layer shifting happens when the printer’s motion system loses position. Since most consumer 3D printers use open-loop stepper motors (no feedback to confirm position), a single missed step compounds — every layer after the shift is offset by the same amount.
The most common causes fall into a few categories:
- Mechanical issues: Loose belts, pulleys, or set screws
- Electrical issues: Overheating stepper drivers, insufficient current
- Speed issues: Acceleration or jerk settings too aggressive for the hardware
- Physical interference: Something blocking the printhead or bed movement
- Software/firmware: Corrupted G-code, USB communication drops
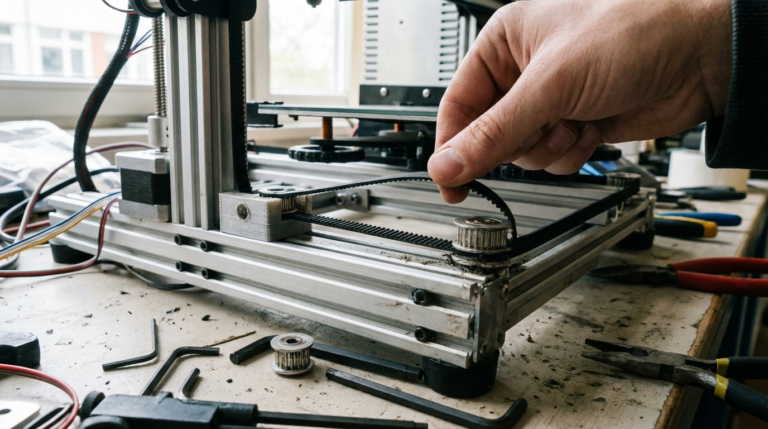
Fix 1: Check Belt Tension
Loose belts are the number one cause of layer shifting, especially on budget printers like the Ender 3 series. The belts transfer motor rotation to linear motion — if they’re loose, the printhead or bed can slip during fast movements.
How to Check
Press on the belt with your finger. It should feel taut, like a guitar string, with minimal deflection. If it’s floppy or you can easily push it more than a few millimeters, it needs tightening.
Both the X-axis belt (moves the printhead left/right) and Y-axis belt (moves the bed forward/back) should be checked. On most Ender-style printers:
- X-axis: Tensioner is on the right side of the X gantry. Loosen the tensioner bolts, pull the belt tight, and re-tighten.
- Y-axis: Tensioner is at the front of the printer under the bed. Same process — loosen, pull, tighten.
Some printers (Prusa, Bambu Lab) have integrated belt tensioning mechanisms with adjustment screws. Consult your printer’s manual for the specific procedure.
How Tight Is Too Tight?
Over-tensioned belts cause problems too. They increase wear on bearings and pulleys, create extra load on the stepper motors, and can actually reduce print quality by introducing vibrations. The belt should be snug with a slight twang when plucked — not banjo-string tight.

Fix 2: Tighten Pulley Set Screws
This is a sneaky one. The pulleys that connect the stepper motor shafts to the timing belts are held in place by tiny set screws (usually 1.5mm or 2mm hex). Over time, vibration loosens these screws, and the pulley starts slipping on the motor shaft.
When this happens, the motor turns but the pulley doesn’t follow precisely. The result is intermittent layer shifts that seem random — sometimes the print is fine, sometimes it shifts at different heights.
How to fix:
- Access the stepper motor pulleys on both X and Y axes.
- Make sure one set screw sits on the flat spot of the motor shaft (the D-shaped flat). This provides a mechanical lock in addition to friction.
- Tighten both set screws firmly. Consider adding a tiny drop of blue threadlocker (Loctite 242) to prevent them from loosening again.
This fix takes two minutes and solves the problem permanently. It’s one of the first things to check on any new printer, even before the first print.
Fix 3: Reduce Print Speed and Acceleration
Stepper motors can only generate so much torque. When you ask them to accelerate the printhead (or bed) too quickly, they can’t keep up, and steps get skipped. Each skipped step is a tiny shift that may not be visible on its own, but a rapid direction change that skips multiple steps creates an obvious offset.
Start by reducing your acceleration values:
- Default Cura acceleration: Often 500–3000 mm/s² depending on printer profile
- Safe starting point: 500–1000 mm/s² for both X and Y
- Jerk/junction deviation: Reduce to 5–8 mm/s (Marlin jerk) or equivalent
If layer shifting only happens on fast infill moves, that’s a strong clue that speed is the issue. Your printer might handle 60 mm/s perimeters fine but struggle with 120 mm/s infill due to the aggressive direction changes.
Also check your maximum speed settings in firmware. If your slicer requests 150 mm/s but your firmware caps at 120 mm/s, the mismatch can cause motion planning issues on some boards.
Fix 4: Check Stepper Motor Drivers
Stepper motor drivers are the chips on your motherboard that convert step signals into motor current. When they overheat, they temporarily shut down to protect themselves — causing missed steps and layer shifts.
Symptoms of overheating drivers:
- Layer shifts happen only during long prints (the board heats up over time)
- Shifts happen more frequently in warm rooms
- The motherboard feels very hot to the touch near the driver chips
Solutions:
- Improve cooling: Make sure the motherboard enclosure has adequate airflow. Add a small fan if needed. Some stock enclosures are basically ovens.
- Reduce driver current: If your drivers are set too high, they generate more heat. This is adjusted either by a potentiometer on the driver or through firmware (for TMC drivers). Check your motor specifications — you often don’t need the maximum rated current.
- Upgrade the board: Older 8-bit boards with A4988 or DRV8825 drivers are more prone to overheating than modern 32-bit boards with TMC2209 or TMC2226 drivers. The TMC drivers also support stealthChop mode, which runs cooler and quieter.
Fix 5: Adjust Stepper Motor Current (Vref)
Counterintuitively, both too much and too little current can cause layer shifts. Too much current overheats the drivers (see above). Too little current means the motor doesn’t have enough torque to move the axis reliably, especially during acceleration.
For TMC2209 drivers, current is typically set in firmware (Marlin’s Configuration_adv.h or through an LCD menu). For older drivers with potentiometer adjustment, you’ll need a multimeter to measure the Vref voltage.
Typical current settings:
- X and Y axes: 580–900 mA RMS (depending on motor and driver)
- Too low indicator: Motor makes grinding noises or skips during fast moves
- Too high indicator: Motor gets very hot (too hot to touch) after printing for 10+ minutes
The correct current for your specific motors should be about 70-80% of the motor’s rated current. Your motor specs are usually printed on the motor label or available from the manufacturer.
Fix 6: Check for Physical Obstructions
Sometimes the cause of layer shifting is embarrassingly simple — something is physically preventing the axis from moving freely.
Common culprits:
- Cables catching: The hotend cable bundle can snag on the frame, the bed, or the printed part at certain positions. Route cables with enough slack for full travel but secured so they can’t catch.
- Filament spool binding: If the spool can’t rotate freely, it creates resistance that pulls on the printhead during certain moves. Use a smooth-rotating spool holder and make sure the filament isn’t tangled.
- Debris on rails: Linear rails and rods accumulate dust, filament shavings, and dried lubricant over time. Clean them periodically and apply fresh lubricant (PTFE-based for linear rails, white lithium grease for smooth rods).
- Print hitting the nozzle: If curling or warping causes part of the print to stick up, the nozzle can crash into it during travel moves, physically pushing the printhead off position. This is especially common with ABS or prints with poor bed adhesion.
- Loose gantry: On Ender-style printers, the eccentric nuts on the V-slot wheels can loosen over time. If the X gantry wobbles on the uprights, it can shift during aggressive Y-axis movements. Adjust the eccentric nuts until the gantry moves smoothly but without play.
Fix 7: Print from SD Card Instead of USB
If you’re printing via USB connection from a computer, communication dropouts can cause layer shifts. When the printer’s buffer runs empty because the computer didn’t send the next line of G-code fast enough, the printer may skip or stall briefly.
This is especially common with:
- Laptops that enter sleep mode or power-save USB settings
- Computers running heavy background tasks during printing
- Long USB cables or cables without proper shielding
- OctoPrint on underpowered Raspberry Pi (especially Pi Zero)
The fix is simple: print from SD card or the printer’s internal storage. This eliminates the communication variable entirely. If you need remote monitoring, use OctoPrint with a properly powered Pi 3B+ or Pi 4 and make sure the serial connection settings are correct.
Fix 8: Inspect the Lead Screws (Z-Axis Shifting)
While this article focuses on X and Y axis shifting, it’s worth noting that Z-axis shifts look different — the print appears to have a sudden change in height rather than a horizontal offset. If you’re seeing what looks like crushed or extra-thick layers at a specific height:
- Check the Z-axis lead screw coupling for tightness
- Look for debris or binding on the lead screw
- Ensure the Z-axis moves smoothly by manually rotating the lead screw with the motor disabled
- Anti-backlash nuts can help if the stock brass nut is worn
Fix 9: Level and Stabilize Your Printer
A printer sitting on an unstable surface can experience vibration-induced shifts, especially at higher speeds. If your printer is on a wobbly desk, shelf, or stand, the rapid direction changes during printing can literally shake the printer and cause the bed or gantry to shift.
Place your printer on a solid, level surface. If the surface isn’t perfectly rigid, placing the printer on a heavy concrete paver or thick piece of MDF can help absorb vibrations. Some users add rubber feet or anti-vibration pads under the printer, which also reduce noise.
Fix 10: Update or Reflash Firmware
In rare cases, firmware bugs can cause unexpected motion behavior that results in layer shifts. This is more common with custom Marlin builds where motion planning parameters might be misconfigured.
If you’ve checked everything mechanical and electrical and still get unexplained shifts, try:
- Updating to the latest stable firmware release for your printer
- Resetting firmware settings to defaults and reconfiguring
- Checking your steps/mm calibration for X and Y axes
- Verifying that your acceleration and velocity limits in firmware match your slicer settings
Diagnosing Which Axis Shifted
When you see a layer shift, identify which axis moved:
- Shift in the left-right direction (as you face the printer): X-axis issue. Check X belt, X pulley, and X motor driver.
- Shift in the front-back direction: Y-axis issue. Check Y belt, Y pulley, and Y motor driver.
- Shift in both directions simultaneously: Rare, but usually indicates a physical collision (nozzle hit the print) or a sudden power issue affecting both drivers.
Take a photo of the failed print before removing it from the bed. The direction and magnitude of the shift often points directly to the cause.
Prevention Checklist
Once you’ve fixed the immediate issue, use this checklist to prevent future layer shifts:
- Check belt tension monthly (or after any maintenance)
- Verify pulley set screws are tight quarterly
- Clean and lubricate linear motion components every few months
- Keep acceleration and speed within your printer’s reliable range
- Ensure adequate cooling for stepper drivers
- Print from SD card for critical prints
- Route cables cleanly and check for snag points
- Monitor the first few layers of important prints for early signs of trouble
Conclusion
Layer shifting is almost always a mechanical or electrical issue rather than a slicer or model problem. The fix is usually straightforward — tighten a belt, secure a set screw, or slow down your speeds. Work through the causes systematically, starting with the most common ones (belts and pulleys), and you’ll typically find the culprit quickly.
The important thing is to actually fix the root cause rather than just reprinting and hoping for the best. Layer shifts tend to be intermittent, which means a successful reprint doesn’t mean the problem is gone — it just means you got lucky. Take the time to properly diagnose and fix the issue, and your printer will reward you with reliable, shift-free prints going forward.