3D Printer Firmware Update Guide for Beginners
Updating your 3D printer’s firmware sounds intimidating — flashing the wrong file could brick your printer, right? Well, technically yes, but in practice it’s one of the safest and most impactful upgrades you can make. New firmware versions fix bugs, add features, improve safety systems, and can even make your prints better.
Whether you’re running Marlin, Klipper, or a manufacturer’s custom firmware, this beginner-friendly guide will walk you through the entire process step by step.
What Is 3D Printer Firmware?
Firmware is the software that runs directly on your printer’s mainboard. It’s the brain that interprets G-code commands from your slicer and translates them into physical movements — telling stepper motors when to turn, heaters when to heat, and fans when to spin.
Think of it this way: your slicer tells the printer what to do, but firmware tells it how to do it. Every time you set a temperature, move an axis, or run auto bed leveling, firmware is handling the execution.
Why Update Your Firmware?
There are several compelling reasons to keep your firmware current:
- Safety fixes: Thermal runaway protection, power loss recovery, and other safety features are regularly improved
- Bug fixes: Older firmware versions may have known issues that cause print failures or unexpected behavior
- New features: Linear advance, input shaping, pressure advance, and other quality-improving features are added in updates
- Better calibration: New firmware often includes improved auto-leveling algorithms and PID tuning
- Hardware support: If you’ve upgraded your printer (new hotend, ABL probe, etc.), you may need firmware that supports the new hardware
Marlin Firmware: The Most Common Choice
Marlin is the open-source firmware that runs on the vast majority of consumer FDM printers. If you have a Creality, Anycubic, Elegoo Neptune, Artillery, or Tronxy printer, you’re almost certainly running Marlin (or a modified version of it).
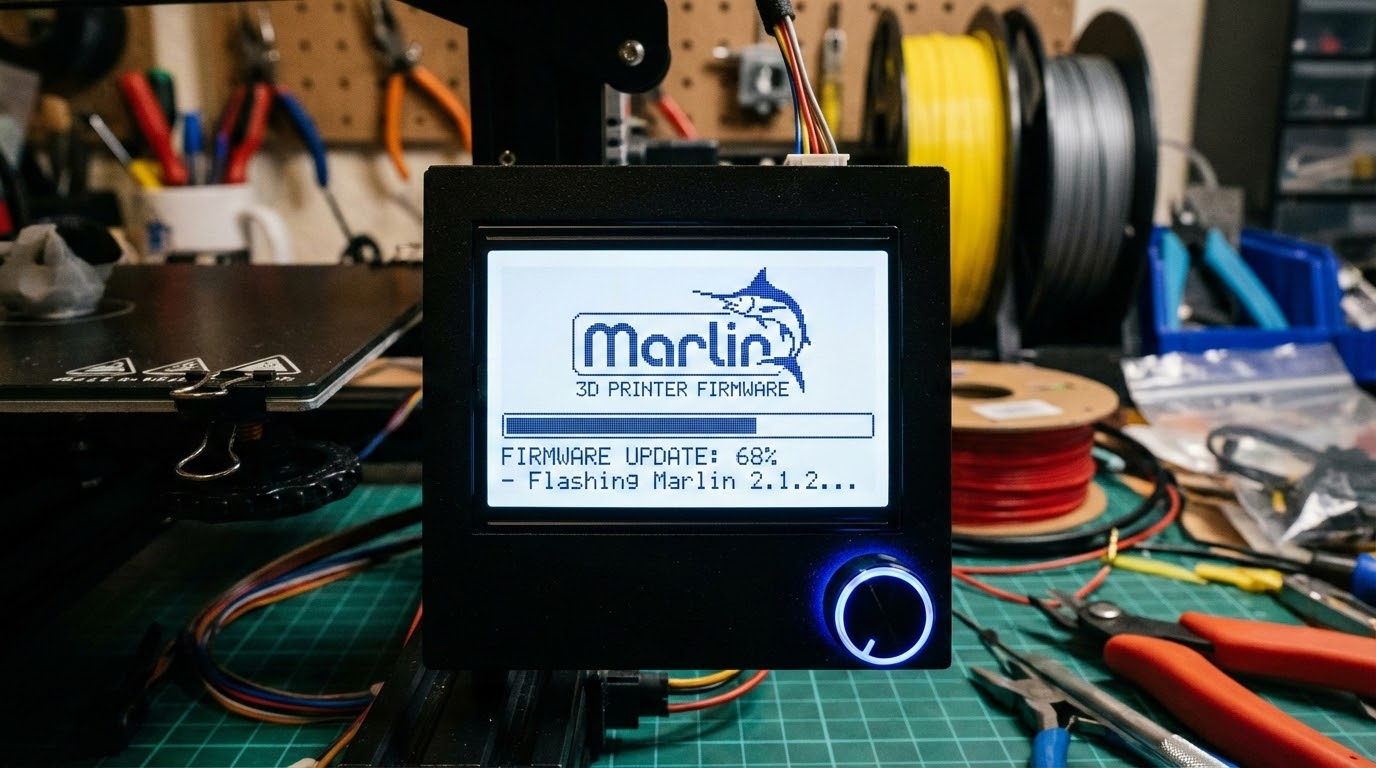
How to Update Marlin via SD Card (Easiest Method)
Most modern 32-bit mainboards support firmware updates via SD card. This is the simplest method:
- Identify your mainboard: Check your printer’s documentation or open the electronics case to read the board name (e.g., Creality v4.2.7, SKR Mini E3 V3, etc.)
- Download the correct firmware: Go to your printer manufacturer’s website or the Marlin releases page on GitHub. Make sure you download the version for your exact board
- Prepare the SD card: Format a microSD card as FAT32 (important — other formats won’t work). Use a card 32GB or smaller
- Copy the firmware file: Place the .bin file on the root of the SD card. Some boards require a specific filename like “firmware.bin” — check your board’s documentation
- Flash: With the printer OFF, insert the SD card. Power on the printer. The screen may go blank for 10–30 seconds while it flashes. Once the normal startup screen appears, the update is complete
- Verify: Navigate to your printer’s “About” screen or info menu to confirm the new firmware version is installed
Critical tip: The .bin filename must be different from the last firmware that was flashed. If the file is named the same, the bootloader will skip it thinking it’s already installed. Rename it to something like “firmware-v2.1.2.bin” to be safe.
How to Update Marlin via USB (For Custom Builds)
If you’ve compiled your own Marlin build (common when heavily modifying settings), you’ll use PlatformIO:
- Install Visual Studio Code and the PlatformIO extension
- Download the Marlin source code from GitHub
- Configure your settings in Configuration.h and Configuration_adv.h
- Connect your printer via USB
- Click “Upload” in PlatformIO to compile and flash
This method gives you complete control over every setting but requires some technical knowledge. I’d recommend starting with pre-compiled firmware and graduating to custom builds once you’re comfortable.
Klipper Firmware: The Performance Option
Klipper takes a different approach — it runs the heavy computation on a Raspberry Pi (or similar SBC) and uses the printer’s mainboard only for real-time motor control. This allows for much faster calculations and features like input shaping that dramatically reduce ghosting.
Updating Klipper
- SSH into your Raspberry Pi
- Navigate to the Klipper directory:
cd ~/klipper - Pull the latest code:
git pull - Recompile the MCU firmware:
make menuconfig(verify your board settings) thenmake - Flash the MCU:
make flash FLASH_DEVICE=/dev/serial/by-id/your-device-id - Restart Klipper:
sudo systemctl restart klipper
If you’re using KIAUH (Klipper Installation And Update Helper), the process is even simpler — it provides a menu-driven interface for updating all components.
Manufacturer-Specific Firmware
Creality
Creality provides pre-compiled firmware on their website. Navigate to Support → Downloads → select your printer model. Flash via SD card. Always make sure you’re downloading for the correct mainboard version — Creality has shipped multiple board revisions for the same printer model.
Prusa
Prusa printers can be updated directly through PrusaSlicer or the printer’s built-in update menu. Connect your Prusa to WiFi (MK4/XL) or USB, and the firmware will download and install automatically. Prusa firmware is heavily tested and updates are generally safe to install.
Bambu Lab
Bambu Lab printers update over WiFi automatically. When a new firmware version is available, you’ll see a notification on the touchscreen or in Bambu Studio. Simply tap “Update” and wait. Bambu’s firmware is closed-source, so custom modifications aren’t possible.
Before You Flash: Essential Precautions
- Back up your current settings: Save your E-steps, PID values, Z-offset, and probe offsets. Firmware updates may reset these to defaults. Write them down or take photos of each settings screen
- Back up your current firmware: Some boards let you dump the current firmware. If available, save a copy so you can roll back if needed
- Read the release notes: Check what changed in the new version. Sometimes updates require recalibration or include breaking changes
- Use a reliable power source: Never flash firmware during a thunderstorm or on an unstable power connection. A power interruption during flashing can brick your board
- Format SD cards properly: Use FAT32 format, 4096 allocation size, and cards under 32GB. Larger cards or different formats may not be recognized by the bootloader
After Flashing: Post-Update Checklist
- Initialize EEPROM: Navigate to your printer’s menu and select “Initialize EEPROM” or “Restore Defaults.” This ensures old settings don’t conflict with new firmware
- Re-enter your calibration values: E-steps, PID tuning, Z-offset, and probe offsets
- Run PID auto-tune: The firmware update may have changed your PID algorithm. Run
M303 E0 S200 C8for the hotend andM303 E-1 S60 C8for the bed - Level your bed: Run your auto bed leveling routine or manual leveling procedure
- Test with a small print: Don’t jump straight into a 12-hour print. Run a calibration cube or benchy first to verify everything works correctly
What to Do If Something Goes Wrong
Printer won’t boot after flashing
- Don’t panic. Try re-flashing with a different SD card (some cards are incompatible)
- Make sure the .bin file isn’t corrupted — re-download it
- Try a different filename for the .bin file
- If the bootloader is intact (screen shows the boot logo), you can always reflash
- As a last resort, use a USB programmer (ST-Link) to reflash the bootloader itself
Printer boots but behaves strangely
- Initialize EEPROM — old settings from the previous firmware version may be causing conflicts
- Check that you flashed the correct firmware for your specific board revision
- Verify motor directions — if an axis moves backward, the firmware might have different default motor directions
How Often Should You Update?
There’s no need to update every time a new version drops. Here’s a sensible approach:
- Update immediately: When a security or safety fix is released (thermal runaway, etc.)
- Update when needed: When you install new hardware that requires firmware support
- Update occasionally: Every 3–6 months to pick up quality improvements and new features
- Don’t update: If everything is working perfectly and the new version doesn’t add anything you need. “If it ain’t broke, don’t fix it” applies here
Firmware updates are one of the best free upgrades available for your 3D printer. They can fix real problems, add useful features, and improve print quality — all without buying new hardware. Take the plunge, follow the steps above, and enjoy the improvements. Just remember to back up your settings first.