3D Printer Homing Wrong Direction: How to Fix Reversed Axis Movement
You hit “Home All” and instead of the printhead moving toward the endstop, it rams into the opposite side of the frame with a horrible grinding noise. Or the bed shoots forward when it should go backward. Or the Z-axis plunges down when it should rise. A reversed axis direction is one of the most alarming problems on a 3D printer — but it’s also one of the easiest to fix once you understand what’s happening.
This guide covers every reason a 3D printer homes in the wrong direction and walks you through the fix for each scenario.
Why Does This Happen?
There are really only three root causes for an axis moving in the wrong direction during homing:
- The stepper motor wiring is reversed — the motor turns the wrong way because the electrical phases are swapped
- The firmware direction setting is wrong — the software tells the motor to turn the wrong way
- The endstop is on the wrong end — the motor direction is correct but it’s homing toward a non-existent endstop
Let’s solve each one.
The Quick Fix: Flip the Connector
On most 3D printers, the stepper motor connects to the controller board via a 4-pin JST-XH or Dupont connector. The simplest way to reverse a stepper motor’s direction is to flip the connector 180 degrees on the board.
How it works: A stepper motor has two coils (A and B). Swapping the polarity of one coil reverses the rotation direction. Flipping the entire connector swaps both coils, which has the same net effect of reversing direction.
Important caveats:
- This only works if the connector is not keyed (has no physical tab preventing reverse insertion). Many modern boards use keyed connectors that can’t be flipped.
- Double-check the board documentation — on some boards, flipping the connector can damage the stepper driver.
- If the connector is keyed, you’ll need to use the firmware method instead.
The Proper Fix: Change Direction in Firmware
The correct and cleanest solution is to change the motor direction in your printer’s firmware configuration. This doesn’t require any physical changes and is instantly reversible.
For Marlin Firmware
Open Configuration.h and find the motor direction settings:
#define INVERT_X_DIR false
#define INVERT_Y_DIR true
#define INVERT_Z_DIR false
#define INVERT_E0_DIR false
Change false to true (or vice versa) for the axis that’s moving the wrong way. Recompile and flash the firmware.
For example, if your X-axis homes to the right instead of the left, change INVERT_X_DIR from false to true (or from true to false if it’s already true).
For Klipper Firmware
In your printer.cfg file, find the stepper section for the problematic axis:
[stepper_x]
dir_pin: PA5
To reverse direction, add or remove the ! prefix on the dir_pin:
dir_pin: PA5→dir_pin: !PA5(reverses direction)dir_pin: !PA5→dir_pin: PA5(reverses back)
Save the file and restart Klipper. No recompilation needed.
For RepRapFirmware (Duet)
In your config.g file, find the M569 command for the driver:
M569 P0 S1 — S1 means forward, S0 means reverse
Change S1 to S0 (or vice versa) to reverse the direction.
CoreXY Printers: A Special Case
If you have a CoreXY printer (like the Voron, RatRig, or many other cube-frame designs), reversing axis direction is more complicated than on a standard bed-slinger. In a CoreXY system, both stepper motors work together to produce X and Y motion. Reversing one motor doesn’t just reverse one axis — it changes the relationship between both axes.
CoreXY direction rules:
- If only the X-axis is reversed: swap the direction of both stepper_x AND stepper_y
- If only the Y-axis is reversed: swap the direction of one stepper (either stepper_x or stepper_y)
- If both axes are reversed: swap the direction of the other stepper than you’d swap for Y-only
This is counterintuitive and catches a lot of people during CoreXY builds. If you can’t figure out the right combination, try all four combinations (both normal, A reversed, B reversed, both reversed) — one of them will be correct.
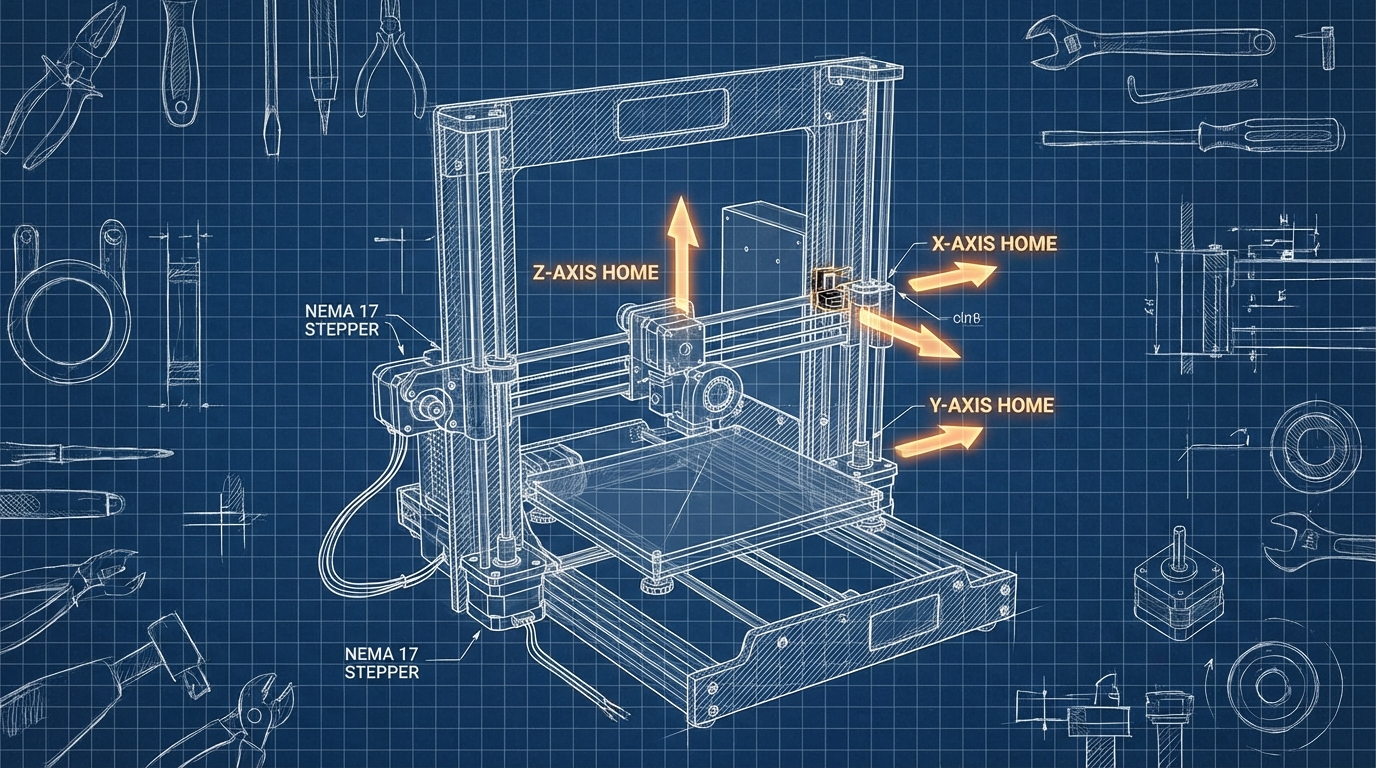
Z-Axis Homing Down Instead of Up (Or Vice Versa)
Z-axis direction issues are particularly dangerous because the nozzle can crash into the bed, potentially damaging the build surface, nozzle, or bed leveling sensor.
If your Z-axis homes downward when it should go up:
- Immediately kill the power (don’t wait for the firmware to stop — hit the switch)
- Fix the direction using the firmware methods above before trying again
- After fixing, manually position the Z-axis in the middle of its travel before testing homing again
If your Z goes up when homing but never triggers the endstop:
- Check that your Z endstop or probe is actually connected and functional (trigger it by hand and check with M119 in a terminal)
- Verify the homing direction in firmware matches the endstop position (Z_HOME_DIR should be -1 for a bed-mounted endstop, or -1 for a probe since probes detect the bed below)
Endstop Verification: M119
Before any homing attempt on a printer with direction issues, verify that your endstops are working:
- Connect to your printer via USB terminal (Pronterface, OctoPrint terminal, or Klipper console)
- Send
M119— this reports the current state of all endstops - Without touching anything, you should see “open” for all endstops
- Manually press each endstop switch and send M119 again — the triggered endstop should show “triggered”
If an endstop shows “triggered” when it’s not being pressed, either the wiring is wrong (normally-closed vs normally-open mismatch) or the endstop pin is configured incorrectly in firmware.
Common Scenarios After Printer Assembly
Most wrong-direction homing happens right after building a new printer or performing major maintenance. Here’s a quick checklist for new builds:
- Before powering on: Verify all stepper motor connectors are fully seated and in the correct sockets (X motor to X driver, etc.)
- First power-on: Don’t hit “Home” immediately. Instead, use the manual movement controls to jog each axis by 10mm and verify the direction is correct
- Check endstops: Use M119 to verify all endstops respond correctly
- Home one axis at a time: Home X first, then Y, then Z. This way if something is wrong, you can react before multiple axes are moving simultaneously
- Keep your hand on the power switch: During the first homing of a new build, be ready to kill power instantly if any axis goes the wrong way
Post-Fix Verification
After changing motor direction, do a full verification:
- Jog each axis +10mm and verify the direction is correct (printhead moves right for +X, bed moves away or printhead moves forward for +Y, Z moves up for +Z)
- Home each axis individually and confirm it moves toward the correct endstop
- Run “Home All” and verify all three axes home correctly
- Do a bed mesh probe (if applicable) to confirm Z direction works correctly during probing
- Print a small test object and verify the first layer goes down correctly
Wrong-direction homing is scary — that grinding sound of a nozzle hitting the frame is genuinely unpleasant. But it’s also one of the simplest problems to fix. A single line change in firmware, and you’re back in business. Just remember to keep your hand on that power switch until you’ve confirmed everything moves the right way.