3D Printer Linear Rail Upgrade Guide: Benefits, Types, and Installation
If there’s one upgrade that consistently transforms a budget 3D printer into a semi-professional machine, it’s swapping from V-slot wheels or smooth rods to linear rails. This upgrade improves print quality, reduces maintenance, and extends the useful life of your printer.
But it’s not a trivial swap. Linear rails require proper installation, alignment, and understanding of the different rail types. This guide covers everything from choosing the right rails to installing them correctly.
Why Linear Rails?
Most budget 3D printers use one of two motion systems:
- V-slot wheels: Delrin or POM wheels rolling in aluminum V-slot extrusions (Ender 3, CR-10, etc.)
- Smooth rods with bearings: Steel rods with LM8UU linear bearings (Prusa i3 style)
Both work, but both have significant limitations. V-slot wheels wear down, develop flat spots, and require periodic eccentric nut adjustment. Smooth rod bearings develop play over time and can create inconsistent motion.
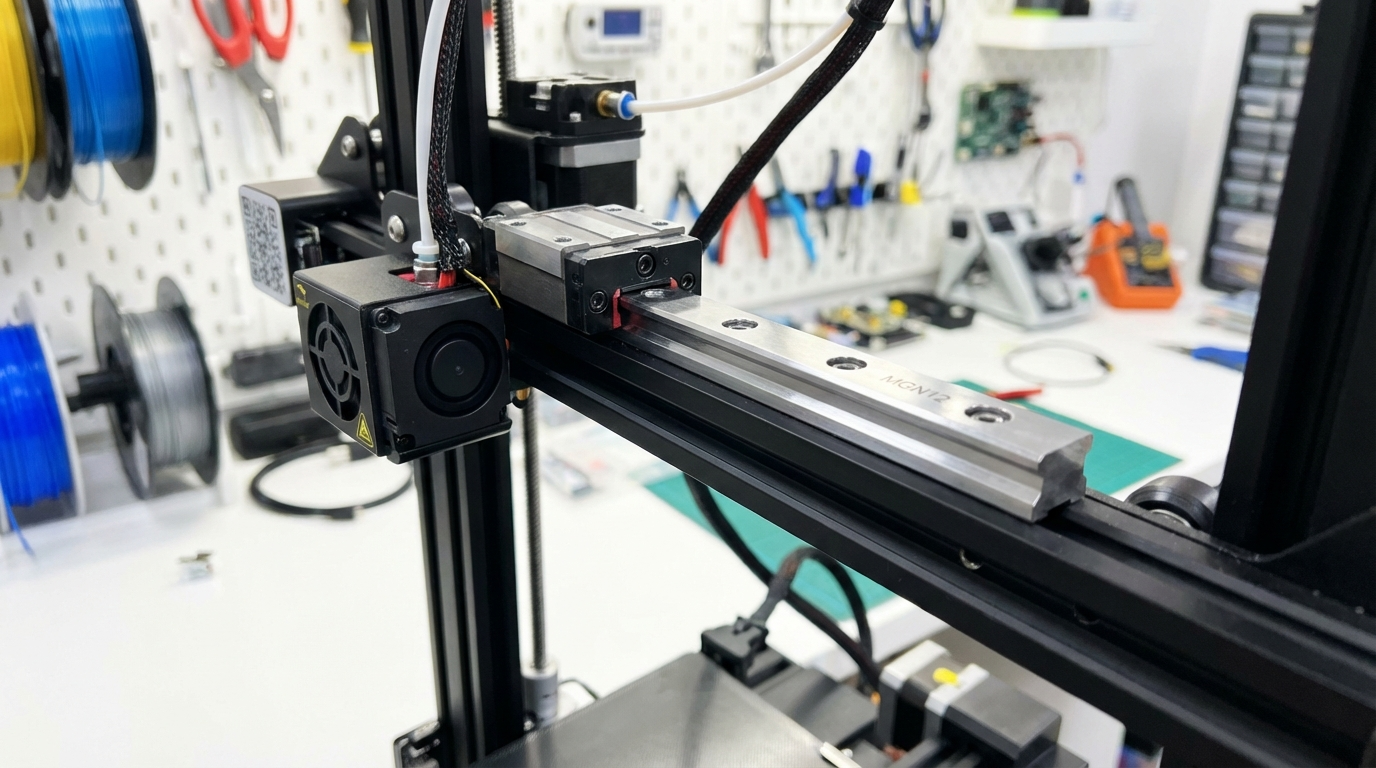
Linear rails (specifically MGN-type rails with recirculating ball carriages) solve these problems. The steel balls distribute load evenly, there’s virtually no play in the carriage, and they maintain precision for thousands of hours without adjustment.
Tangible Print Quality Improvements
After installing linear rails, you can expect:
- Reduced ringing/ghosting: Tighter motion tolerance means less vibration-induced artifacts
- More consistent first layers: Less Z-axis wobble translates to even first-layer squish
- Better dimensional accuracy: Less backlash means features print closer to their designed dimensions
- Smoother top surfaces: Reduced X/Y play eliminates micro-shifts that cause rough surfaces
- Higher maximum speed: Linear rails handle faster acceleration without losing steps
Types of Linear Rails for 3D Printers
MGN7
7mm wide rail. Used on lightweight axes like the X-axis of small printers. Low load capacity but very compact. Common in Voron 0 and other compact designs.
MGN9
9mm wide rail. A good compromise between size and load capacity. Popular for X-axis upgrades on Ender 3 sized printers. The MGN9H carriage (extended length) provides better moment resistance than the MGN9C (standard length).
MGN12
12mm wide rail. The most popular choice for 3D printer upgrades. Plenty of load capacity for any axis, and mounting hardware is widely available. If in doubt, go with MGN12H — it fits most applications perfectly.
MGN15
15mm wide rail. Overkill for most hobby printers but used on larger machines (300mm+ bed) or industrial CoreXY builds where the gantry is heavy. Higher load capacity and rigidity, but also heavier.
Which Rail Size Should You Choose?
For a typical Ender 3/CR-10 class printer:
- X-axis: MGN12H (most common) or MGN9H (lighter, fine for small to medium printers)
- Y-axis: MGN12H (needs to support the heated bed weight)
- Z-axis: MGN12H or MGN12C (Z moves slowly, a shorter carriage is acceptable)
Rail Quality: What to Look For
Not all linear rails are created equal. The quality spectrum ranges from cheap Amazon rails (~$5-8 each) to genuine Hiwin rails ($50+ each). Here’s how to assess what you’re getting:
Grade Ratings
- H grade: Standard precision (±20μm). Fine for 3D printing.
- N grade: Normal precision (±15μm). Better but harder to find in hobby-grade rails.
- P grade: Precision (±10μm). Used in CNC machines. Overkill for 3D printing but nice to have.
For 3D printing, H-grade rails are perfectly adequate. The resolution of an FDM printer (typically 50-100μm layer height) is much coarser than the precision difference between H and P grade rails.
Testing Rail Quality
When you receive your rails, check them before installation:
- Clean them. Remove the protective oil/grease, clean with isopropyl alcohol, then re-lubricate with a proper grease (Super Lube or similar).
- Slide the carriage. It should move smoothly with no rough spots or catching. A slight resistance is normal and expected — it means the balls are properly preloaded.
- Check for straightness. Lay the rail on a flat surface (glass or granite). It should sit flat with no visible bowing. Budget rails sometimes have a slight curve that needs to be addressed during mounting.
- Wiggle test. Hold the rail and try to wiggle the carriage side to side. There should be virtually no perceptible play. Any looseness means bad preload or worn balls.
Installation Guide
Tools You’ll Need
- Allen key set (M2, M2.5, M3, M4)
- Dial indicator or feeler gauges (for alignment)
- Threadlocker (Loctite Blue 242)
- T-nuts or M3 mounting hardware
- Super Lube or other PTFE-based grease
- Isopropyl alcohol and lint-free cloths
Step 1: Remove the Old Motion System
Disassemble the axis you’re upgrading. Remove V-slot wheels, eccentric nuts, and the carriage plate. If upgrading from smooth rods, remove the rods, bearings, and bearing holders. Keep everything — you might want to revert if something goes wrong.
Step 2: Prepare the Mounting Surface
The rail needs a flat, clean mounting surface. If you’re mounting to aluminum extrusion, clean the V-slot channel thoroughly. Use a straight edge to verify the extrusion isn’t bent. Any bow in the extrusion will transfer directly to the rail.
For X-axis upgrades on Ender 3 style printers, you’ll need printed or machined adapter brackets to mount the rail where the wheels used to run. Multiple designs are available on Printables and Thingiverse.
Step 3: Mount the Rail (Alignment Is Critical)
This is the most important step. A poorly aligned rail will perform worse than the V-slot wheels you replaced.
- Place the rail in position and loosely install all mounting screws (finger tight only)
- Push the carriage to one end and tighten the two screws nearest to the carriage
- Slide the carriage to the other end. If it moves smoothly, tighten those end screws
- Move the carriage back and forth while tightening screws from the ends toward the middle
- After all screws are snug, do a final full-length travel test. The carriage should glide effortlessly with no binding at any point
If you feel any binding or resistance at specific points, loosen the nearest screws, re-align, and retighten. Even 0.1mm of misalignment can cause binding.
Step 4: Apply Threadlocker
Once alignment is confirmed, remove each screw one at a time, apply a tiny drop of Loctite Blue 242, and reinstall. Linear rail screws vibrate loose over time, and a detached rail mid-print is catastrophic. Threadlocker prevents this.
Step 5: Attach the Carriage to Your Toolhead/Bed
Mount your print head or bed plate to the linear rail carriage. Make sure the mounting doesn’t introduce any torsion or binding. The carriage should still move freely after the attachment.
Step 6: Lubricate
Apply a small amount of PTFE grease to the rail. Run the carriage back and forth several times to distribute the lubricant. Wipe off any excess. Over-lubrication attracts dust and debris, which causes premature wear.
Common Installation Mistakes
Over-Constraining the Axis
If you’re using two rails on one axis (dual linear rails for a Y-axis bed, for example), they must be perfectly parallel. Even a fraction of a millimeter of misalignment causes binding. Use the bed plate itself as an alignment jig — mount the carriages to the plate first, then align the rails to match.
Wrong Screw Length
Screws that are too long can bottom out in the rail’s mounting slot and lift the rail off the surface. M3x6 or M3x8 screws are typically correct for most MGN rails mounted to aluminum extrusion with T-nuts.
Not Cleaning New Rails
New rails ship with an anti-rust oil that’s terrible as a lubricant. Always clean new rails thoroughly and apply fresh grease before installation.
Mixing Rail and Carriage Brands
Don’t swap carriages between rails, even if they’re the same size. Each rail-carriage pair is matched during manufacturing. A carriage from one MGN12 rail won’t fit properly on another MGN12 rail.
Maintenance Schedule
Linear rails are low maintenance but not zero maintenance:
- Every 200 print hours: Wipe the rail with a lint-free cloth and apply fresh grease
- Every 500 hours: Check mounting screws for looseness
- Every 1000 hours: Full cleaning — remove carriage (carefully!), clean balls and raceways, re-grease
- Annually: Check for wear. If the carriage develops noticeable play that greasing doesn’t fix, it’s time to replace
Cost Breakdown
A full linear rail conversion for an Ender 3 class printer typically costs:
- MGN12H rails × 3 (X, Y, Z): $25–40 for budget rails, $80–150 for quality brands
- Mounting hardware (T-nuts, screws): $5–10
- Printed adapter brackets: Free (print them yourself)
- Lube and threadlocker: $10–15
- Total: $40–175 depending on rail quality
For the improvement you get, this is one of the best value upgrades in 3D printing — right up there with a BLTouch/CR Touch and an all-metal hotend.
Conclusion
Linear rails are the single most impactful mechanical upgrade for any 3D printer running on V-slot wheels or smooth rods. They eliminate play, reduce ringing, support higher speeds, and last far longer than the components they replace. The installation requires patience and attention to alignment, but it’s well within the ability of anyone comfortable with basic tools.
Start with the X-axis — it has the most visible impact on print quality. If you like the results (you will), upgrade Y and Z next. Your prints will look better, your printer will sound better, and you’ll spend less time fiddling with eccentric nuts and wondering why your first layer looks different every Tuesday.