3D Printer Making Grinding Noise? Here Is How to Fix It
Why Is Your 3D Printer Making a Grinding Noise?
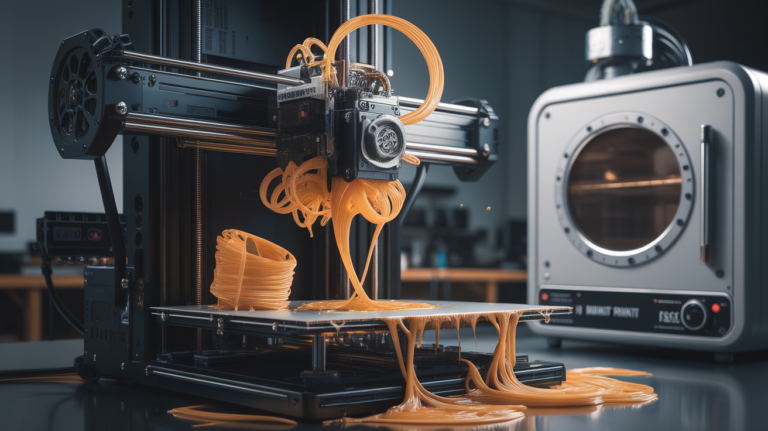
There’s nothing quite like the sound of a healthy 3D printer humming along — and nothing quite as alarming as a sudden grinding, clicking, or crunching noise coming from your machine. If your 3D printer has started making grinding sounds, don’t panic. In most cases, the fix is straightforward once you identify the source.
A grinding noise typically points to a mechanical issue with your extruder, stepper motors, or motion system. The key is diagnosing where the sound is coming from and when it occurs during the print. In this guide, we’ll walk through every common cause of grinding noises in FDM 3D printers and show you exactly how to fix each one.
Extruder Gear Grinding Against Filament
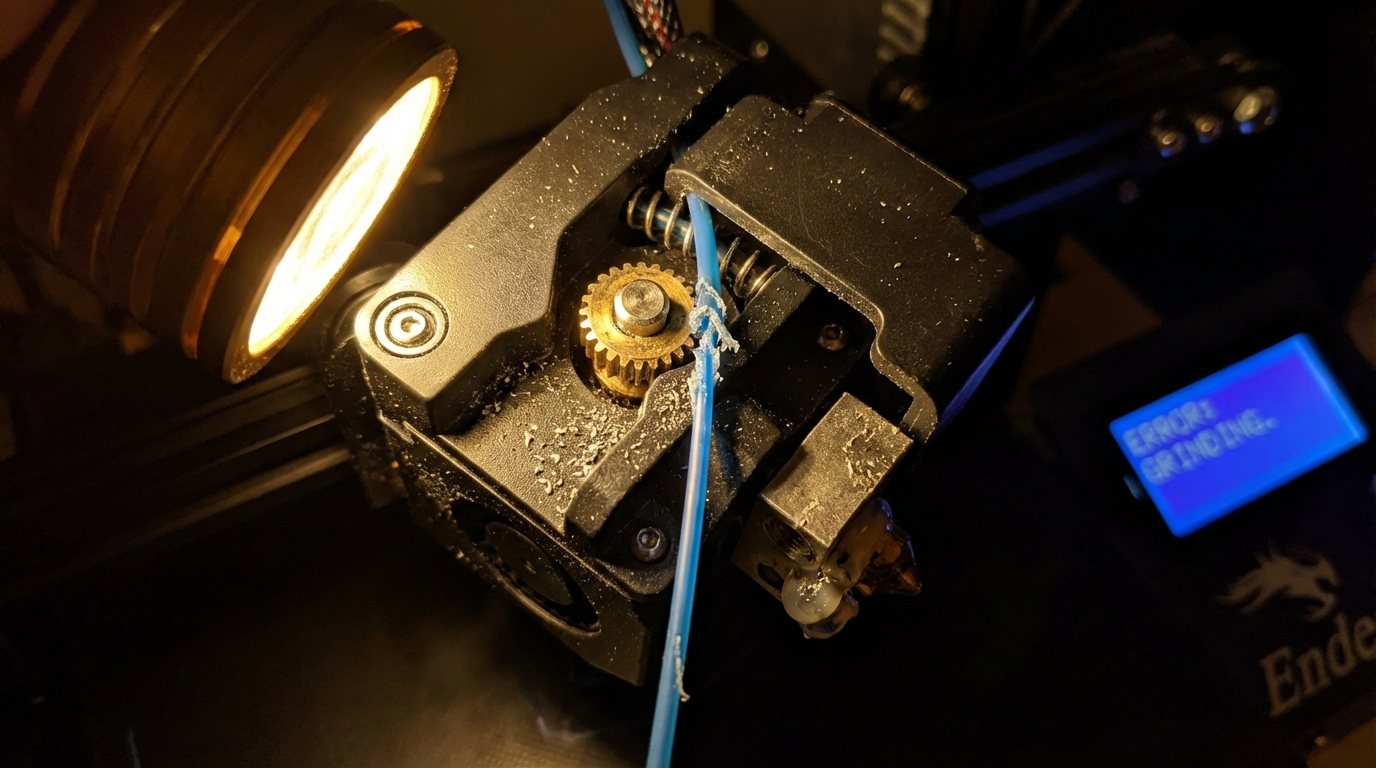
The most common source of grinding noise is the extruder drive gear chewing into your filament instead of feeding it smoothly. When the gear can’t push filament through the hotend, it digs into the filament surface, creating a rhythmic clicking or grinding sound.
Common Causes of Extruder Grinding
- Partial nozzle clog: The most frequent culprit. If the nozzle is partially blocked, the extruder motor tries to push filament through a restricted opening, causing the gear to slip and grind against the filament.
- Printing too fast: Running at speeds the hotend can’t keep up with means the filament doesn’t melt fast enough. The extruder gear then grinds as it tries to force solid filament through.
- Temperature too low: Similar to printing too fast — if the nozzle temperature is too low for your material, the filament won’t flow freely and the extruder will struggle.
- Retraction settings too aggressive: Long retraction distances or high retraction speeds can cause the gear to repeatedly grind the same section of filament until it’s stripped flat.
- Tension too high: If the idler bearing presses the filament too hard against the drive gear, it can deform the filament and cause grinding.
How to Fix Extruder Grinding
Start by removing the filament and inspecting it. If you see teeth marks or a flat spot ground into the filament, the extruder gear is definitely the source. Here’s your action plan:
- Do a cold pull to clear any partial clog in the nozzle. Heat the hotend to printing temperature, push filament through manually, then cool to about 90°C (for PLA) and pull the filament out firmly. Repeat 2-3 times.
- Check your nozzle temperature. Try increasing it by 5-10°C. For PLA, aim for 200-215°C. For PETG, 230-245°C.
- Reduce print speed by 20-30% and see if the grinding stops. If it does, your hotend can’t melt filament fast enough at higher speeds.
- Adjust retraction settings. For direct drive, keep retraction distance under 2mm. For Bowden, stay under 6mm. Reduce retraction speed to 25-35 mm/s.
- Loosen the idler tension slightly. The filament should feed smoothly with just enough grip — you don’t want to crush it.
Stepper Motor Grinding and Skipping
Stepper motors are the workhorses of your 3D printer, controlling the X, Y, Z axes and the extruder. When a stepper motor can’t complete its commanded movement, it skips steps — producing a distinctive grinding or clunking sound.
What Causes Stepper Motor Skipping?
- Obstruction in the motion path: A loose cable, stray piece of filament, or even a warped print catching the nozzle can physically block movement.
- Belts too tight or too loose: Over-tensioned belts put excessive load on the motor. Under-tensioned belts can slip and cause erratic movement.
- Driver current too low: If the stepper driver isn’t supplying enough current, the motor won’t have enough torque to move under load.
- Overheating: Stepper motors and drivers that get too hot will lose torque and start skipping. Touch the motors after a print — they should be warm but not too hot to touch.
- Mechanical binding: Bent lead screws, misaligned linear rails, or dry bearings can all create enough resistance to cause skipping.
Fixing Stepper Motor Issues
First, identify which axis is making the noise. Move each axis manually (with the printer off) and feel for resistance or binding. Here’s what to check:
- Clear any obstructions. Check for loose wires, debris, or anything catching in the motion path.
- Check belt tension. Belts should be taut but not guitar-string tight. You should be able to pluck them and get a low twang.
- Lubricate linear rails and lead screws. Use a light machine oil or white lithium grease. Avoid WD-40 — it’s a solvent, not a lubricant.
- Check stepper driver current. If you have access to the driver potentiometers or firmware settings (like Vref in Marlin or run_current in Klipper), ensure they’re set correctly for your motors.
- Add cooling to stepper drivers if they’re overheating. A small fan blowing across the mainboard can make a huge difference.

Bearing and Bushing Noise
Worn or dry bearings produce a distinctive grinding or squealing noise, especially during fast movements. Linear bearings (LM8UU type) and bushings (like IGUS Drylin) both degrade over time.
Signs of Bearing Problems
- Grinding noise that gets worse during fast travel moves
- Visible play or wobble when you push the print head by hand
- Rough feeling when sliding the carriage along the rods
- Metal dust or particles near the bearing housings
The Fix
For linear ball bearings, try cleaning them with isopropyl alcohol and re-lubricating with light machine oil. If the bearing still feels rough or has play, replace it. Bearings are cheap — usually $2-5 each — and keeping spares on hand is good practice.
For polymer bushings like IGUS Drylin, they’re self-lubricating but do wear out. If they develop play, it’s replacement time. Many users find polymer bushings quieter than ball bearings for everyday printing.
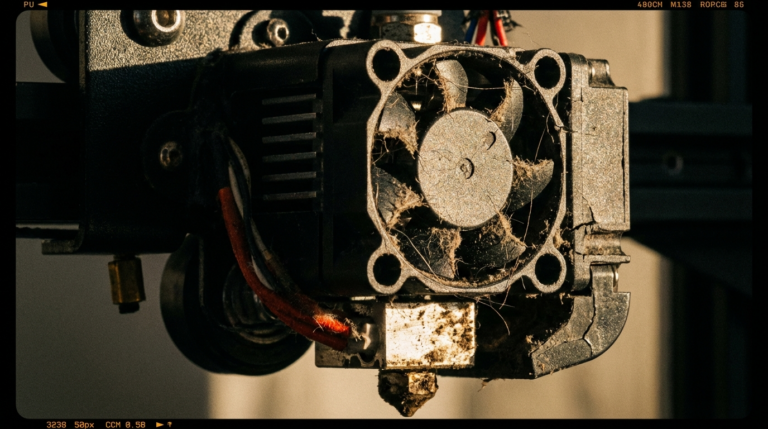
Cooling Fan Grinding
Don’t overlook the fans. A grinding noise that’s constant (not tied to specific movements) often comes from a failing fan. 3D printers typically have 2-4 fans: the hotend heatsink fan, the part cooling fan, the mainboard fan, and sometimes a power supply fan.
Diagnosing Fan Issues
- Listen carefully to isolate which fan is making noise. You can briefly (and carefully) stop each fan with a fingertip to identify the culprit.
- Check for debris. A strand of filament or dust bunny caught in a fan blade causes grinding and vibration.
- Look for wobble. A fan with a worn bearing will wobble visibly when spinning.
Replacement fans are inexpensive ($5-10) and easy to swap. Match the voltage (usually 24V or 12V) and connector type. Many makers upgrade to higher-quality fans like Noctua (with a buck converter if needed) for quieter operation.
Lead Screw and Z-Axis Grinding
The Z-axis lead screw can produce grinding noises if it’s misaligned, bent, or running dry. This typically sounds like a periodic grinding that happens during Z-movements (layer changes).
Common Z-Axis Noise Causes
- Dry lead screw: Lead screws need periodic lubrication. Apply a thin layer of PTFE or lithium grease every few months.
- Bent lead screw: Roll the screw on a flat surface. If it wobbles, it’s bent and should be replaced.
- Misaligned Z coupler: If the coupler connecting the motor shaft to the lead screw isn’t centered, it creates binding at certain positions. Loosen the coupler, align it, and re-tighten.
- Anti-backlash nut too tight: If your printer has a spring-loaded anti-backlash nut, the spring tension might be too high, causing excessive friction.
Prevention: Keep Your Printer Quiet and Happy
Most grinding noises are preventable with basic maintenance. Here’s a simple schedule to follow:
- Every 50 print hours: Clean the extruder gear teeth with a small brush. Check belt tension. Inspect fan blades for debris.
- Every 200 print hours: Lubricate lead screws and linear rails. Check all bolts and screws for tightness. Clean the nozzle with a cold pull.
- Every 500 print hours: Replace the nozzle (especially brass ones). Inspect bearings for play. Check stepper motor connectors for corrosion.
When to Worry (and When Not To)
Not every sound is a problem. Some normal 3D printer noises include:
- A slight whine from stepper motors (especially TMC drivers in spreadCycle mode)
- Clicking sounds during retraction (some extruders click mechanically by design)
- Fan noise that’s consistent and smooth
Sounds that should concern you include sudden new grinding noises, intermittent clunking, metallic scraping, and any noise accompanied by visible print defects like layer shifting or under-extrusion.
If you’ve worked through all the checks above and the noise persists, consider recording the sound and posting it to communities like r/FixMyPrint or your printer manufacturer’s forum. A short video with audio often leads to quick identification by experienced users.
Final Thoughts
A grinding noise is your printer telling you something needs attention. The good news is that almost every cause has a straightforward fix that doesn’t require special tools or expertise. Start with the most likely culprit (the extruder), work your way through the mechanical systems, and you’ll have your printer humming happily again in no time.
Remember: regular maintenance prevents most grinding issues before they start. A few minutes of cleaning and lubricating every couple of weeks saves hours of troubleshooting later. Your printer — and your ears — will thank you.