How to Fix Thin Walls Not Printing on Your 3D Printer
Why Thin Walls Fail in 3D Printing
You’ve designed a part with thin walls — maybe a vase, a phone case, or a lightweight enclosure — and your 3D printer just refuses to print them properly. The walls come out incomplete, full of gaps, or don’t print at all. Sound familiar?
Thin wall printing is one of the trickier aspects of FDM 3D printing because it sits right at the intersection of nozzle geometry, slicer math, and extrusion precision. But once you understand why thin walls fail, fixing them is surprisingly manageable.
Understanding the Nozzle Width Problem
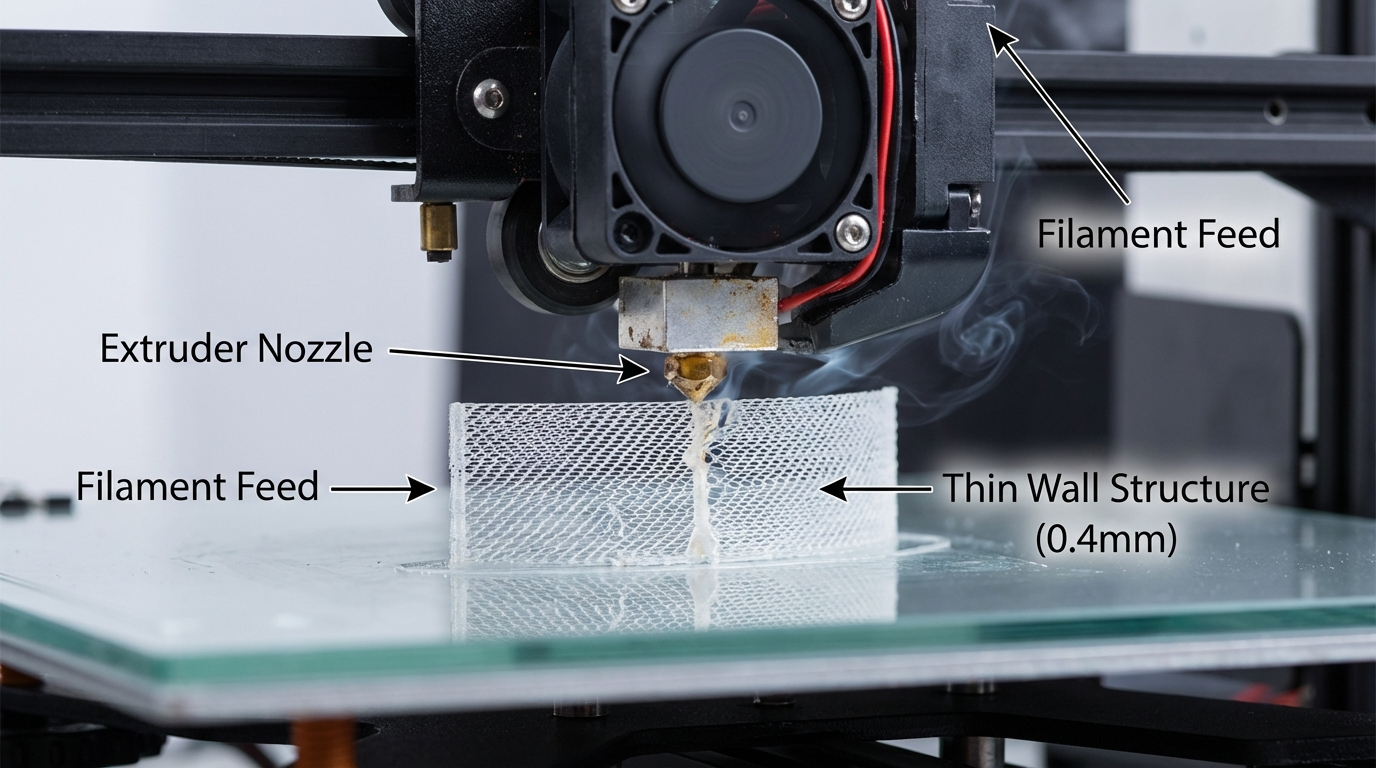
Every FDM printer extrudes a line of plastic with a minimum width determined by the nozzle diameter. A standard 0.4mm nozzle typically produces lines between 0.4mm and 0.48mm wide. This creates a fundamental limitation: if your wall thickness doesn’t align with multiples of the extrusion width, the slicer doesn’t know what to do.
For example, with a 0.4mm nozzle and 0.45mm line width:
- 0.45mm wall = exactly 1 perimeter. Works fine.
- 0.9mm wall = exactly 2 perimeters. Works fine.
- 0.7mm wall = too thick for 1 perimeter, too thin for 2. The slicer either leaves a gap or skips it entirely.
This is the number one reason thin walls don’t print correctly. The wall thickness in your CAD model doesn’t match what the slicer can physically produce.
Slicer Settings That Fix Thin Walls
Enable Thin Wall Detection
Most modern slicers have a setting specifically for this problem:
- Cura: Enable “Print Thin Walls” under the Shell settings. This tells Cura to attempt single-line fills for walls that are too thin for the normal wall count.
- PrusaSlicer/OrcaSlicer: Look for “Detect thin walls” in Print Settings > Layers and Perimeters. Also check “Detect bridging perimeters.”
- Bambu Studio: Enable “Detect thin wall” in Quality settings. Works similarly to PrusaSlicer.
Adjust Line Width
You can fine-tune your extrusion width to better match thin wall dimensions. Most slicers let you set line width as a percentage of nozzle diameter or as an absolute value.
If your model has 0.8mm walls and your nozzle is 0.4mm, set the outer wall line width to exactly 0.4mm. Two passes at 0.4mm = 0.8mm total, which fits perfectly. If your walls are 0.6mm, try setting line width to 0.3mm (two passes) — though note that extruding narrower than your nozzle diameter reduces layer adhesion.
Use Variable Line Width (Arachne Engine)
If you’re using Cura 5.x+ or PrusaSlicer 2.5+, you have access to the Arachne perimeter generator. This is a game-changer for thin walls because it dynamically adjusts line width to fill the available space perfectly.
To enable it:
- Cura: Set Wall Ordering to “Arachne” in the experimental settings.
- PrusaSlicer: Set Perimeter generator to “Arachne” in Print Settings > Layers and Perimeters.
Arachne can vary line width within a single perimeter, eliminating gaps that fixed-width approaches leave behind. If you’re printing anything with thin walls regularly, this single setting change will improve your results dramatically.
Design Tips for Better Thin Walls

Design to Nozzle Multiples
The simplest fix is to design your walls at exact multiples of your planned extrusion width. With a 0.4mm nozzle:
- Minimum wall: 0.4mm (single perimeter)
- Good thin wall: 0.8mm (2 perimeters)
- Standard wall: 1.2mm (3 perimeters)
Avoid “in-between” values like 0.5mm, 0.7mm, or 1.0mm unless you’re using Arachne or have specifically calibrated your line width to accommodate them.
Add Fillets and Chamfers
Sharp internal corners in thin walls are stress concentrators and often print poorly. Adding small fillets (rounded corners) of 0.5-1mm radius improves both printability and structural strength.
Consider a Smaller Nozzle
If you regularly print thin-walled parts, a 0.2mm or 0.3mm nozzle gives you much finer control. A 0.2mm nozzle can print walls as thin as 0.2mm — though print times increase significantly. Many makers keep a smaller nozzle on hand specifically for detailed work.
Hardware and Calibration Checks
Calibrate Your E-Steps and Flow Rate
Thin walls are unforgiving of flow inaccuracies. Even 5% over- or under-extrusion that’s barely visible on thick walls becomes obvious on thin features. Calibrate your extruder e-steps and then fine-tune flow rate with a single-wall cube test.
Print a single-wall cube (1 perimeter, 0 infill, 0 top layers) and measure the wall thickness with calipers. It should match your set line width. Adjust flow rate until it does.
Check Nozzle Condition
A worn or partially clogged nozzle can cause inconsistent extrusion that’s devastating for thin walls. If you’re using a brass nozzle and have printed abrasive materials (carbon fiber, glow-in-the-dark), the nozzle bore may be enlarged or irregular. Swap to a fresh nozzle and test again.
Slow Down for Thin Sections
Thin walls printed at high speeds often suffer from poor layer adhesion and inconsistent width. Many slicers let you set a separate speed for thin walls or outer walls. Try reducing speed to 20-30 mm/s for thin wall sections while keeping higher speeds for infill and inner walls.
Material Matters
Not all filaments perform equally on thin walls:
- PLA: Best for thin walls due to low warping and predictable flow. Great for decorative thin-walled prints.
- PETG: Can be stringy on thin walls. Increase retraction slightly and slow down.
- ABS: Warping forces can distort thin walls. An enclosure is essential for ABS thin wall prints.
- TPU: Flexible materials and thin walls are challenging. Expect walls under 1mm to be very flexible and potentially inconsistent.
Troubleshooting Specific Thin Wall Problems
Walls Not Printing at All
If the slicer is skipping thin walls entirely, check the layer preview. If the wall doesn’t appear in the preview, it’s a slicer issue — enable thin wall detection or adjust line width. If it appears in the preview but doesn’t print, it’s a hardware issue — likely under-extrusion or a nozzle too far from the bed.
Walls Printing But With Gaps
Gaps between inner and outer walls on thin features usually mean the line width doesn’t divide evenly into the wall thickness. Switch to Arachne or adjust your design dimensions. Also try increasing the “wall overlap” percentage in your slicer.
Thin Walls Warping or Curling
Tall, thin walls are especially prone to warping because they have minimal cross-section to resist thermal stress. Lower the print temperature by 5°C, increase part cooling fan to 100%, and consider printing a brim for better base adhesion.
Summary: Your Thin Wall Checklist
- Design walls at nozzle width multiples (0.4, 0.8, 1.2mm for a 0.4mm nozzle)
- Enable thin wall detection in your slicer
- Switch to Arachne perimeter generator if available
- Calibrate e-steps and flow rate precisely
- Slow down print speed for thin sections
- Use PLA for easiest thin wall printing
- Consider a smaller nozzle for regularly printing fine features
- Preview in slicer before printing — if it’s not in the preview, it won’t print
Thin wall printing rewards precision in both design and calibration. Once you align your model dimensions with what your hardware can physically produce, those previously impossible thin features will come out clean every time.