3D Printer Frame Wobble and Stability Fix: The Complete Guide
Why Frame Rigidity Matters More Than You Think
Your 3D printer is only as good as its frame. A wobbly, flexible, or poorly assembled frame translates directly into print defects — ghosting, ringing, inconsistent layers, and dimensional inaccuracy. If you’ve tuned every slicer setting and calibrated every axis but still get mediocre prints, your frame might be the bottleneck.
Frame stability issues are especially common on budget printers, DIY builds, and older machines that have loosened over time. The good news: fixing frame wobble is one of the most impactful upgrades you can make, and it doesn’t require replacing the printer.
Signs Your Frame Is the Problem
Frame instability can mimic other print problems, so here’s how to identify it specifically:
- Ghosting/ringing that doesn’t improve with speed reduction: If you’ve lowered print speed to 30 mm/s and still see ringing, the vibrations are structural, not acceleration-related.
- Inconsistent layer lines on one side: A frame that’s rigid on one axis but loose on another will produce directional artifacts. Print a calibration cube and compare all four sides.
- Visible frame movement during printing: Push gently on the top of your printer while it’s printing. If the frame deflects noticeably, it’s too loose.
- Print quality degrades with height: Tall prints amplify frame wobble because the print head moves further from the fixed base. If your first 20mm prints great but quality drops higher up, frame flex is likely involved.
- Noise increases during direction changes: Rattling or clunking during direction changes (especially at corners) often means loose frame connections.
Tightening Your Existing Frame
Step 1: Check Every Bolt
This sounds basic, but it’s the single most effective fix. Grab the right Allen keys (usually 2mm, 2.5mm, and 3mm for 2020/2040 extrusions) and systematically check every frame bolt. Don’t just tighten blindly — loosen each bolt slightly, square up the joint, then tighten firmly.
Pay special attention to:
- Corner brackets and T-nuts (these work loose from vibration over months of printing)
- Z-axis mounting points (the gantry connection to the vertical uprights is critical)
- Base frame connections (the foundation of everything above)
Step 2: Square the Frame
A tight but misaligned frame creates binding and uneven motion. Use a machinist’s square or a reliable right-angle reference to check:
- Both vertical uprights are exactly 90° to the base
- The X-gantry is perpendicular to the vertical uprights
- The base is flat (use a level; adjust the rubber feet if needed)
For Ender 3 and similar Creality printers, the most common squareness issue is the gantry arm sagging on one side. Loosen the eccentric nuts on the X-gantry rollers, square the gantry, and re-tighten while holding it in position.
Step 3: Eliminate Play in Rollers and Bearings
V-slot roller-based printers (Ender 3, CR-10, etc.) use eccentric nuts to adjust roller tension. These need to be set just right:
- Too loose: the carriage wobbles on the rail, causing inconsistent positioning
- Too tight: the rollers bind, causing stepper motor strain and flat spots on the wheels
- Just right: the carriage moves smoothly with no play when you push it side to side
Check every roller assembly — X-axis carriage, Y-axis bed, and Z-axis gantry. Adjust the eccentric nut (the offset hex nut on one roller in each set of three) until the carriage moves freely with zero wobble.
Structural Upgrades That Make a Real Difference
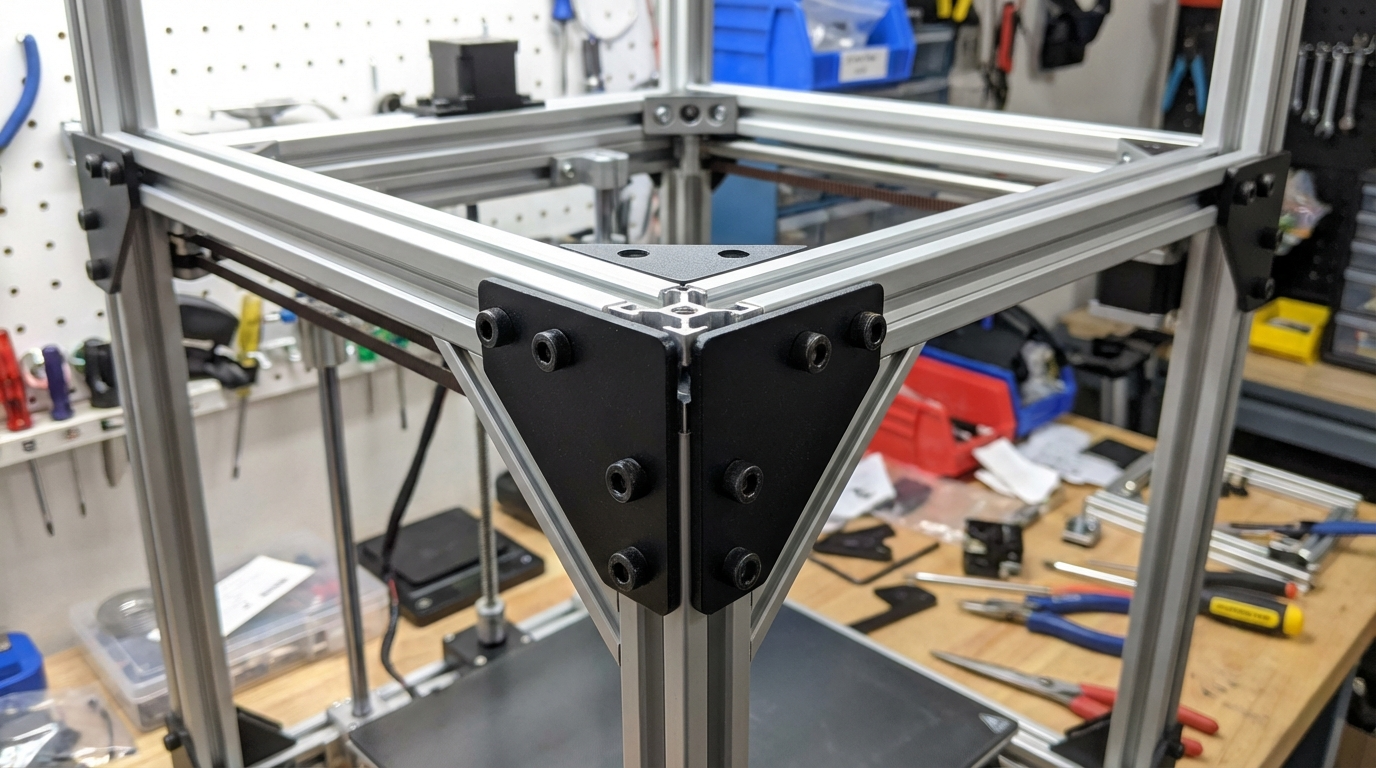
Corner Braces and Brackets
The cheapest and most effective structural upgrade is adding corner braces to your frame joints. For 2020 extrusion printers, 90° cast aluminum corner brackets cost about $1 each and dramatically increase rigidity.
Priority locations for corner braces:
- Where vertical uprights meet the base (4 brackets — most critical)
- Where the top horizontal bar meets the uprights (2 brackets)
- Any L-shaped frame joints that only use T-nuts without brackets
Some makers 3D print corner braces, which works fine for light-duty reinforcement. For maximum rigidity, use metal brackets — aluminum is light and stiff, which is exactly what you want.
Cross Braces and Diagonal Supports
A rectangular frame resists forces along its members but is weak against racking (parallelogram-like deformation). Adding diagonal cross braces turns this weakness into strength.
For the Ender 3, the most popular upgrade is a rear diagonal brace connecting the top bar to the lower rear of the frame. This single addition eliminates most of the front-to-back wobble that plagues the stock design. Multiple printable designs are available on Printables and Thingiverse.
Replacing Plastic Brackets with Metal
Some budget printers ship with plastic frame brackets that flex under load. The Ender 3’s stock plastic gantry brackets are a well-known weak point. Replacing them with machined aluminum versions (available for $15-20 as kits) provides a noticeable improvement in print quality.
The Surface Matters: Printer Placement
Even a perfectly rigid frame will wobble if it’s sitting on an unstable surface. Your printer placement affects stability more than most people realize.
Ideal Setup
- Use a solid, heavy surface. A thick wooden desk, concrete slab, or dedicated workbench is ideal. Avoid lightweight IKEA-style furniture that resonates with printer vibrations.
- Level the surface. An uneven surface puts unequal stress on the frame, which can cause warping and loosening over time.
- Add vibration dampening. Concrete pavers ($2-3 from any hardware store) under the printer add mass and absorb vibrations. The combination of mass + rubber feet is extremely effective.
- Avoid wall-mounted shelves. Shelves flex and amplify vibrations. If shelf mounting is your only option, use a heavy shelf bracket rated for the weight and add mass underneath.
The Concrete Paver Trick
This is arguably the best bang-for-buck improvement in all of 3D printing. Place a concrete paver (30x30cm, about 3kg) on your desk, put rubber feet or a mouse pad on top, and set your printer on that. The added mass dampens vibrations before they can become print artifacts. Total cost: $3-5. Impact on print quality: dramatic.
Advanced Frame Modifications
Full Frame Replacement
For printers like the Ender 3, aftermarket frame kits made from thicker extrusions (2040 instead of 2020) are available. These offer substantially more rigidity but require rebuilding the printer. Brands like OpenBuilds and Misumi offer cut-to-length extrusions that fit popular printer designs.
Linear Rail Conversion
Replacing V-slot rollers with linear rails (MGN12H or MGN12C) eliminates the play inherent in roller-based systems. Linear rails bolt directly to the extrusions and provide smooth, zero-play motion. This is a significant upgrade that typically costs $30-60 for a full conversion kit and takes a few hours to install.
Rubber vs. Silicone Feet
Stock rubber feet are usually too hard to absorb vibration effectively. Aftermarket silicone feet (often called “squash ball feet”) are significantly better at absorbing vibration. Some makers literally cut squash balls in half and use them — it works surprisingly well.
Measuring Frame Rigidity
Want to quantify your improvements? Here are two easy methods:
The Resonance Test
Tap the frame with a screwdriver handle and listen. A rigid frame produces a short, sharp “tink.” A loose frame produces a longer, buzzy “twang.” Compare before and after your modifications.
The Calibration Cube Test
Print a calibration cube at 60 mm/s before your upgrades, then print another identical one after. Compare:
- Ghosting/ringing on the walls
- Dimensional accuracy (measure with calipers)
- Surface consistency across all four sides
Take photos in the same lighting conditions for a direct visual comparison. The improvement from frame tightening alone is often visible to the naked eye.
Maintenance Schedule
Frame rigidity isn’t set-and-forget. Vibration gradually loosens bolts over time. Build these checks into your routine:
- Monthly: Wiggle the gantry and frame by hand. Check for any new play or looseness.
- Every 3 months: Systematic bolt check on all frame connections. Re-square if needed.
- Every 6 months: Check roller/bearing condition. Replace worn V-slot wheels (they develop flat spots). Re-tension belts.
- After any move: Full frame check. Moving a printer almost always loosens something.
Final Thoughts
Frame stability is the foundation that every other tuning parameter builds on. You can have perfect slicer settings, a perfectly calibrated extruder, and premium filament — but if the frame wobbles, none of that matters. The best part is that frame upgrades are among the cheapest and most satisfying improvements you can make. A $3 concrete paver and 20 minutes tightening bolts can transform print quality more than a $50 nozzle upgrade ever will.
Start with the basics: tighten everything, square the frame, check your rollers. Then add braces and mass as needed. Your prints will show the improvement immediately.