3D Printer Layer Shifting: Every Cause and How to Fix It
Layer shifting is one of those print failures that hurts the most because it usually happens hours into a print. Everything looks perfect, then suddenly the layers are offset by a few millimeters and your print looks like a building after an earthquake. I’ve lost count of how many overnight prints I’ve woken up to find ruined by layer shifts.
The good news: layer shifting almost always has a mechanical cause, which means it’s fixable. In this guide, I’ll cover every cause I’ve encountered and the fix for each one.
What Layer Shifting Looks Like
Layer shifting shows up as a sudden horizontal offset in your print. All layers above a certain point are shifted in one direction (X, Y, or both) relative to the layers below. Sometimes it’s a single shift at one point. Other times, you get multiple small shifts throughout the print, making the whole thing look wobbly.
The shift can range from barely noticeable (0.5mm) to catastrophic (10mm+). Direction matters too — if it’s only shifting on one axis, that tells you which motor or belt to investigate.
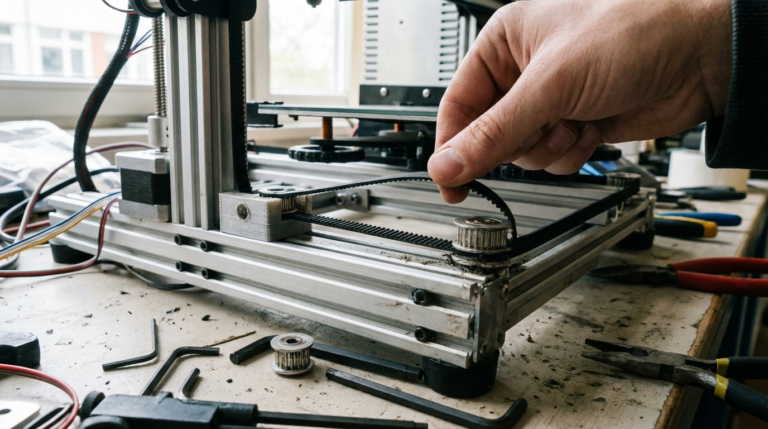
Cause #1: Loose Belts (The Most Common Culprit)
This is the number one cause of layer shifting, especially on printers like the Ender 3 that use GT2 timing belts. Over time and use, belts stretch and loosen. A loose belt means the motor turns but the print head doesn’t move the full distance — the belt absorbs the motion by deflecting instead of transmitting it.
How to Check
Press down on the belt with your finger. It should feel taut, like a guitar string. If it deflects more than a few millimeters, it’s too loose. When you pluck it, you should hear a low twang. A floppy belt that barely makes a sound is way too loose.
How to Fix
Most printers have belt tensioners. On the Ender 3 V2 and newer models, there are adjustment knobs on the front and side of the frame. Turn them until the belt is snug but not overly tight — over-tensioning can increase motor load and cause other problems.
On the original Ender 3 without built-in tensioners, you’ll need to loosen the bolts on the idler pulley side, pull the belt tight, and re-tighten. It’s awkward but it works. Print a belt tensioner upgrade from Thingiverse — it’s one of the most useful quality-of-life mods you can do.
Photo by Haripriya K on Unsplash
Cause #2: Stepper Motors Overheating
Stepper motors skip steps when they overheat. The motor driver reduces current to protect itself, and the motor loses torque. This usually causes intermittent layer shifts that happen more frequently as the print progresses (because the motors get hotter over time).
How to Check
Carefully touch the stepper motors after a long print. Warm is normal. Hot enough that you can’t keep your finger on it for more than 2 seconds means there’s a problem.
How to Fix
- Reduce motor current (Vref): If you’re comfortable with a multimeter, check the Vref voltage on your stepper drivers. It might be set too high from the factory. A slight reduction can dramatically cut heat without losing print quality.
- Add cooling: Small heatsinks on the stepper drivers and a cooling fan pointed at the electronics board help a lot. Many aftermarket mainboard enclosures include fan mounts.
- Reduce print speed: Faster speeds require more motor torque, which generates more heat. If shifts happen consistently on fast prints but not slow ones, this is likely your issue.
Cause #3: Print Head Hitting the Part
This is the second most common cause in my experience. When a print curls up (warping) or has a blob of over-extruded material, the print head can physically collide with the part. The motor tries to move but can’t push through the obstacle, so it skips steps. The controller has no idea this happened — there’s no position feedback on most hobby printers — so all subsequent layers are offset.
How to Fix
- Fix warping first (see my warping guide — it’s closely related to this issue).
- Enable Z-hop: In your slicer, enable “Z hop when retracted” with a height of 0.4-0.8mm. This lifts the nozzle during travel moves, clearing any minor bumps or curling.
- Reduce over-extrusion: Calibrate your e-steps and flow rate. Over-extruded layers create raised ridges that the nozzle can catch on.
- Lower print temp: Excess temperature can cause filament to ooze and create surface bumps.
Cause #4: Loose Grub Screws on Pulleys
The pulleys on your stepper motors are held in place by tiny set screws (grub screws). If these loosen — and they do, vibration works them loose over time — the pulley can slip on the motor shaft. The motor turns, the pulley doesn’t (or doesn’t fully). Result: layer shift.
How to Check
While the printer is off, try to wiggle the pulleys on each stepper motor shaft. There should be zero play. Then try rotating the pulley while holding the motor still — it shouldn’t slip at all.
How to Fix
Tighten the grub screws with the correct size Allen key (usually 1.5mm). Make sure at least one screw sits on the flat of the motor shaft — most stepper motor shafts have a flat section specifically for this. Apply a tiny drop of blue Loctite (threadlocker) if the screws keep loosening. Don’t use red Loctite — that’s permanent.
Photo by Osman Talha Dikyar on Unsplash
Cause #5: Printing Too Fast
Every printer has a speed limit determined by the motors, frame rigidity, and mass of the print head. Exceed it and the motors can’t keep up. They skip steps, and you get layer shifts.
How to Fix
Reduce print speed by 20-30% and see if the problem goes away. Pay special attention to acceleration and jerk settings — these matter more than top speed for layer shifting. High acceleration forces the motor to instantly change speed, which is where skipping usually happens.
For an Ender 3, I keep acceleration at 500 mm/s² and jerk at 8 mm/s. Some people go higher, but these conservative values eliminate most speed-related shifting.
Cause #6: Electrical Issues
Less common but worth checking if nothing else works:
- Loose stepper motor cables: The connectors on the mainboard can work loose over time. Press each one firmly to reseat it. Also check the connectors at the motor end.
- Damaged cables: If a cable has a break (especially in the wires that flex with the print head), the motor intermittently loses signal. Flex the cable while the printer is homing and watch for stuttering movement.
- Electromagnetic interference: This is rare, but I’ve seen it happen when a printer is plugged into the same circuit as a heavy appliance. The voltage dip when the fridge compressor kicks on can briefly starve the stepper drivers.
- Bad stepper driver: If one axis consistently shifts and you’ve ruled out everything else, the stepper driver chip on the mainboard might be failing. On boards with removable drivers (like the MKS Gen L), you can swap drivers between axes to test.
Cause #7: Mechanical Binding
If the motion system has a tight spot — maybe a bent lead screw, a misaligned linear rail, or debris in a V-slot wheel — the motor has to work harder at that point. This can cause intermittent skipping.
How to Check
With the printer off, manually move the print head across the full range of each axis. It should glide smoothly with consistent resistance. Any catching, grinding, or tight spots indicate a mechanical issue.
How to Fix
- V-slot wheels: Adjust the eccentric nuts so wheels are snug against the rail but not binding. You should be able to spin a wheel with your fingers but feel some resistance.
- Linear rails: Clean and re-lubricate with a light machine oil.
- Lead screw (Z axis): Check for bending. A bent lead screw can bind at certain heights. Roll it on a flat surface — if it wobbles, replace it.
- Clean the rails: Dust, filament debris, and dried grease can accumulate on the motion rails. Wipe them down with IPA and apply fresh lubricant.
Cause #8: USB Connection Dropouts
If you’re printing from a computer via USB instead of from the SD card, USB disconnections can cause layer shifts or worse. The printer stops receiving commands mid-move, loses position, and resumes in the wrong spot.
How to Fix
Print from the SD card. Always. USB printing is convenient for short test prints, but for anything longer than 30 minutes, slice it, save to SD, and print from the card. It’s more reliable in every way.
If you must use USB (maybe for OctoPrint), make sure your USB cable is good quality and the connection is solid. Disable power saving on the USB port in your OS. Some people put a piece of tape over the 5V pin on the USB connector to prevent power supply conflicts between the computer and printer.
Diagnosing Layer Shifts: My Process
When I get a layer shift, here’s my troubleshooting order:
- Which axis? Look at the shift direction. Left-right is X. Front-back is Y. This tells me which belt/motor/pulley to check first.
- Single shift or multiple? A single shift often means the nozzle hit something. Multiple gradual shifts suggest overheating motors or loose belts.
- When did it happen? Early in the print often means nozzle collision (from poor first-layer adhesion). Late in the print might mean motor overheating.
- Check belts and pulleys — takes 2 minutes and fixes the problem most of the time.
- Check for obstructions — look for warping or blobs on the failed print.
- Check motor temperature — feel the motors right after the failure.
Nine times out of ten, it’s belts or pulleys. The other fixes are for that stubborn 10% of cases.
Prevention Checklist
Run through this monthly:
- Check belt tension on X and Y axes
- Verify grub screws on all pulleys are tight
- Clean motion rails and wheels
- Check V-slot wheel tension (eccentric nuts)
- Verify stepper motor cables are seated firmly
- Update firmware if available (newer versions often have better motor tuning)
Layer shifting is frustrating because it wastes time and filament, but it’s also one of the most predictable failures in 3D printing. Mechanical issues cause mechanical symptoms. Once you work through the checklist, you’ll find the culprit — and once it’s fixed, it stays fixed. No more earthquake prints.