How to Fix Sagging and Drooping Overhangs on Your 3D Printer
What Sagging Overhangs Look Like (And Why They Happen)
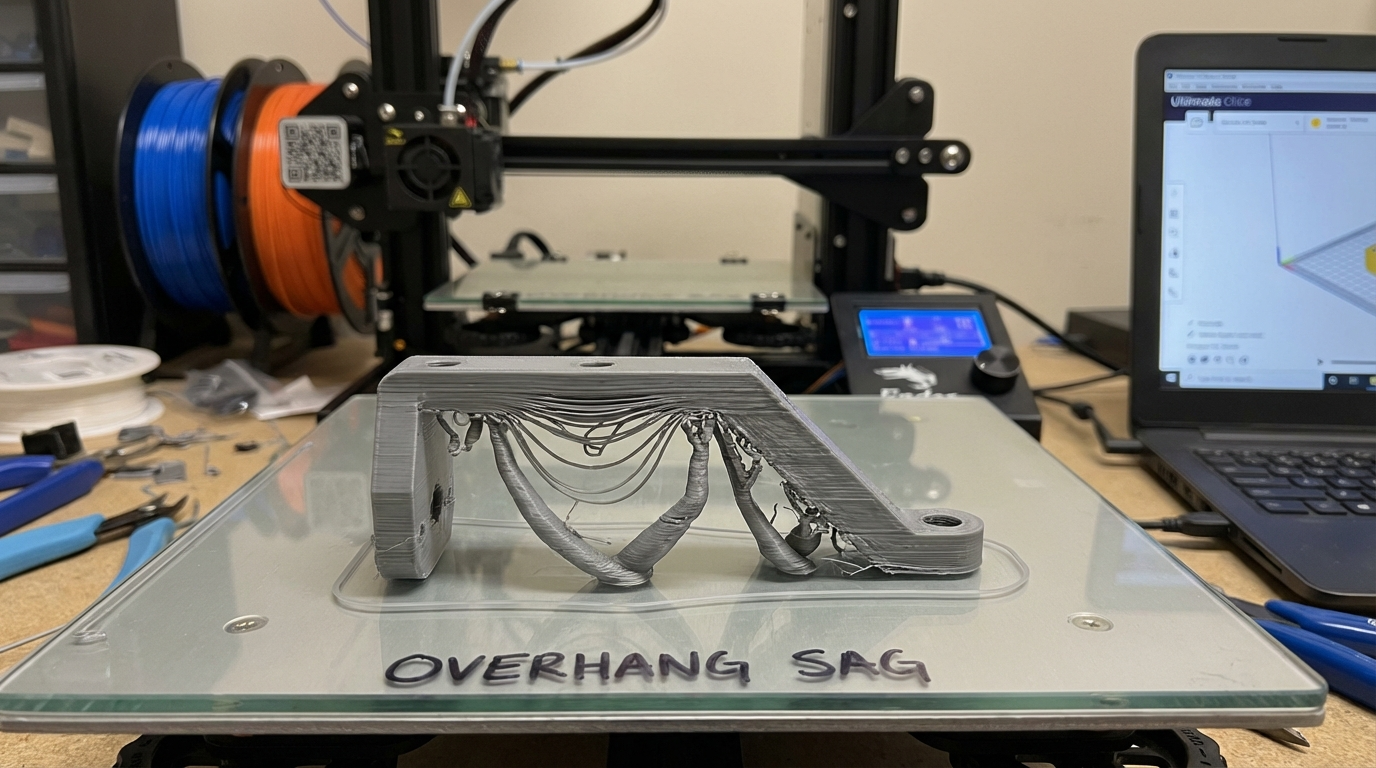
You’ve sliced a model with a beautiful 45-degree overhang, hit print, and come back to find the underside looks like melted cheese hanging off a pizza. The layers droop, curl, and leave behind a rough, ugly surface that no amount of post-processing can fully fix. Welcome to one of the most common problems in FDM 3D printing: sagging overhangs.
Sagging happens when freshly extruded filament doesn’t have enough support — either from the layer below or from rapid cooling — to maintain its shape before the next layer arrives. The molten plastic yields to gravity and droops downward, creating a bumpy, uneven surface on the underside of any angled or horizontal feature.
The good news? This is one of the most fixable problems in 3D printing. With the right combination of settings, hardware tweaks, and design awareness, you can push your printer’s overhang capabilities from a disappointing 30° to a clean 70° or beyond.
Understanding Overhang Angles
Before diving into fixes, let’s establish a common language. Overhang angle is measured from the vertical axis:
- 0° (vertical wall): No overhang at all. Every layer sits directly on top of the previous one.
- 45°: The “standard” overhang limit. Most printers handle this without issues. Each layer extends about 50% beyond the layer below it.
- 60°: Challenging but achievable with good cooling and proper settings. This is where most stock printers start to struggle.
- 70-80°: Requires excellent cooling, slow speeds, and optimized settings. The bottom surface will be rough but structurally sound.
- 90° (horizontal): A full bridge. Requires completely different handling — the filament spans an unsupported gap.
The 7 Main Causes of Sagging Overhangs
1. Insufficient Part Cooling
This is the number one cause. When filament is deposited on an overhang, it’s partially unsupported. The only thing preventing it from drooping is how quickly it solidifies. If your part cooling fan is too weak, blowing from only one direction, or running at too low a speed, the filament stays molten long enough for gravity to pull it down.
Fix: Increase fan speed to 100% for PLA overhangs. Consider upgrading to a dual-fan setup or a better fan duct design that delivers airflow from multiple directions. See our guide on cooling fan duct upgrades for detailed recommendations.
2. Printing Too Fast
Speed kills overhang quality. When you print fast, you deposit more material per second, which means the cooling system has to work harder to solidify it in time. At the same time, faster travel means less time for each layer to cool before the next one arrives.
Fix: Reduce print speed for overhangs to 20-30 mm/s. Most slicers allow you to set a separate speed for overhangs — use it. In Cura, look for “Overhang Speed” in experimental settings. In PrusaSlicer/OrcaSlicer, enable “Slow down for overhangs.”
3. Print Temperature Too High
Higher temperatures mean more fluid filament, which means more droop time. If you’re printing PLA at 215°C and getting saggy overhangs, dropping to 200-205°C might solve the problem entirely.
Fix: Reduce nozzle temperature by 5-10°C from your normal setting when printing models with significant overhangs. Run a temperature tower to find the lowest temperature at which your specific filament extrudes reliably.
4. Layer Height Too Tall
Taller layer heights mean more material per layer, which means more weight pulling on unsupported overhangs. A 0.3mm layer height droops significantly more than a 0.12mm layer height on the same overhang angle.
Fix: Use 0.12-0.16mm layer height for models with aggressive overhangs. You can also use adaptive layer height in PrusaSlicer or OrcaSlicer to automatically use thinner layers only where overhangs are steep, keeping the rest of the print at a faster, taller layer height.
5. Extrusion Width Too Wide
A wider extrusion line extends further beyond the layer below, giving it less surface area to bond to and more unsupported material that can droop. The default 0.4mm extrusion width with a 0.4mm nozzle is usually fine, but going wider (like 0.48mm or 0.5mm) worsens overhangs.
Fix: Reduce extrusion width to 90-95% of your nozzle diameter for overhang regions. Some slicers call this “line width” or “extrusion width.”
6. Over-Extrusion
If you’re extruding too much material, the excess has to go somewhere — and on overhangs, it goes down. Over-extrusion makes every overhang problem worse because there’s simply more molten plastic to droop.
Fix: Calibrate your flow rate. Print a single-wall calibration cube and measure the wall thickness. If your slicer says 0.4mm but you’re measuring 0.44mm, your flow rate is too high. Reduce it proportionally.
7. Poor Model Orientation
Sometimes the best fix isn’t a setting change — it’s rotating the model. A steep overhang on one orientation might become a gentle slope on another. Spend a minute rotating your model in the slicer before printing to minimize problematic overhangs.
Fix: Use your slicer’s preview mode to identify overhang regions. Rotate the model to reduce the maximum overhang angle. Some slicers like OrcaSlicer even highlight overhangs in red to make them easy to spot.
Advanced Overhang Techniques
Overhang-Specific Slicer Settings
Modern slicers have dedicated overhang settings that go beyond basic speed and cooling adjustments:
- OrcaSlicer “Slow Down for Overhang” feature: Automatically reduces speed and increases cooling for detected overhangs. Set to “auto” for most cases.
- Cura “Overhanging Wall Speed” and “Overhanging Wall Angle”: Controls the speed for walls that exceed a specified overhang angle. Set the angle to 40-50° and speed to 20-30 mm/s.
- PrusaSlicer “Bridge Flow Ratio”: Adjusts the amount of material extruded during bridges. Reducing this to 85-95% can improve bridge quality on overhangs approaching 90°.
The “Inside-Out” Wall Order Trick
Most slicers print outer walls first (outside-in) by default for dimensional accuracy. But for overhangs, printing inner walls first (inside-out) can help because the inner wall provides a partial support shelf for the outer wall to rest on.
This won’t make a dramatic difference, but on marginal overhangs (50-60°), it can be the difference between a clean surface and a rough one.
Using Supports Strategically
Sometimes the right answer is to just use supports. Modern slicers offer much better support options than they did a few years ago:
- Tree supports use less material, are easier to remove, and leave fewer marks
- Paint-on supports let you add support only where you need it
- Support interface layers create a smooth separation between the support and the model
- Lower support density (5-10%) makes removal easier with minimal quality loss
Material-Specific Overhang Tips
PLA: The easiest material for overhangs. Max cooling (100%), lower temp (195-205°C), and slow speed (20-30 mm/s) gives the best results. With a good cooling setup, clean 70°+ overhangs are achievable.
PETG: More challenging than PLA. Use moderate cooling (40-60%) — too much cooling causes poor layer adhesion. Lower temperature by 5°C from your normal PETG setting. Expect clean overhangs up to 50-55°.
ABS/ASA: The hardest materials for overhangs. Minimal cooling required (0-20%) to prevent warping, which directly conflicts with overhang performance. Use supports more liberally with ABS. Clean overhangs beyond 40° are difficult without an enclosure.
TPU: Moderate cooling (30-50%). TPU is naturally more forgiving of overhangs because of its flexibility, but the drooping is harder to fix in post-processing because you can’t easily sand flexible material.
Testing Your Overhang Performance
Print a dedicated overhang test model to establish your baseline and measure improvements. The most popular options are:
- All-In-One Overhang Test: A compact model with overhangs at 20°, 30°, 40°, 50°, 60°, 70°, and 80°. Print it, examine the bottom surface of each angle, and note where quality becomes unacceptable.
- 3DBenchy: While not a dedicated overhang test, the hull overhang and the cabin roof provide useful real-world overhang benchmarks.
- Bridging Test: If your overhangs at 90° (full bridges) are problematic, print a bridge test with increasing spans to find your limit.
When to Just Use Supports Instead
There’s no shame in using supports. If your model has overhangs beyond 60° and the surface quality matters, supports will almost always give a better result than trying to push your printer’s limits. The time you save not tweaking settings and reprinting failed attempts usually outweighs the small amount of extra material and cleanup time.
For the best support removal experience, use a support interface gap of 0.1-0.2mm, set interface density to 80-100%, and use a support pattern like “lines” for easy separation. If you’re using a multi-material printer, soluble supports (PVA for PLA, HIPS for ABS) eliminate cleanup entirely.
Summary: The Quick Fix Checklist
If your overhangs are sagging, work through this list from top to bottom. Each step addresses the most common cause in order of impact:
- Increase part cooling fan to 100% (for PLA)
- Reduce print speed to 20-30 mm/s for overhangs
- Lower nozzle temperature by 5-10°C
- Reduce layer height to 0.12-0.16mm
- Calibrate flow rate to eliminate over-extrusion
- Consider rotating the model to reduce overhang angles
- Upgrade cooling fan and duct if steps 1-6 aren’t enough
- Use tree supports for overhangs beyond 60°
With the right approach, sagging overhangs go from a constant frustration to a manageable challenge. Start with the easy fixes and work your way down the list — most people find their answer in the first three steps.