3D Printer 12V to 24V Upgrade Guide: Benefits, Steps, and Safety Tips
Most budget 3D printers ship with 24V power systems these days, but if you own an older machine — an original Ender 3, CR-10, Anet A8, or any printer from the 12V era — you might be wondering whether upgrading to 24V is worth the effort. The short answer: yes, almost always. The longer answer involves understanding exactly why voltage matters and how to do the upgrade safely.
In this guide, I’ll explain the real-world benefits of running your 3D printer on 24V, walk you through the upgrade process step by step, and help you avoid the mistakes that can fry your printer (or worse, start a fire).
Why Does Voltage Matter for 3D Printers?
The core principle is simple: for the same amount of power (watts), a 24V system draws half the current (amps) that a 12V system does. This has cascading benefits throughout the entire printer.
Power = Voltage × Current. A 40W heated bed on 12V draws 3.3 amps. The same 40W bed on 24V draws only 1.67 amps. Lower current means less heat in wires, connectors, and MOSFETs — which means less wasted energy, less fire risk, and more reliable operation.
But the benefits go beyond just reducing current. Let’s break them down.
Benefits of Upgrading from 12V to 24V
1. Dramatically Faster Bed Heating
This is the most noticeable improvement. A 24V heated bed reaches temperature in roughly half the time of a 12V bed with the same wattage. But in practice, the improvement is even bigger because 24V beds are typically available in higher wattages — a 200W 24V bed heats a 235×235mm surface to 60°C in under 2 minutes, compared to 5–8 minutes for a typical 120W 12V bed.
For ABS and PETG users who need bed temperatures of 80–100°C, this isn’t just convenient — it’s transformative. What used to be a 15-minute wait becomes a 3-minute one.
2. More Responsive Hotend Heating
A 24V heater cartridge heats faster and recovers temperature more quickly during printing. This matters most during fast printing, where the cold filament entering the hotend can temporarily drop the nozzle temperature. A 24V heater compensates faster, maintaining more consistent temperature — which directly translates to better print quality, especially at higher speeds.
3. Stronger Stepper Motor Performance
Stepper motors perform better at higher voltages. At 24V, the stepper drivers can push current into the motor coils more quickly, which means the motors hold their steps at higher speeds. The practical result: you can print faster without layer shifts. The torque at high RPM improves significantly — a motor that loses steps at 100mm/s on 12V might handle 150mm/s comfortably on 24V.
4. Reduced Fire Risk
Half the current means half the heat generated in wires and connectors. Many 3D printer fires are caused by overheated connectors — particularly the bed power connector on the mainboard, which carries the highest current in the system. Dropping that current from 10+ amps to 5 amps dramatically reduces the risk of connector melt and fire.
5. Thinner Wires, Less Weight
Lower current means you can use thinner gauge wire for the same power delivery. This is particularly relevant for the heated bed wiring, which carries the most current. On a bed-slinger printer, lighter bed wiring means less moving mass, which can reduce ringing and allow higher print speeds.
What You Need for the Upgrade
Core Components
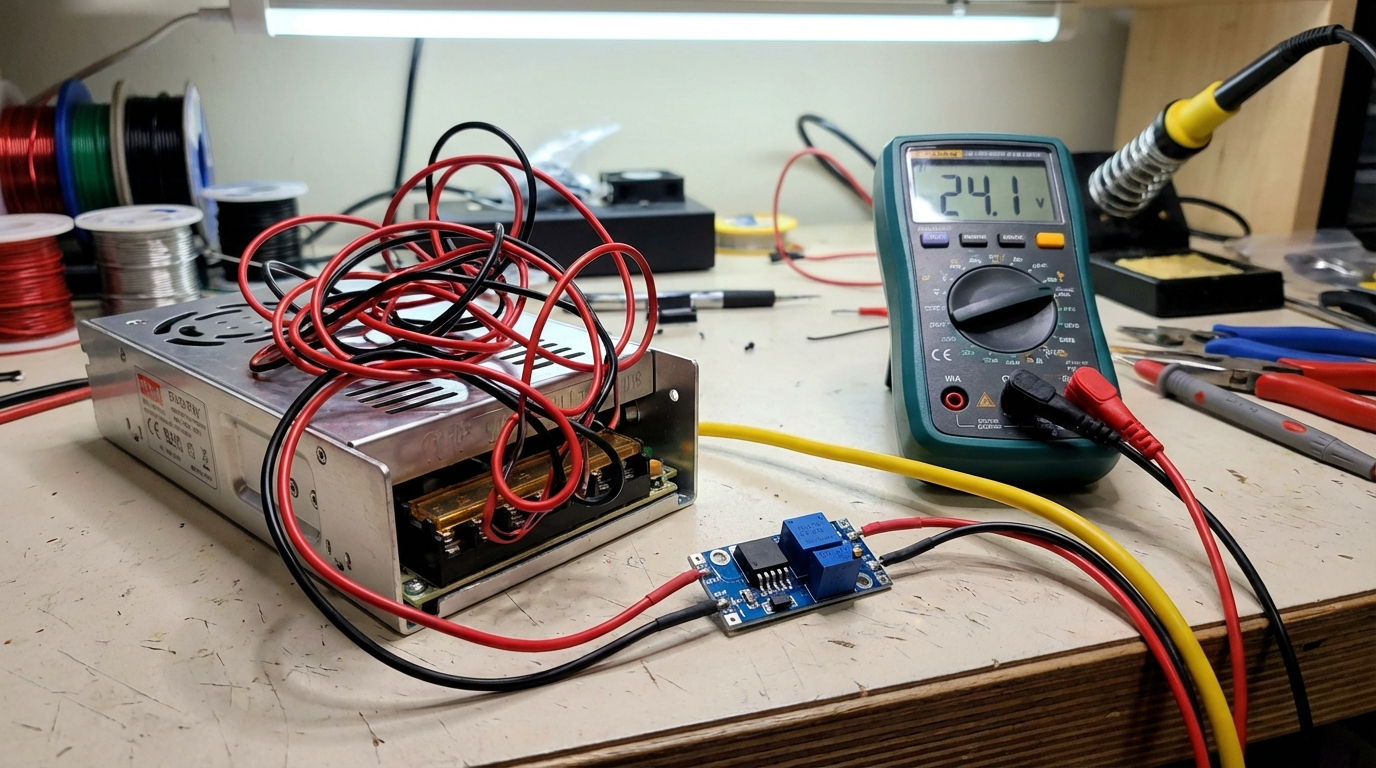
- 24V power supply — a quality 24V PSU rated for at least the total wattage of your printer. A 360W (24V, 15A) MeanWell LRS-350-24 is the gold standard. Budget options exist, but don’t cheap out on the PSU — this is the safety-critical component.
- 24V heated bed — your 12V bed will not work on 24V (it would draw double the intended current and likely burn out or catch fire). You need a bed specifically rated for 24V. Creality and Keenovo make drop-in replacements for most popular printers.
- 24V heater cartridge — typically 40W or 50W for 24V operation. A 12V cartridge on 24V will glow red-hot and may melt your hotend. Never mix these up.
- 24V part cooling fans — your 12V fans will spin too fast and burn out on 24V. Replace with 24V versions, or use buck converters to step down to 12V for each fan.
- 24V-compatible mainboard — many modern boards (SKR Mini, BTT Octopus, Creality v4.2.7) accept 24V input. If your board is 12V-only, you’ll need to upgrade it too. Check the board’s specifications before connecting 24V.
Optional but Recommended
- MOSFET module — an external MOSFET for the heated bed removes the high-current load from the mainboard. Even at 24V, this is good practice for bed heaters over 150W.
- Upgraded wiring — while 24V allows thinner wire, use at least 16 AWG for the heated bed and 18 AWG for the hotend heater. Add ferrules to all screw-terminal connections.
- Buck converters — 24V to 12V step-down modules for any components you want to keep running at 12V (LED strips, 12V fans, etc.).
Step-by-Step Upgrade Guide
Step 1: Plan and Document
Before disconnecting anything, photograph your current wiring from multiple angles. Label every wire. Create a spreadsheet listing every component and whether it needs replacing for 24V compatibility. This documentation will save you hours of troubleshooting later.
Step 2: Replace the Power Supply
Mount the new 24V PSU in the same location as the old 12V unit. If it’s a different size, you may need to print or fabricate a new mounting bracket. Connect the AC input (line, neutral, ground) exactly as the old unit was connected. Always connect the ground wire. Set the voltage selector switch (if present) to match your mains voltage (110V or 220V).
Step 3: Replace the Heated Bed
Remove the 12V bed heater and install the 24V replacement. If your printer uses a PCB heater (integrated into the bed), this means swapping the entire bed assembly. If it uses a silicone heater pad, simply peel off the old pad and apply the new 24V one. Connect the bed wiring to the mainboard or external MOSFET.
Step 4: Replace the Heater Cartridge
Remove the old 12V heater cartridge from the heat block and insert the new 24V cartridge. Tighten the grub screw to hold it in place — snug but not so tight that you strip the tiny Allen bolt. This is the component most likely to cause a fire if mismatched, so triple-check that it’s rated for 24V.
Step 5: Replace or Convert the Fans
You have two options for each fan:
- Replace with a 24V fan — cleanest solution, direct swap
- Add a buck converter — converts 24V to 12V so you can keep your existing fans. A single converter can power multiple fans if the total current doesn’t exceed its rating.
Common fans to replace: hotend cooling fan (typically 4010 or 4020 size), part cooling fan (5015 blower), and any case fans for the mainboard or PSU.
Step 6: Verify Mainboard Compatibility
Check your mainboard’s input voltage specification. Most modern boards accept 12–24V without modification. Older boards (like the original Creality v1.1.x boards) may not — in that case, the board itself needs replacing. Common 24V-compatible boards include:
- Creality v4.2.2 / v4.2.7
- BigTreeTech SKR Mini E3 V3
- BigTreeTech Octopus
- MKS Robin Nano V3
- Any board with TMC2209 or TMC2226 drivers (these all support 24V)
Step 7: Power On and Test
Before connecting everything: Use a multimeter to verify the PSU is outputting 24V (±0.5V). Then connect components one at a time:
- Power on with only the mainboard connected — verify it boots
- Connect the hotend heater — send an M104 S200 and verify it heats to 200°C
- Connect the heated bed — send an M140 S60 and verify it heats to 60°C
- Connect the fans — verify they spin at the correct speed
- Test the stepper motors — home all axes and verify movement
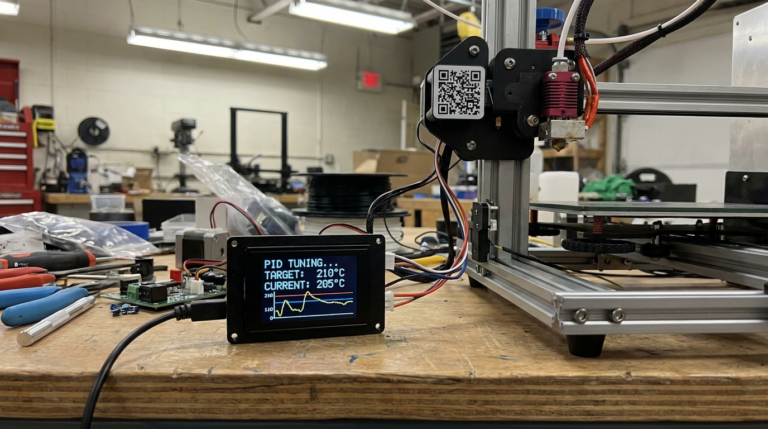
Step 8: Recalibrate PID Tuning
Your new heaters have different thermal characteristics than the old ones. Run PID autotune for both the hotend and the bed:
- Hotend: M303 E0 S200 C8 (PID tune to 200°C, 8 cycles)
- Bed: M303 E-1 S60 C8 (PID tune to 60°C, 8 cycles)
Save the results with M500. Without PID tuning, your temperatures will oscillate wildly, causing print quality issues.
Common Mistakes to Avoid
Using 12V components on 24V. This is the most dangerous mistake. A 12V heater cartridge on 24V will draw 4x the intended power (power scales with voltage squared for resistive loads). It will glow red and can melt your heat block, ignite filament, or start a fire. Always verify voltage ratings before connecting anything.
Skipping the ground wire. The safety ground on your PSU exists to prevent electrocution if a wire comes loose and contacts the metal frame. Never skip it. If your printer’s frame is metal, bond the ground wire to it as well.
Undersized wiring. Even at 24V, the heated bed can draw 8+ amps. Use adequately rated wire (16 AWG minimum for the bed) and ensure all connections are tight with ferrules on stranded wire.
Forgetting the LCD backlight. Some printer LCDs have a 12V backlight. If your mainboard’s LCD connector is now at 24V, the backlight will burn out. Check the LCD specifications and add a voltage regulator if needed.
Not updating firmware. Some firmware configurations include voltage-specific settings (thermal runaway thresholds, PID values, fan speed curves). After the upgrade, update or reconfigure your firmware to match the new voltage.
Cost Breakdown
Here’s what a typical 12V-to-24V upgrade costs for a printer like the Ender 3:
- MeanWell LRS-350-24 PSU: $30–40
- 24V heated bed: $15–25
- 24V heater cartridge: $3–5
- 24V fans (set of 3): $10–15
- Wiring, ferrules, connectors: $10–15
- Buck converter (optional): $5–8
Total: $70–110 — comparable to many popular printer upgrades but with a much bigger impact on daily usability and safety.
Is It Worth It?
If you own a 12V printer and plan to keep using it, the voltage upgrade is one of the highest-value modifications you can make. Faster heating, better motor performance, reduced fire risk, and improved print quality at higher speeds — all for about $80 in parts and an afternoon of work.
That said, if your printer is already struggling with mechanical issues (loose belts, bent frame, worn bearings), address those first. A voltage upgrade won’t fix a wobbly gantry. But on a mechanically sound printer, going from 12V to 24V feels like buying a new machine.
Final Thoughts
The 3D printing community moved to 24V for good reason — it’s better in virtually every way. If you’re still running a 12V system, this upgrade brings your printer in line with modern standards and opens up possibilities for faster printing, higher bed temperatures, and more reliable operation. Take your time with the wiring, double-check every connection, and enjoy the improvement.
For more printer upgrade guides, check out our articles on linear rail upgrades and best direct drive extruder upgrades.