Flexible Filament Jamming in Extruder – 10 Fixes That Actually Work
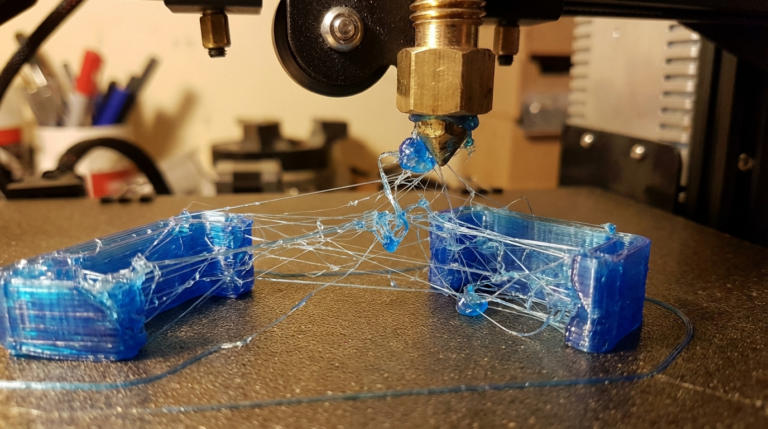
There’s nothing quite as annoying as loading up a spool of flexible filament, hitting print, and hearing that dreaded grinding noise from your extruder. Flexible filament jams are a common headache, especially for anyone new to printing with materials like TPU, TPE, or soft PLA. The filament buckles, wraps around the drive gear, or gets stuck somewhere it shouldn’t — and your print fails before it even gets started.
The good news is that most flexible filament jams come from a handful of predictable causes, and all of them have straightforward fixes. Let’s dig in.
Why Flexible Filament Jams in the Extruder
Rigid filaments like PLA and ABS act like a stiff rod being pushed through a tube. Apply force at one end, and it transfers cleanly to the other. Flexible filaments don’t work that way. Think of it like trying to push a piece of cooked spaghetti through a straw — if there’s any gap, curve, or resistance, the spaghetti bends and buckles instead of going through.
This fundamental difference explains nearly every flexible filament jam:
- Gaps in the filament path give the filament room to bend sideways instead of feeding forward.
- Too much extruder pressure causes the soft material to compress and deform before reaching the melt zone.
- Excessive speed creates back-pressure that the flexible filament can’t overcome without buckling.
- Poor filament path geometry introduces curves or friction points that rigid filament would push through but flexible filament cannot.
Fix 1: Switch to a Direct Drive Extruder
This is the single most impactful change you can make. If you’re trying to print flexible filament on a Bowden tube setup, you’re fighting physics. The long tube between the extruder motor and the hotend is the perfect environment for flexible filament to buckle, compress, and jam.
Direct drive extruders mount the motor directly above (or very close to) the hotend, creating a short, straight path for the filament. Less distance means less opportunity for the filament to flex and bind.
Can You Print Flexible Filament on a Bowden Setup?
Yes, but with limitations. Softer filaments (shore 85A and below) are nearly impossible on Bowden systems. Firmer TPU (shore 95A, like NinjaTex NinjaFlex or Overture TPU) can work if you print very slowly and use the other fixes in this guide. Just know that you’re working against the design of your printer.
If switching to a full direct drive setup isn’t in the budget, consider a short Bowden conversion — some mounts let you position the extruder motor on the X carriage with only 50–100mm of Bowden tube. This dramatically improves flexible filament feeding while keeping most of the weight-saving benefits of Bowden.
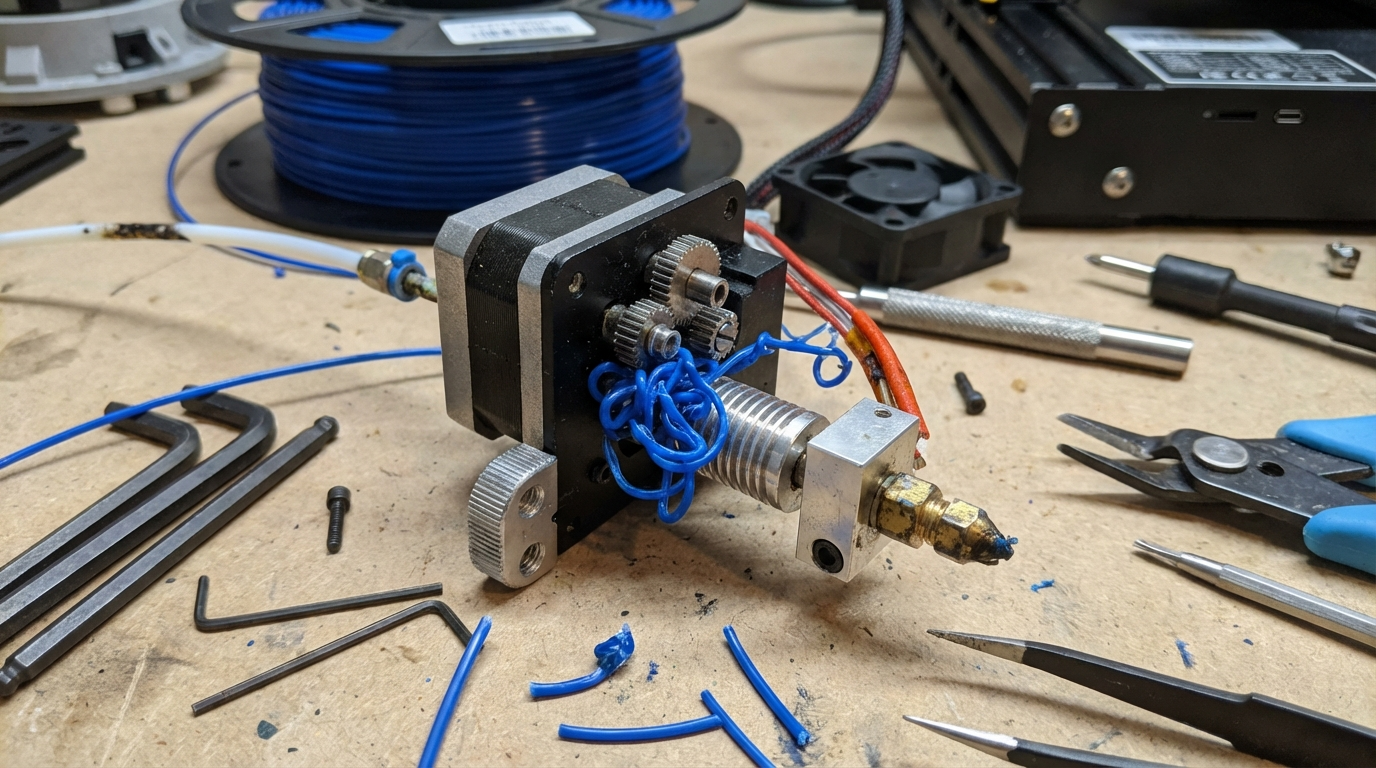
Fix 2: Close the Gap Between Extruder Gear and Hotend
This is where most flexible filament jams actually happen. Between the extruder drive gear and the entrance to the hotend (or the PTFE tube leading to it), there’s often a small gap. With rigid filament, this gap doesn’t matter — the filament bridges it easily. With flexible filament, this gap is where the filament curls sideways and wraps around the drive gear.
How to fix it:
- Print or buy a filament guide: Many extruder designs have community-made filament guides that plug the gap between the gear and the tube. Search Thingiverse or Printables for your specific extruder model + “flexible filament guide.”
- PTFE tube insert: Cut a small piece of PTFE tube and fit it snugly between the drive gear area and the hotend entrance. The inner diameter should match your filament (1.75mm filament uses 2mm ID PTFE tube). This gives the filament a constrained path with no room to escape.
- Upgrade your extruder: Some extruders are designed with flexible filament in mind. The Bondtech BMG, E3D Hemera, and Orbiter V2 all have constrained filament paths that minimize gaps. If you print flexible filament regularly, one of these is a worthwhile investment.
Fix 3: Reduce Extruder Tension
Most extruders have a spring-loaded idler bearing that presses the filament against the drive gear. With rigid filament, you want firm tension to ensure consistent grip. With flexible filament, too much tension squishes the filament flat, which changes its diameter and creates feeding problems downstream.
Loosen your extruder tension until the drive gear just barely grips the filament without deforming it. You can check this by extruding a short length of filament and then pulling it back out — look at the section that went through the gear. If you see deep bite marks or the filament is noticeably flattened, your tension is too high.
Some extruders have a tension adjustment screw. Others require you to modify the spring or add washers. The Creality stock extruder, for example, has a single spring with no adjustment — replacing it with a softer spring or adding a printed tensioner arm helps significantly.
Fix 4: Slow Down — Seriously
Speed kills when it comes to flexible filament. Fast extrusion creates high pressure in the melt zone, and that pressure pushes back against the incoming filament. Rigid filament handles this fine. Flexible filament buckles.
Recommended speeds for flexible filament:
- Shore 95A TPU (direct drive): 20–30 mm/s
- Shore 95A TPU (Bowden): 15–20 mm/s
- Shore 85A or softer: 10–20 mm/s
- First layer: 10–15 mm/s regardless of setup
Also slow down your retraction speed. Fast retractions yank the flexible filament and can cause it to stretch and then bunch up when it re-feeds. Keep retraction speed at 20–25 mm/s maximum.
Fix 5: Increase Your Nozzle Temperature
If the filament isn’t melting completely in the melt zone, the partially solid material creates resistance. The extruder pushes harder, pressure builds up, and the flexible filament buckles somewhere upstream.
Try increasing your nozzle temperature by 5–10°C from the manufacturer’s recommended range. Yes, this might increase stringing slightly (see our guide on fixing TPU stringing), but a print with some strings beats a print that fails from a jam.
The relationship between temperature and jam frequency is straightforward: hotter filament flows more easily, which means less back-pressure, which means less tendency for the filament to buckle. Find the temperature that gives you reliable feeding first, then optimize for stringing and surface quality afterward.
Fix 6: Check Your Hotend for Clogs or Partial Blockages
A partially clogged nozzle or heat break creates exactly the kind of restriction that causes flexible filament to jam. The extruder motor has to push harder to force filament through the narrowed passage, and the increased pressure buckles the flexible filament upstream.
Signs of a partial clog:
- Extrusion is inconsistent — sometimes it flows fine, sometimes it struggles
- You can hear the extruder motor clicking or skipping
- The filament comes out of the nozzle in a curved path instead of straight down
- Previously successful flexible filament prints start failing
Clear any clogs before attempting to print flexible filament. A cold pull using nylon or dedicated cleaning filament is the safest method. Heat the nozzle to 250°C, push cleaning filament through, then let it cool to around 90°C and pull it out firmly. The cooled filament acts like a plug that pulls debris with it. Repeat until the pulled filament comes out clean.
Fix 7: Disable or Minimize Retraction
This might sound counterintuitive if you’re also battling stringing, but for filaments that jam frequently, disabling retraction entirely can be a valid strategy. Every retraction cycle is an opportunity for the flexible filament to shift, compress, or tangle. Fewer retractions means fewer chances for things to go wrong.
If you disable retraction, compensate with:
- Higher travel speeds (150+ mm/s) to minimize ooze during moves
- Coasting enabled in your slicer to relieve nozzle pressure before travel
- Combing/avoid crossing perimeters to keep travel moves over printed areas
- Wipe enabled to clean the nozzle before travel moves
The strings you get can usually be cleaned up with a heat gun or lighter after the print finishes. A completed print with some strings is always better than a failed print with none.
Fix 8: Use Higher Quality Flexible Filament
Not all flexible filament is created equal. Cheap TPU often has inconsistent diameter, which creates alternating tight and loose fits in the extruder path. Tight spots increase friction and cause jams. Loose spots allow the filament to wander and buckle.
Quality brands to consider:
- NinjaTek NinjaFlex: The original and still one of the most reliable. Consistent diameter and well-documented settings.
- Overture TPU: Excellent budget option with good diameter consistency.
- SainSmart TPU: Another solid budget choice, widely available.
- Polymaker PolyFlex: Premium option with excellent consistency and low odor.
When you find a brand and color that feeds well in your printer, buy several spools. Switching brands often means re-tuning your settings.
Fix 9: Print from a Dry Box
Wet flexible filament is more prone to jamming than dry filament. Moisture in the filament turns to steam in the melt zone, creating bubbles and pressure spikes that disrupt smooth extrusion. These pressure irregularities are enough to cause the soft filament to buckle upstream.
TPU is particularly hygroscopic — it absorbs moisture faster than PLA and needs more careful storage. If your filament has been sitting out for more than a day or two in a humid environment, dry it before printing (50–60°C for 4–6 hours).
For the best results, print directly from a sealed dry box with desiccant. The filament feeds through a small hole in the box’s wall into the extruder, staying dry throughout the entire print. Several commercial options exist (Sunlu FilaDryer, eSun eBox), or you can build one from a large food container and some PTFE tube fittings.
Fix 10: Modify Your Extruder Geometry
If you’ve tried everything else and still get jams, it might be time to look at your extruder’s physical design more critically. Some modifications that help:
- Widen the filament entry: Some extruders have a sharp-edged entry point that catches flexible filament. Using a small drill bit or file to create a slight chamfer can help the filament find its way in smoothly.
- Add a guide tube: A continuous PTFE tube from the spool holder through the extruder and into the hotend eliminates every gap the filament could escape through. This is the nuclear option but very effective.
- Reduce the gear-to-hotend distance: If you can position the drive gear closer to the hotend entrance, there’s less unsupported filament to buckle. Some extruder designs allow shimming or repositioning the motor mount.
Troubleshooting Flowchart
When flexible filament jams, work through this sequence:
- Is the filament dry? If not, dry it first. Wet filament causes problems that mask other issues.
- Are you printing slow enough? Drop to 15 mm/s and see if the jam goes away.
- Is there a gap in the filament path? Inspect from spool to nozzle. Any gap is a potential jam point.
- Is the hotend clogged? Do a cold pull to check.
- Is extruder tension correct? Too tight deforms the filament; too loose lets it slip.
- Is your temperature high enough? Bump up 5–10°C and retry.
- Are you on Bowden? Consider switching to direct drive or a short Bowden conversion.
Wrapping Up
Flexible filament jamming is one of those problems that seems mysterious at first but becomes predictable once you understand the mechanics. The filament is soft, it doesn’t like gaps, it doesn’t like pressure, and it doesn’t like speed. Give it a smooth, constrained path, gentle handling, and plenty of time, and it’ll reward you with prints that rigid filaments simply can’t match.
If you’re just getting started with flexible filament, begin with a shore 95A TPU on a direct drive printer at 20 mm/s. Get that working reliably before trying softer materials or pushing speeds. Build your settings profile step by step, and before long, flexible filament printing will feel as routine as PLA.