How to Remove 3D Printing Supports Cleanly (Without Ruining Your Print)
Support structures are a necessary evil in 3D printing. They enable complex geometries that would otherwise collapse during printing — but removing them cleanly without damaging your print is an art form that most guides gloss over with a casual “just snap them off.”
If you’ve ever ripped a chunk out of your print while removing supports, left ugly scars on a visible surface, or spent an hour with pliers trying to extract supports from tight spaces, this guide is for you. Here’s everything I’ve learned about clean support removal across thousands of prints.
Before Removal: Setting Yourself Up for Success
Clean support removal starts in the slicer, not at your workbench. The settings you choose before printing determine 80% of how easily supports come off afterward.
Support Interface Density
This is the most impactful setting for support removal. The interface is the layer where your support structure contacts your actual print. Higher density means a smoother surface on the overhang but harder removal. Lower density means easier removal but a rougher overhang surface.
For most prints, I set interface density to 60-75%. This provides enough contact for a decent overhang surface while leaving enough gaps for clean separation. If surface quality on the overhang doesn’t matter (it’s hidden or will be sanded), drop to 40-50% for effortless removal.
Z Distance (Gap Between Support and Print)
The Z distance setting controls the vertical gap between the top of the support and the bottom of your print’s overhang. Increasing this gap (even by 0.04-0.08mm beyond the default) makes supports dramatically easier to remove. The tradeoff is a slightly rougher overhang surface, since the first bridging layer has more space to sag before hitting the support.
My default: one layer height for the Z distance (so 0.2mm if printing at 0.2mm layer height). For easy removal on non-visible surfaces, I bump it to 1.5x layer height (0.3mm at 0.2mm layers).
Support Pattern
Different support patterns behave differently during removal:
Lines: The easiest to remove manually. Each line is relatively independent, so supports tend to peel away in strips rather than requiring brute force.
Zigzag: Connected lines that remove in larger sheets. Good for big flat overhangs where you want to pull the support off in one piece.
Grid: Stronger support but harder to remove. Each intersection creates a bonding point. I avoid grid pattern unless the overhang geometry specifically requires extra rigidity.
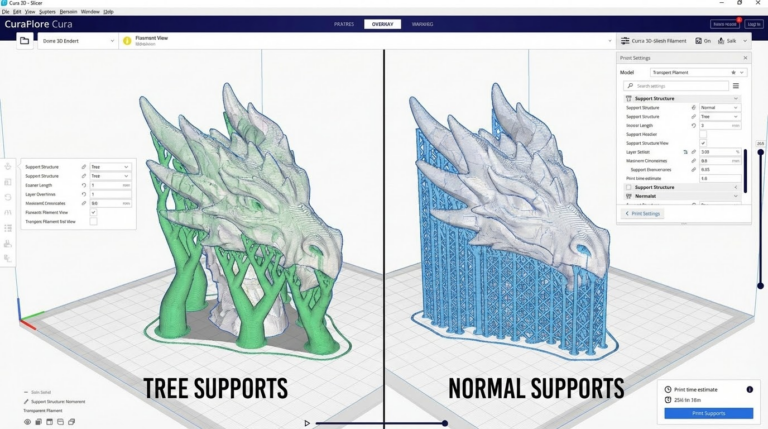
Tree (Cura) or Organic (PrusaSlicer): These deserve their own discussion — more on that later in this guide.

Essential Tools for Support Removal
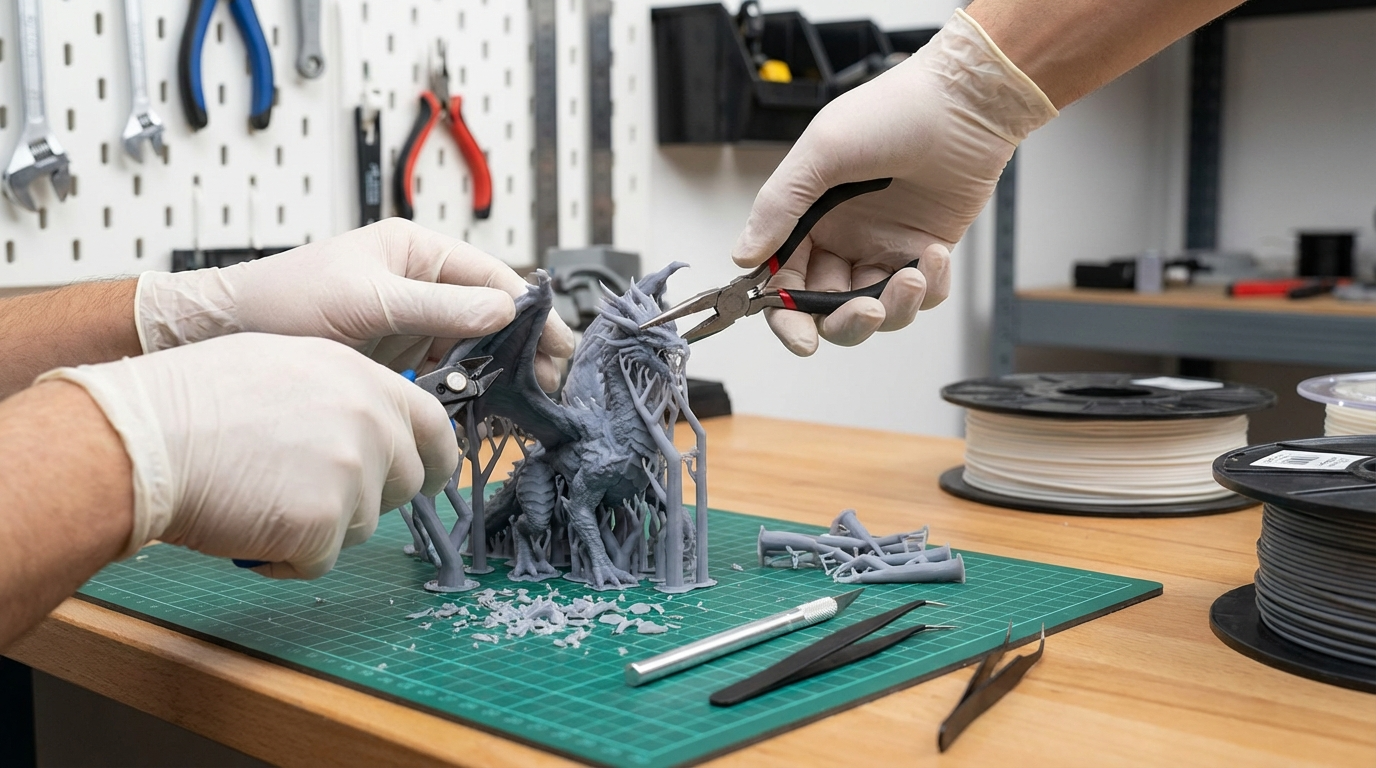
Having the right tools makes the difference between a frustrating 45-minute ordeal and a satisfying 5-minute cleanup. Here’s what I keep at my workstation:
Flush cutters: The single most important tool. Get a quality pair (Hakko CHP-170 or similar) with a flat cutting edge. You’ll use these to snip support contact points and trim remaining nubs. Cheap flush cutters crush instead of cutting, leaving ragged edges.
Needle-nose pliers: Essential for gripping support in tight spaces. Long, thin tips can reach into cavities and grab support material that fingers can’t reach. I prefer pliers with a slight curve at the tip.
Craft knife or X-Acto: For trimming support remnants flush with the print surface. A sharp blade cleanly shaves off nubs that cutters can’t reach. Keep spare blades on hand — a dull craft knife causes more damage than it prevents.
Dental picks: A set of dental picks or sculpting tools is invaluable for prying support away from surfaces and cleaning up detailed areas. The hook-shaped picks are particularly useful for getting under support edges.
Sandpaper (150-400 grit): For smoothing surfaces after support removal. Start with 150-220 grit to level obvious marks, then move to 320-400 for a cleaner finish. Wet sanding with 400 grit produces surprisingly good results on PLA.
The Removal Process: Step by Step
Step 1: Let the Print Cool
Patience. Let the print cool completely to room temperature before touching the supports. Warm PLA is more flexible, meaning supports are more likely to stretch and tear rather than snap cleanly. PETG is especially important to cool — warm PETG supports will pull strings and leave a mess.
Step 2: Identify Separation Points
Before you start pulling, examine your print and identify where supports connect. Look for:
The interface layer — that’s your separation target. You want to peel at this layer, not rip through the support body. The interface should be visible as a slightly different texture where support meets print.
Fragile areas of your print near support contact points. Plan your removal direction to pull force AWAY from thin walls, delicate features, or bridges.
Step 3: Start with Easy Sections
Remove the support structures that are barely touching the print first. These sections often just need a gentle twist or flex to pop free. This gives you better access to the trickier sections and reduces the overall mass of support material you’re wrestling with.
Step 4: Use the Wiggle Technique
For supports that don’t pop off easily, don’t just pull harder — wiggle. Grip the support with pliers near the interface point and rock it back and forth with small movements. This progressively breaks the contact points without applying enough force in any one direction to damage the print. Think of it like removing a loose tooth rather than yanking it out.
Step 5: Work from Bottom to Top
When removing tall support structures, start separating from the bottom. Break the support free from the build plate first, then work upward to where it contacts the print. This lets you use the entire support column as a lever, distributing force across a wider area rather than concentrating it at a single point.
Step 6: Trim and Clean
After removing the bulk of the support, use flush cutters to trim any remaining nubs flush with the surface. Then use a craft knife to carefully shave any bumps down to level. For curved surfaces, wrap sandpaper around a dowel or cylinder to match the contour.
Material-Specific Tips
PLA
PLA supports snap relatively cleanly due to the material’s brittleness. This is actually an advantage — supports break at the interface rather than stretching. Cooling the print in a freezer for 10-15 minutes can make PLA supports even more brittle and easier to snap off. Yes, this actually works.
PETG
PETG is the hardest common material for support removal. It’s stringy, flexible, and tends to weld slightly to the print surface. Increase your Z distance by 0.04-0.08mm beyond what you use for PLA. Reduce interface density to 50% or lower. And consider using a different interface material if your printer supports it — PVA (water-soluble) support with PETG is the gold standard for clean removal.
ABS
ABS supports remove similarly to PLA but with less brittleness. The acetone vapor smoothing trick works well here — a light acetone vapor exposure after support removal can smooth over minor scars. Just be careful not to over-smooth and lose detail.
TPU
Flexible material supports are a nightmare to remove by design — the material stretches instead of breaking. Best approach: maximize Z distance, minimize interface density, and use tree supports (which contact the print at fewer points). Some users print TPU with PLA supports using a dual-extruder setup, which makes removal trivial.
Advanced Techniques
Water-Soluble Supports (PVA, BVOH)
If you have a dual-extruder printer, water-soluble support material is the ultimate solution. Print your model in your primary material with PVA or BVOH supports, then drop the finished print in water. Supports dissolve completely in 12-24 hours, leaving a clean surface with zero manual removal needed.
Warm water (40-60°C) speeds up dissolution significantly. Adding a small amount of dish soap helps water penetrate the support structure. Change the water halfway through for faster results.
Breakaway Support Materials (HIPS)
HIPS (High Impact Polystyrene) dissolves in limonene, making it useful as a support material when printing ABS. The advantage over PVA: HIPS prints at similar temperatures to ABS, so the interface bond is more predictable. The disadvantage: limonene is slower than water and has a strong citrus odor.
Support Blocker Optimization
The best support to remove is the one you never printed. Most slicers allow you to place support blockers — regions where supports are prevented from generating. For prints with multiple overhangs of varying angles, use blockers to eliminate supports on overhangs under 45° (which bridge fine without support) and only allow supports on the truly critical sections.
This reduces removal time, saves material, and minimizes the surface area affected by support contact marks.
Post-Removal Surface Finishing
Even with perfect removal technique, supported surfaces will show some scarring. Here’s how to get them looking good:
Sanding progression: Start at 150 grit to remove major marks, move to 220, then 400. For a near-glossy finish on PLA, continue to 600 and 800 grit with wet sanding.
Heat treatment: A heat gun on low setting (held 6-8 inches away, keep moving) can smooth PLA surfaces slightly. Be extremely careful — PLA softens quickly and it’s easy to warp the print. Practice on scraps first.
Filler primer: For painted prints, automotive filler primer fills minor support scars in 2-3 coats. Sand between coats with 320 grit for a flawless painted surface.
UV resin coating: A thin layer of UV-curable resin, brushed on and cured with a UV lamp, can fill small imperfections and create a smooth, glossy surface. This works especially well for display pieces.
Wrapping Up
Clean support removal is a skill that improves with practice, but it also depends heavily on preparation. The right slicer settings — appropriate Z distance, interface density, and support pattern — do more for clean removal than any tool or technique at the workbench.
Start with your slicer settings, invest in quality flush cutters and pliers, practice the wiggle technique, and match your approach to your material. With time, support removal goes from the most frustrating part of 3D printing to just another quick step in the workflow.