How to Fix Inconsistent Extrusion in 3D Printing
How to Fix Inconsistent Extrusion in 3D Printing (Gaps, Thin Lines, and Random Weak Spots)
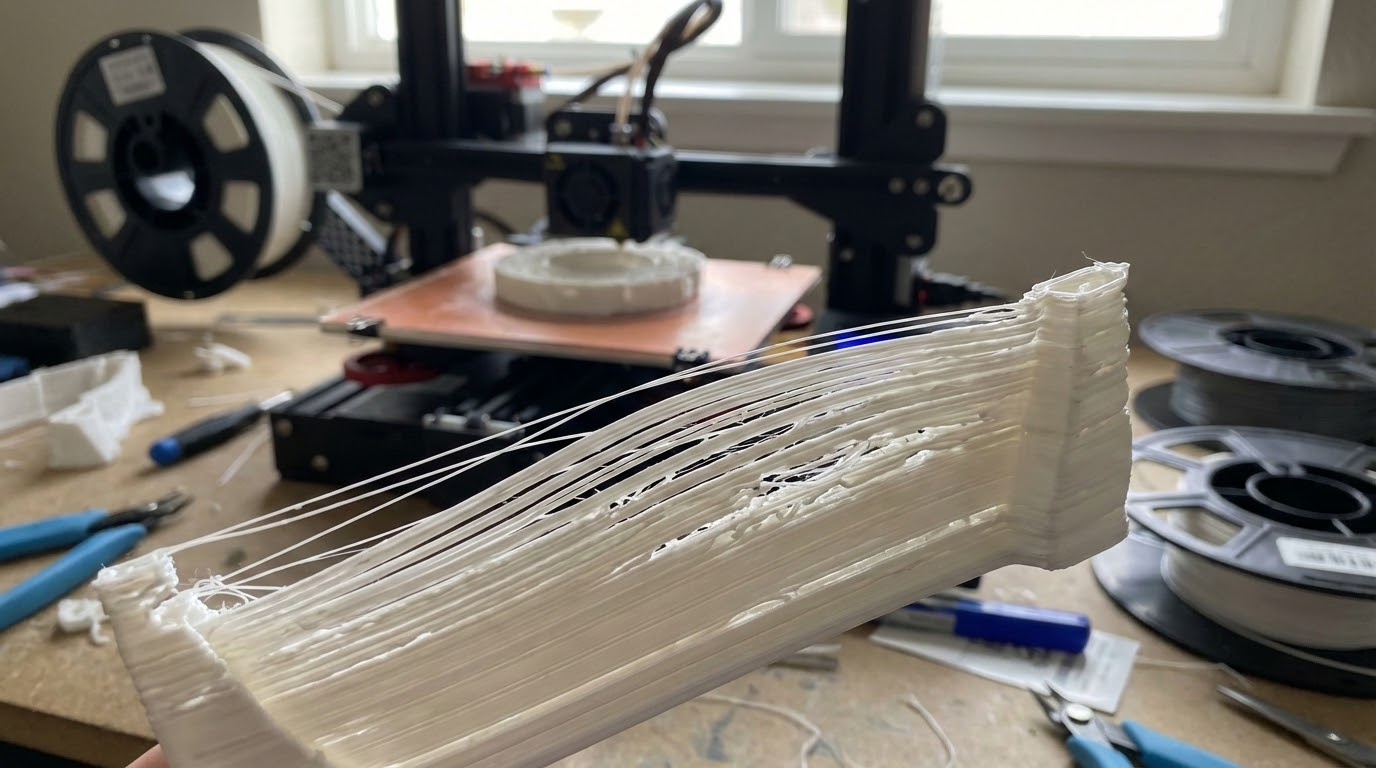
Inconsistent extrusion is one of those issues that ruins prints slowly. You’ll see thin lines, weak layers, or random gaps in walls—and it’s never the same place twice. I’m Mike Reynolds, and in my shop this problem almost always comes down to flow stability: something is changing the pressure inside the hotend as the print runs.
The fix isn’t one magic setting. It’s a set of checks that stabilize flow, from filament quality to hotend temperature to extruder mechanics. This guide walks through a full diagnostic, with practical settings you can apply today.
What Inconsistent Extrusion Looks Like
- Walls that are thin in some sections and thick in others
- Gaps between lines or between infill and perimeters
- Random under-extrusion that disappears after a few layers
- Surface texture that alternates smooth and rough
Step 1: Check Filament Quality and Diameter
Inconsistent filament diameter can cause inconsistent flow. Measure 5–10 spots on your spool:
- 1.75 mm filament should stay within ±0.05 mm.
- Anything outside that range can cause alternating over/under extrusion.
Also check for moisture. Wet filament causes popping, bubbles, and uneven extrusion. If you hear crackling or see steam, dry the spool.
Step 2: Stabilize Nozzle Temperature
A fluctuating hotend temperature causes viscosity changes in the plastic. That translates to inconsistent extrusion. Make sure your temperature is stable within ±2°C:
- Check that the thermistor is firmly seated.
- Run PID tuning if your printer allows it.
- Avoid excessive part cooling that chills the nozzle.
Step 3: Inspect the Extruder Drive System
Loose tension, worn gears, or a dirty drive gear all cause intermittent grip. Clean the gear, then set tension so the filament has light, even tooth marks. If the gear is shiny or rounded, replace it.
Step 4: Rule Out Partial Clogs
Partial clogs create uneven back pressure. They don’t always stop flow, but they make it inconsistent. Perform a cold pull and inspect the filament tip for debris. If you see dark chunks, clean or replace the nozzle.
Step 5: Tune Retraction and Flow Settings
Overly aggressive retraction can cause intermittent starvation. Start with these ranges:
- Direct drive: 0.8–1.5 mm, 25–35 mm/s
- Bowden: 4–6 mm, 25–40 mm/s
Also check your flow rate/extrusion multiplier. If it’s too low, your printer may under-extrude in thin sections.
Step 6: Verify Volumetric Flow Limits
If you’re printing too fast for your hotend, you’ll get random gaps. That’s the hotend running out of melt capacity. Reduce speed or layer height, or increase nozzle temp slightly.
Baseline Settings to Stabilize Extrusion
- PLA: 205–215°C, 35–50 mm/s
- PETG: 230–245°C, 30–45 mm/s
- ABS: 235–250°C, 35–50 mm/s
Common Causes in Order of Likelihood
- Partial clog or dirty nozzle
- Moist or inconsistent filament
- Temperature instability
- Extruder gear slipping
- Slicer asking for too much flow
Diagnostic Flow: Find the Root Cause Fast
Use this decision path to avoid random tinkering:
- Gaps appear from the first layer: Check flow rate and nozzle temp, then inspect filament diameter.
- Print starts fine then degrades: Suspect heat creep or a partial clog forming during the print.
- Only certain layers are thin: Inspect Z-axis motion for binding or missed steps.
- Only on small details: Your minimum layer time or cooling may be causing the nozzle to run too cool.
Calibrate E-Steps and Flow
If your extruder steps are off, flow will be inconsistent across prints. Do a basic E-steps calibration:
- Mark 120 mm on the filament above the extruder.
- Command 100 mm extrusion at slow speed.
- Measure what was actually fed.
- Adjust E-steps in firmware or via EEPROM.
After E-steps, tune flow/extrusion multiplier using a single-wall calibration cube. This ensures the slicer’s idea of flow matches reality.
Mechanical Issues That Mimic Extrusion Problems
Sometimes the extrusion looks inconsistent, but the true cause is mechanical:
- Loose belts: Can cause layer shifts that look like gaps.
- Z-axis binding: Makes layers uneven even when flow is steady.
- Wobble in the spool holder: Creates fluctuating drag and uneven feed.
Make sure the spool rotates smoothly with minimal resistance.
Preventive Maintenance to Keep Flow Stable
- Clean the drive gear monthly.
- Dry filament after long storage.
- Replace PTFE tubes that show discoloration or wear.
- Keep a spare nozzle for quick swaps.
Advanced Slicer Tweaks (When the Basics Are Solid)
If hardware checks out, these slicer adjustments can smooth flow:
- Enable pressure advance / linear advance. This compensates for pressure changes in the nozzle and reduces under-extrusion on corners.
- Reduce acceleration and jerk. Sudden changes in speed cause pressure swings inside the hotend.
- Use a smaller maximum volumetric flow. Many slicers allow a cap that prevents unrealistic speeds.
These tweaks don’t fix a clogged nozzle, but they do make a healthy system much more consistent.
Flow Test: The Fastest Reality Check
Run a simple extrusion test to validate flow stability:
- Heat the nozzle to printing temp.
- Extrude 100 mm at 5 mm/s.
- Watch the flow: it should be smooth and consistent.
If the flow sputters or pulses, the issue is mechanical or thermal, not slicer-related.
Material-Specific Notes
- PLA: Sensitive to moisture—drying often fixes random gaps.
- PETG: Stringing and heat creep can cause intermittent under-extrusion.
- ABS: Temperature instability shows up as alternating thick and thin lines.
Case Study: Random Gaps After Two Hours
I’ve seen many prints that start perfect and then suddenly develop gaps. The culprit is often a hotend fan that slows down as it warms up, causing heat creep. The fix: replace the fan or improve airflow, then reduce retraction a bit. The gaps disappear because the filament stops swelling in the heat break.
Quick FAQ
Can inconsistent extrusion be caused by a bad SD card? Rarely, but yes—corrupted gcode can cause strange flow behavior. If nothing else makes sense, try a different card.
Should I increase flow to hide gaps? Only after mechanical checks. Raising flow masks the symptom but can cause over-extrusion and dimensional errors.
What’s the fastest “first step”? Do a cold pull and dry the filament. If the problem persists, move to calibration.
Extended Checklist (Work Top to Bottom)
- Dry the filament and measure diameter.
- Clean or replace the nozzle.
- Check extruder gear tension and cleanliness.
- Verify PTFE tube seating and replace if worn.
- Run PID tuning for stable temperature.
- Reduce speed and retractions to confirm stability.
- Recalibrate E-steps and flow.
Once you finish that list, you’ve eliminated 95% of inconsistent extrusion causes. If the issue persists after that, it’s likely a deeper mechanical problem or a faulty hotend component.
Real-World Examples
Example 1: Thin walls on tall prints, but short prints are fine. This is often heat creep or a hotend fan that weakens over time. Replace the fan or improve airflow.
Example 2: Gaps appear only after a filament swap. That points to moisture or diameter variation in the new spool. Dry it and re-measure.
Example 3: Gaps appear only at corners. That’s pressure advance or acceleration causing pressure dips—reduce acceleration or enable linear advance.
Preventive Habits
- Store filament in sealed containers with desiccant.
- Clean the nozzle after abrasive filaments.
- Re-run PID tuning after hotend changes.
Calibration Tips That Smooth Flow
Run a temperature tower for each filament brand. You’ll often find that 5–10°C higher produces smoother, more consistent flow. Combine that with a slow first layer and stable cooling, and most inconsistent-extrusion cases disappear.
Storage and Handling Tips
Filament that sits on an open shelf often absorbs moisture. Even PLA can soften and expand slightly, which changes flow. Store spools in sealed bins with desiccant, and if you live in a humid area, dry them for a few hours before long prints. Consistent storage removes a huge variable from the extrusion system.
When to Replace Hotend Parts
If you’ve cleaned the nozzle multiple times and flow is still inconsistent, the heat break or PTFE liner may be damaged. Replacing those parts is inexpensive and often restores stable extrusion immediately.
If the printer has thousands of hours on it, a fresh nozzle and heat break can be the fastest “reset” for consistent flow.
It’s a cheap refresh compared to chasing random settings.
Once the hotend is clean and calibrated, consistent extrusion becomes the default again.
That’s the goal: predictable flow every time you hit print.
Consistency beats speed.
Final Thoughts
Inconsistent extrusion is frustrating because it’s not one single failure. Treat it like a stability issue: stabilize the filament, stabilize the temperature, stabilize the feed. Once those are steady, the extrusion becomes predictable again.
If you only do one thing, clean the nozzle and dry the filament. Those two steps solve more inconsistent-extrusion cases than any fancy slicer tweak.
When you’ve solved it, lock in the profile and write down the successful settings. It saves you hours the next time a spool behaves differently.