Best 3D Printers for Cosplay Props and Armor in 2026
Why 3D Printing Is a Cosplayer’s Best Friend
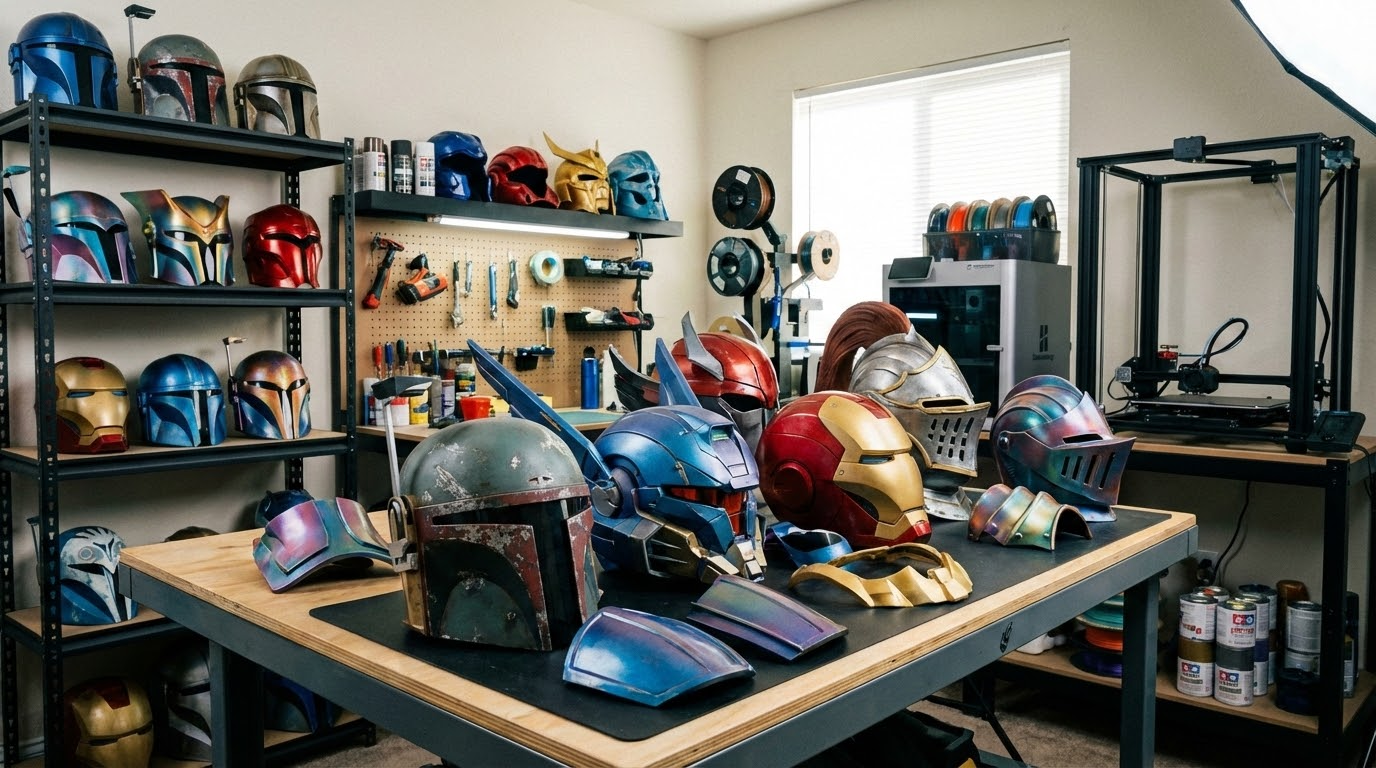
Cosplay used to mean foam, fiberglass, and a whole lot of Bondo. You’d spend weeks sculpting a helmet by hand, sanding until your fingers went numb, and hoping the symmetry was close enough. 3D printing flipped that equation entirely. Download or design your file, hit print, and get a perfectly symmetrical, dimensionally accurate part every time. The catch? You need to know which printer, settings, and techniques actually work for cosplay — because not all 3D printers are created equal for this job.
After years of printing helmets, armor pieces, weapons, and accessories for conventions, I’ve developed strong opinions about what works and what wastes your time and filament. This guide covers the best printers, materials, settings, and post-processing techniques for cosplay props in 2026.
Best 3D Printers for Cosplay Props
Bambu Lab A1 (Best Overall — $299)
The A1 hits the sweet spot for cosplay work. It’s fast enough to print a full helmet in 8-12 hours instead of 30+, accurate enough for clean surfaces, and the 256×256×256mm build volume handles most armor panels without splitting. The automatic calibration means zero fiddling — unbox, load filament, start printing. For cosplayers who want results without becoming 3D printing engineers, this is the one.
The speed matters more than you’d think. A Mandalorian helmet at 0.2mm layer height on an older printer takes 35-40 hours. On the A1 at 200mm/s? About 10-12 hours. When you’re printing a full suit with 20+ pieces, that time difference is measured in weeks.
Creality K1 Max (Best Large Format — $499)
With a 300×300×300mm build volume, the K1 Max prints larger pieces without splitting. Full chest plates, oversized helmets, and shield halves come out in one piece. The enclosed chamber also helps with ABS and ASA printing — materials that are superior to PLA for props that need to survive convention heat.
Elegoo Neptune 4 Pro (Budget Pick — $199)
If you’re starting out and don’t want to invest heavily, the Neptune 4 Pro delivers surprisingly good results for cosplay at half the price of premium options. The Klipper firmware gives it respectable speeds, and the 225×225×265mm volume handles most individual armor pieces.
Bambu Lab P1S (Premium Pick — $599)
The enclosed design makes it ideal for ABS and ASA filaments, which are far more durable and heat-resistant than PLA. If you’re building props meant to last years and survive hot convention halls, the P1S with ASA filament produces professional-grade results. The AMS (automatic material system) also enables multi-color prints without manual filament changes.
What About Resin Printers?
Resin printers (SLA/MSLA) produce incredible surface detail — perfect for small accessories, jewelry, and fine-detail parts. But for full armor and helmets? Not practical. Build volumes are too small, resin is brittle, and post-processing (washing, curing) adds significant steps. Use a resin printer for small detail pieces and an FDM printer for structural components. That combination is unbeatable.
Best Filaments for Cosplay
PLA (Easy Mode)
PLA is where most cosplayers start, and honestly, it works fine for a lot of props. Easy to print, no heated enclosure needed, minimal warping, and it sands well. The downside: PLA softens around 55-60°C. Leave a PLA helmet in a hot car or wear it at an outdoor summer convention and you might end up with a modern art piece instead of armor.
Best for: Indoor conventions, weapons, accessories, first-time builds.
PETG (The Middle Ground)
PETG bridges the gap between PLA’s printability and ABS’s durability. It handles temperatures up to about 75°C, has some flexibility (less likely to shatter on impact), and prints reasonably well on most machines. The downside is stringing — PETG loves to leave tiny hairs everywhere, which means more cleanup.
Best for: Armor that needs some impact resistance, pieces worn in warmer conditions.
ABS/ASA (The Pro Choice)
ABS and ASA are the materials serious cosplayers gravitate toward. Heat resistance above 90°C means no convention meltdowns. Both acetone-smooth beautifully — dip or vapor-bath your pieces and layer lines vanish, leaving a surface that looks injection-molded. ASA is the better choice of the two; it’s UV-stable (won’t yellow in sunlight) and slightly easier to print than ABS.
Best for: Outdoor props, armor that needs durability, pieces you want to acetone-smooth.
Nylon (Functional Parts)
For hinges, clips, mechanical joints, and anything that needs to flex repeatedly without breaking, nylon is unmatched. It’s tough, flexible, and wear-resistant. But it’s also hygroscopic (absorbs moisture from air) and difficult to print, requiring a dry box and enclosed printer. Use nylon for functional components, not surface pieces.
Optimal Print Settings for Cosplay
Cosplay prints have different priorities than typical 3D prints. You want decent surface quality, strong layer adhesion, and reasonable print times — but you don’t need dimensional precision down to hundredths of a millimeter.
- Layer height: 0.2mm for most pieces. Use 0.12mm for detail areas like face plates. Never go above 0.28mm — layer lines become too visible even after sanding.
- Walls: 3-4 perimeters minimum. This gives structural strength and a thicker shell for sanding without breaking through. For armor that takes impacts, go to 5 walls.
- Infill: 10-15% gyroid or cubic for worn armor (keeps weight down). 20-25% for handheld weapons that need rigidity. Higher infill adds weight you’ll carry all day.
- Top/bottom layers: 5-6 minimum. Thin top layers show infill pattern underneath, which looks terrible on visible surfaces.
- Speed: Surface quality matters, so slow down outer walls to 40-60mm/s even on fast printers. Inner walls and infill can run at full speed.
- Supports: Tree supports save massive post-processing time. They break away cleaner than grid supports and leave fewer marks on visible surfaces.
Splitting Large Models for Printing
Most cosplay pieces are bigger than your printer’s build volume. A full Stormtrooper helmet is roughly 280mm tall — too big for many printers. The solution is splitting the model into printable pieces and joining them after.
Software for splitting: Meshmixer (free), Lychee Slicer, or 3D Builder (Windows built-in). Some model designers pre-split files with alignment pins, which saves you the trouble.
Joining methods, ranked by strength:
- CA glue + baking soda: Instant bond, fills small gaps, sands well. The baking soda acts as an accelerator and filler. This is my go-to for most joints.
- Epoxy: Strongest bond, bridges larger gaps. Longer cure time (5-30 minutes depending on type) but forms a nearly indestructible joint.
- Solvent welding: For ABS/ASA — acetone literally melts the pieces into each other. Strongest possible joint since it becomes one continuous piece of plastic.
- Friction welding: A piece of filament in a rotary tool spun against the seam melts and fuses the joint. Messy but effective for large, non-visible seams.
Always add alignment keys (dowel holes or interlocking features) to your splits. Trying to align two halves of a helmet by eye while glue sets is a recipe for a crooked prop.
Post-Processing: From Printed to Professional
Raw 3D prints look like 3D prints — visible layer lines, slight imperfections, and that unmistakable “printed” texture. Post-processing transforms them into props that look manufactured.
Step 1: Fill and Sand
Apply automotive spot putty (Bondo Spot Putty or equivalent) to layer lines and imperfections. Let it cure 15-30 minutes, then sand with 120-grit to remove bulk material. Follow with 220-grit, then 400-grit. For a truly smooth surface, finish with 600-grit wet sanding.
For ABS and ASA, acetone vapor smoothing is faster — hang the piece in a sealed container with a small amount of acetone, and the vapor melts the outer surface smooth. This method eliminates layer lines without any sanding but rounds sharp edges slightly.
Step 2: Prime
Filler primer (Rust-Oleum Filler Primer is the community standard) reveals imperfections you missed and provides a uniform base for paint. Apply 2-3 light coats. Sand between coats with 400-grit if you spot remaining defects.
Step 3: Paint
Spray paint in light, even coats. Metallic finishes look incredible on armor — Rust-Oleum Bright Coat Chrome followed by a candy-color clear coat creates stunning metallic effects. For weathering, dry-brush silver or gunmetal on edges to simulate wear.
If you’re painting a helmet or full suit, invest in an airbrush ($30-50 for a starter kit). The control and finish quality far exceeds rattle cans, especially for gradients and detail work.
Step 4: Clear Coat
Protect everything with 2-3 coats of clear coat. Matte clear for battle-worn looks, gloss for clean armor, satin for a natural middle ground. This protects the paint from handling and adds durability.
Where to Find Cosplay 3D Models
- MyMiniFactory: Large collection of cosplay-specific models, many designed for FDM printing with proper splitting and support considerations.
- Thingiverse: Free but quality varies wildly. Always check comments and makes before committing to a long print.
- Cults3D: Mix of free and paid models. Many professional cosplay designers sell here.
- Etsy: Search for STL files. Many independent designers sell complete cosplay kits with detailed print and assembly instructions.
- Do Agimus / Nikko Industries / Galactic Armory: Premium cosplay-specific designers known for excellent file quality, clear instructions, and print-optimized designs.
Weight Management Tips
A full 3D printed armor set can easily weigh 5-10kg, which gets exhausting at a full-day convention. Here’s how to keep it manageable:
- Use 10% gyroid infill instead of 20%+ for worn pieces — the weight difference is significant.
- Print thin walls (1.2-1.6mm) for decorative pieces that don’t take impacts.
- Use hollow prints with only 2 walls for shoulder and forearm pieces.
- Consider EVA foam for body-conforming pieces (chest, back) and 3D print only the hard armor panels and helmets.
- Line the interior with EVA foam strips for padding — this also absorbs sweat and makes wearing more comfortable.
Final Thoughts
3D printing hasn’t just changed cosplay — it’s democratized it. Props that used to require a workshop full of tools and years of fabrication experience now need a $300 printer and some patience. The learning curve is real, but it’s shorter than learning traditional prop-making, and the results are more consistent.
Start with a simple prop — a blaster, a mask, or a single armor piece. Learn the workflow of printing, splitting, joining, filling, sanding, priming, and painting on something small before committing to a full suit. Once you’ve done one piece from start to finish, you’ll have the confidence and skills to tackle anything.
And honestly? That first time you walk into a convention wearing armor you printed yourself? Nothing beats that feeling.