How to Calibrate PID Tuning on Your 3D Printer: Hotend and Bed Guide
What Is PID Tuning and Why Does It Matter?
If your 3D printer’s temperature fluctuates wildly during prints, you’re likely dealing with poorly tuned PID settings. PID (Proportional-Integral-Derivative) tuning is the process of calibrating your printer’s heating system so it reaches and maintains target temperatures with minimal overshoot and oscillation.
Think of it like cruise control for your car. Without proper tuning, your printer constantly overshoots the target temperature, drops below it, then overshoots again. This cycle creates visible artifacts in your prints — inconsistent extrusion, blobbing, and poor layer adhesion. A well-tuned PID controller holds temperature within ±1°C of your target, giving you cleaner, more consistent results.
Understanding PID Parameters
Before diving into the calibration process, let’s break down what each PID parameter actually controls:
P (Proportional): This is the main correction force. It looks at how far the current temperature is from the target and applies a proportional amount of heating power. A higher P value means more aggressive correction, but too high causes oscillation.
I (Integral): This accounts for accumulated error over time. If your temperature consistently sits slightly below target, the integral term gradually increases power to compensate. It eliminates steady-state error but can cause overshoot if set too high.
D (Derivative): This predicts future error by looking at the rate of temperature change. When temperature is rising quickly toward the target, the derivative term reduces power early to prevent overshoot. It acts as a dampener on the system.
Together, these three values create a feedback loop that keeps your hotend and heated bed at precisely the right temperature throughout your entire print.
When Should You Run PID Tuning?
You don’t need to tune PID every week, but certain situations call for recalibration:
- After installing a new hotend or heating element — Different heaters have different thermal characteristics
- When switching to a significantly different printing temperature — PID values optimized for 200°C may not work well at 260°C
- After replacing your thermistor — Even the same model can have slightly different readings
- If you notice temperature fluctuations on your display — Swinging more than ±3°C indicates poor tuning
- When you upgrade your cooling setup — A new part cooling fan can affect hotend stability
- After firmware updates — Some updates may reset PID values to defaults
How to Run PID Tuning on Marlin Firmware
Most consumer 3D printers run Marlin firmware, which has built-in PID autotune functionality. Here’s the step-by-step process:
Hotend PID Tuning
Step 1: Connect to your printer via a terminal program like Pronterface, OctoPrint, or your printer’s built-in terminal. You need to send G-code commands directly.
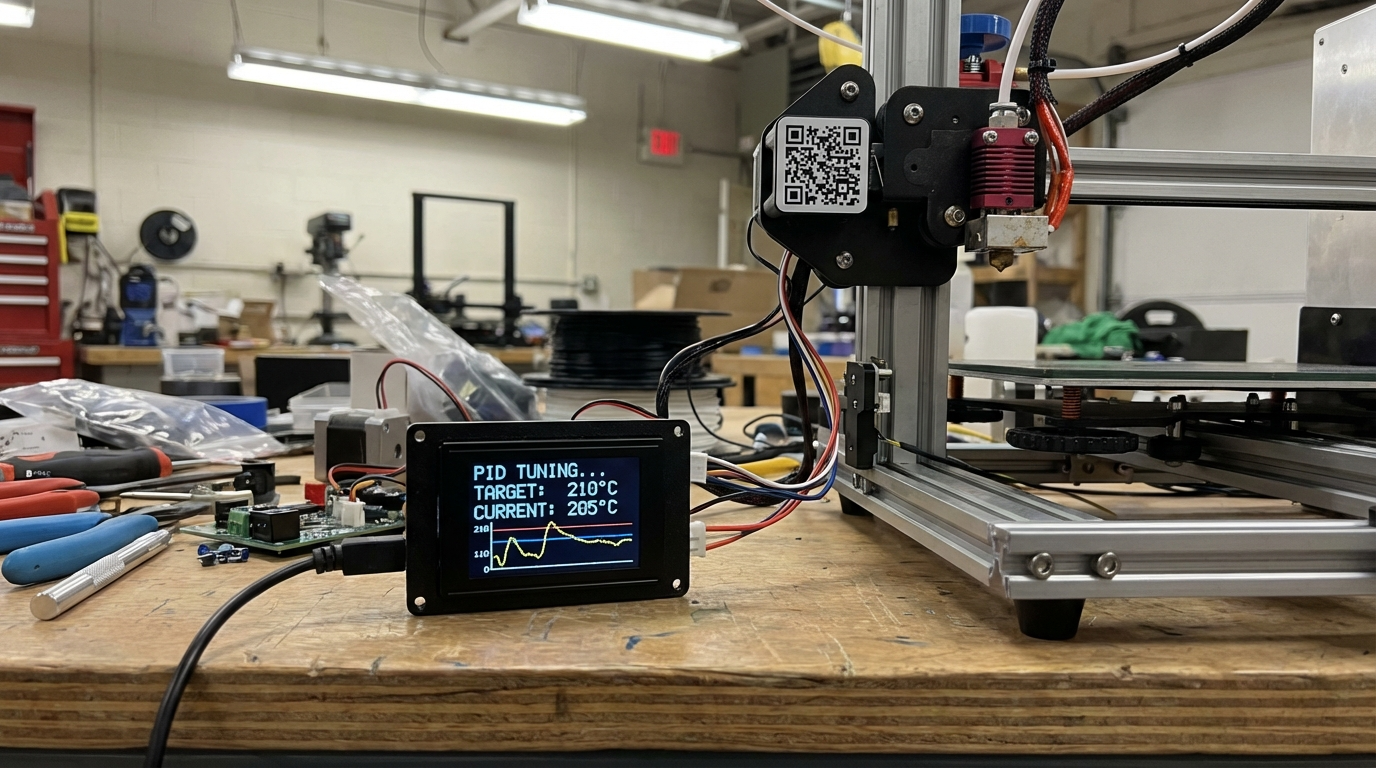
Step 2: Send the autotune command. For a target temperature of 210°C (typical for PLA), enter:
M303 E0 S210 C8Breaking this down: M303 initiates PID autotune, E0 selects the first extruder, S210 sets the target temperature, and C8 runs 8 heating cycles for more accurate results. More cycles mean better accuracy — I recommend at least 8.
Step 3: Wait for the process to complete. Your printer will heat up and cool down multiple times. This typically takes 3-5 minutes. Don’t touch anything during this process.
Step 4: Once finished, Marlin will output three values — Kp, Ki, and Kd. They’ll look something like:
Recv: PID Autotune finished! Put the last Kp, Ki and Kd constants from below into Configuration.h
Recv: #define DEFAULT_Kp 22.20
Recv: #define DEFAULT_Ki 1.08
Recv: #define DEFAULT_Kd 114.00
Step 5: Apply these values immediately with:
M301 P22.20 I1.08 D114.00Step 6: Save to EEPROM so the values persist after power cycling:
M500Heated Bed PID Tuning
The process for your heated bed is nearly identical, but uses E-1 to select the bed instead of the extruder:
M303 E-1 S60 C8After getting the results, apply them with M304 instead of M301:
M304 P100.00 I2.50 D350.00
M500
Bed PID tuning takes longer because heated beds have much more thermal mass. Expect 10-15 minutes for 8 cycles. Be patient — the results are worth it.
PID Tuning on Klipper Firmware
If you’re running Klipper, the process is different but equally straightforward. Klipper uses the Mainsail or Fluidd web interface for configuration.
For the hotend:
PID_CALIBRATE HEATER=extruder TARGET=210For the heated bed:
PID_CALIBRATE HEATER=heater_bed TARGET=60After calibration completes, Klipper will display the new PID values and prompt you to save. Run:
SAVE_CONFIGThis writes the values directly to your printer.cfg file and restarts the firmware. No need to manually enter values — Klipper handles everything automatically.
One advantage of Klipper’s PID tuning is that it performs the calibration with your part cooling fan running at the speed you specify, giving you values that account for real-world printing conditions. You can add WRITE_FILE=1 to output a detailed temperature log for analysis.
Advanced PID Tuning Tips
Basic autotune gets you 90% of the way there, but these tips will help you dial in that last 10%:
Tune at Your Most-Used Temperature
PID values are somewhat temperature-dependent. If you mostly print PLA at 200-215°C, tune at 210°C. If you frequently print PETG at 230-250°C, consider running separate tuning sessions and switching values when you change materials. Some firmware versions support temperature-dependent PID values automatically.
Account for Your Enclosure
If you print inside an enclosure, run PID tuning with the enclosure closed and pre-warmed. The ambient temperature inside an enclosure significantly affects how your hotend and bed behave. Values tuned in open air won’t be optimal for enclosed printing.
Check Your Wiring First
Before blaming PID tuning for temperature instability, check your wiring. Loose connections on heater cartridges or thermistors cause intermittent temperature readings that no amount of PID tuning can fix. Wiggle the wires while watching the temperature readout — if it jumps around, you have a wiring issue, not a PID issue.
Troubleshooting Common PID Issues
Temperature Still Oscillates After Tuning
If your temperature swings more than ±2°C after PID tuning, try running the autotune with more cycles (C12 or even C16). You can also try manually adjusting the D term slightly higher, which increases the dampening effect and reduces oscillation.
Thermal Runaway Errors After PID Change
Aggressive PID values can sometimes trigger thermal runaway protection. This usually means your P value is too low — the heater can’t reach the target temperature fast enough and the firmware thinks something is wrong. Run autotune again or slightly increase the P value.
Different Results Each Time You Tune
External factors like room temperature, airflow, and fan speeds affect PID tuning results. For the most consistent results, tune with your part cooling fan at the speed you’ll actually use during printing, in the location where the printer normally sits, with minimal drafts.
Bed Temperature Overshoots Significantly
Heated beds have high thermal inertia, meaning they’re slow to heat up and slow to cool down. If your bed consistently overshoots by more than 5°C during initial heating, try enabling PID control instead of bang-bang mode (if your firmware defaults to bang-bang for the bed). In Marlin, check that PIDTEMPBED is defined in Configuration.h.
Verifying Your PID Calibration
After applying new PID values, you should verify they’re actually working well. Here’s how:
- Set your hotend to your target temperature and watch the temperature graph in your slicer or OctoPrint
- The temperature should reach the target with minimal overshoot (less than 3°C)
- Once stable, the reading should stay within ±1°C of the target
- Turn on your part cooling fan at 100% — the temperature should recover quickly with minimal dip
- Start a test print and monitor temperature throughout the first few layers
If your printer passes all five checks, your PID tuning is dialed in. If not, run the autotune again with the fan running at your typical print speed, as the fan’s cooling effect is a major variable.
PID Tuning Quick Reference Table
Here’s a handy reference for the most common PID tuning commands across different firmware:
| Action | Marlin Command | Klipper Command |
|---|---|---|
| Hotend Autotune | M303 E0 S210 C8 | PID_CALIBRATE HEATER=extruder TARGET=210 |
| Bed Autotune | M303 E-1 S60 C8 | PID_CALIBRATE HEATER=heater_bed TARGET=60 |
| Apply Hotend PID | M301 P__ I__ D__ | Automatic after SAVE_CONFIG |
| Apply Bed PID | M304 P__ I__ D__ | Automatic after SAVE_CONFIG |
| Save to EEPROM | M500 | SAVE_CONFIG |
| Read Current PID | M503 | Check printer.cfg |
Final Thoughts
PID tuning is one of those calibrations that takes five minutes but pays dividends on every single print afterward. If you’ve never tuned your PID values — or if you tuned them once a year ago and have since upgraded components — it’s time to revisit this fundamental calibration step. Your prints will thank you with better layer consistency, fewer surface artifacts, and more reliable results across different materials and temperatures.
Remember: PID tuning isn’t a one-time thing. Every significant hardware change warrants a fresh calibration. Build it into your maintenance routine alongside nozzle cleaning, belt tensioning, and lubrication, and you’ll consistently get the best possible results from your printer.