Best Settings for 3D Printing Miniatures on FDM Printers
Why FDM Miniatures Are Challenging
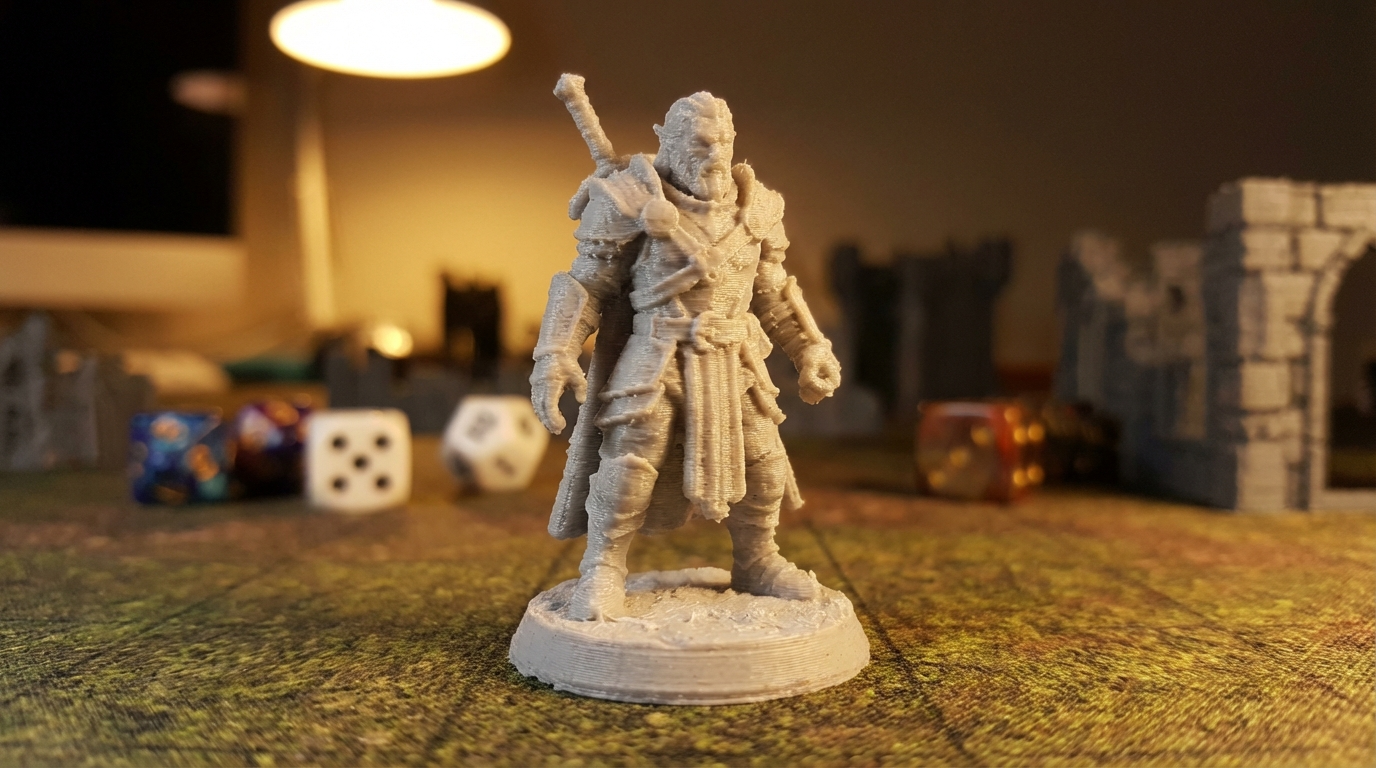
Printing miniatures on an FDM 3D printer is one of the most demanding tasks you can throw at a filament-based machine. You’re asking a technology designed for functional parts and large models to produce tiny, intricate details — often at scales where every fraction of a millimeter matters.
The challenges are real: layer lines become visible at small scales, fine details like facial features and weapon tips can blob or disappear entirely, and supports can leave marks that are nearly impossible to clean up on a 28mm figure. But with the right settings and techniques, you can get surprisingly impressive results from even a budget FDM printer.
I’ve printed hundreds of miniatures on FDM machines over the past few years, and I’ve dialed in a reliable process that consistently delivers tabletop-quality results. Here’s everything I’ve learned.
Essential Slicer Settings for Miniature Printing
Layer Height: The Foundation of Detail
Layer height is the single most important setting for miniature quality. For standard 28-32mm tabletop miniatures, you want the thinnest layers your printer can reliably produce:
- 0.08mm (80 microns) — The gold standard for FDM miniatures. Most printers with a 0.4mm nozzle can handle this reliably. Layer lines become nearly invisible after priming and painting.
- 0.12mm (120 microns) — A good compromise between quality and speed. Layer lines are visible up close but disappear at arm’s length on a painted mini.
- 0.04mm (40 microns) — Technically possible but rarely worth it. Print times double compared to 0.08mm, and the quality improvement is marginal. Adhesion issues also become more common.
My recommendation: stick with 0.08mm for display-quality minis and 0.12mm for game pieces you need in bulk. The time difference is significant — a mini that takes 3 hours at 0.08mm might take only 1.5 hours at 0.12mm.
Nozzle Size Matters More Than You Think
While most printers come with a 0.4mm nozzle, switching to a smaller nozzle transforms your miniature output:
- 0.4mm nozzle — Can print decent minis but struggles with fine details. Thin swords, staffs, and fingers often don’t resolve properly.
- 0.3mm nozzle — The sweet spot for miniatures. Noticeably better detail resolution without extreme print time penalties.
- 0.2mm nozzle — Maximum detail but significantly slower, prone to clogging, and requires very precise calibration. Best for showcase pieces.
When using a smaller nozzle, remember to adjust your line width accordingly. A good starting point is 100-120% of your nozzle diameter. For a 0.3mm nozzle, set your line width to 0.3-0.36mm.
Print Speed: Slow Down for Quality
Speed is the enemy of detail in miniature printing. Here are the speeds I use consistently:
- Outer walls: 20-25mm/s — This is critical. Faster outer walls mean more ringing, worse corners, and lost detail.
- Inner walls: 30-40mm/s — Can be slightly faster since they’re not visible.
- Infill: 40-60mm/s — Minis need very little infill, so this barely affects total time.
- Top/bottom: 20-25mm/s — Keep these slow for clean top surfaces.
- Travel speed: 120-150mm/s — Keep travel fast to minimize oozing during non-print moves.
- First layer: 15mm/s — Ensure solid adhesion at the base.
Walls and Infill for Miniatures
Miniatures are small enough that wall settings matter more than infill:
- Wall count: 3-4 walls minimum. On small models, most of the volume IS walls. More walls mean stronger thin features.
- Infill: 10-15% is plenty. At this scale, infill barely contributes to strength. Gyroid or cubic work well.
- Top layers: 5-6 layers to ensure smooth top surfaces on flat areas like bases.
- Bottom layers: 4-5 layers for a solid foundation.
Temperature and Cooling Settings
Hotend Temperature
For PLA miniatures (which is what most people print), I recommend printing 5-10°C cooler than your normal temperature:
- Standard PLA: 195-205°C (versus typical 210-215°C)
- PLA+: 200-210°C
Lower temperatures reduce oozing and stringing, which is critical on miniatures where even tiny strings between a character’s arm and body ruin the look. The reduced flow from lower temperatures also helps with fine detail resolution.
Cooling Is Everything
Maximum cooling is non-negotiable for miniatures. Set your part cooling fan to 100% after the first 2-3 layers and leave it there. On small features like arms, weapons, and horns, the plastic needs to solidify almost instantly to maintain shape.
If your printer’s stock cooling isn’t cutting it, a fan duct upgrade like the Hero Me or Satsana is one of the best modifications you can make for miniature printing. Better cooling means sharper details, cleaner overhangs, and less drooping on small features.
Supports: The Make-or-Break Factor
Support strategy can determine whether your miniature comes out clean or covered in scars. Here’s what works:
Tree Supports Are Your Best Friend
If your slicer supports tree supports (Cura, OrcaSlicer, PrusaSlicer 2.7+), use them exclusively for miniatures. Tree supports offer several advantages:
- They touch the model at fewer points, reducing surface damage
- They wrap around complex geometry more efficiently
- They’re easier to remove without tools
- They use less material than traditional supports
Support Settings for Clean Removal
- Support Z distance: 0.15-0.2mm — Slightly more than one layer height to ensure easy separation.
- Support X/Y distance: 0.5-0.7mm — Enough gap to prevent bonding to the model.
- Support density: 5-10% for tree supports, 15-20% for normal supports.
- Support interface layers: 2-3 layers with 80-90% density for a smooth contact surface.
- Overhang angle: 45-50° — Support anything steeper than this.
Orientation Matters
Before adding supports, consider rotating your model. A miniature printed straight up might need supports under both arms, the chin, any weapons, and cape details. Tilt it back 15-30° and suddenly the arms and chin print as overhangs that don’t need support, while only the back of the cape needs supporting — a much less visible area.
For each miniature, I try 3-4 orientations in the slicer to find the one that minimizes support contact on visible surfaces. Five minutes of experimentation saves thirty minutes of post-processing.
Retraction and Stringing Prevention
Stringing is the number one cosmetic issue on FDM miniatures. Those tiny wisps of filament between features are nearly invisible on large prints but devastate the look of a 28mm figure.
- Retraction distance: 5-6mm for Bowden, 1-2mm for direct drive
- Retraction speed: 40-50mm/s
- Combing mode: “Within infill” — Prevents the nozzle from crossing open areas
- Z-hop: 0.2mm — Lifts the nozzle during travel to avoid hitting small features
- Wipe distance: 2-3mm — Wipes the nozzle at the end of each extrusion line
- Minimum travel distance for retraction: 1.5mm — Retract on even short moves
If you’re still seeing stringing after dialing in these settings, try drying your filament. Moisture in PLA causes micro-bubbles that create fine strings even with perfect retraction settings.
Post-Processing Your FDM Miniatures
Even with perfect settings, FDM miniatures benefit enormously from basic post-processing:
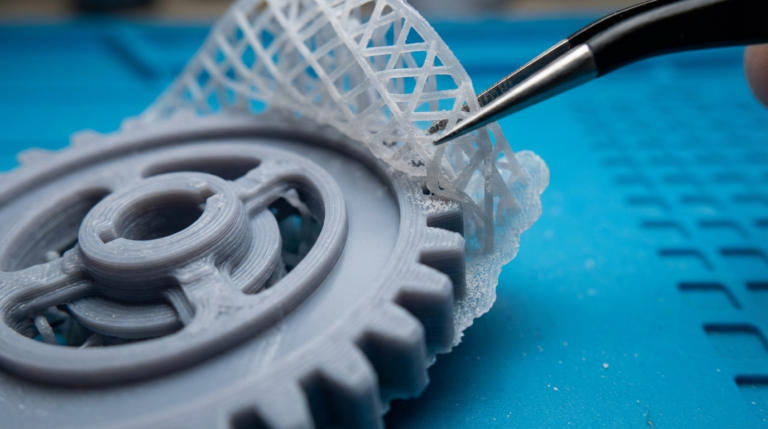
Support Removal
Use flush cutters to snip supports at the contact point, then clean up any remaining nibs with a hobby knife or fine sandpaper (400+ grit). Work slowly and carefully — it’s easy to gouge soft PLA.
Priming Is Mandatory
A coat of spray primer (I use Vallejo Surface Primer or cheap automotive primer) does two things: it reveals any defects you missed, and it fills in minor layer lines. A good primer can make a 0.12mm print look like it was printed at 0.08mm. Apply 2-3 thin coats, letting each dry completely.
Gap Filling
For any remaining visible layer lines or support scars, thin superglue or modeling putty works wonders. Apply a tiny amount, let it cure, and sand smooth. This step is optional for game pieces but essential for display-quality minis.
Best Filament for Miniatures
Not all PLA is created equal when it comes to miniatures:
- Standard PLA — Works well for most minis. Stick with reputable brands like Hatchbox, eSun, or Polymaker for consistent diameter and minimal stringing.
- PLA+ — Slightly tougher than standard PLA, which helps with thin features that might snap during support removal.
- Matte PLA — Excellent for minis because the matte surface hides layer lines and takes primer and paint beautifully.
- Avoid silk/shiny PLA — The additives that create the shine also increase stringing and reduce detail sharpness.
My Go-To Profile for 28mm Miniatures
Here’s a summary of the complete profile I use for almost all my FDM miniatures on a standard Cartesian printer with a 0.3mm nozzle:
| Setting | Value |
|---|---|
| Layer height | 0.08mm |
| Line width | 0.32mm |
| Nozzle | 0.3mm |
| Walls | 4 |
| Infill | 10% gyroid |
| Print speed (outer wall) | 20mm/s |
| Temperature | 200°C |
| Bed | 60°C |
| Fan | 100% after layer 3 |
| Retraction | 1.5mm @ 45mm/s (direct drive) |
| Supports | Tree, 45° threshold |
Final Tips for Better FDM Miniatures
- Print a test mini first — Before committing to a full army, print one test figure and tweak settings based on the results.
- Batch similar minis — Printing 3-4 minis at once gives each one more cooling time between layers.
- Calibrate your printer first — E-steps, flow rate, and bed leveling should all be dialed in before attempting miniatures.
- Consider model choice — Some miniature STLs are designed for resin printers with impossibly thin features. Look for models specifically designed or tested for FDM.
- Embrace the learning curve — Your first few minis won’t be perfect. Compare against resin output and you’ll always be disappointed. Compare against your own progress and you’ll be amazed at how quickly you improve.
FDM miniature printing isn’t a resin replacement, but for tabletop gaming, D&D campaigns, and display pieces viewed from normal distances, a well-tuned FDM printer produces results that are more than good enough — and at a fraction of the per-unit cost of resin printing.