3D Printer Belt Tension: How to Calibrate and Adjust for Perfect Prints
Why Belt Tension Is Critical for Print Quality
Your 3D printer’s motion system is only as good as the belts driving it. Too loose, and you’ll see ringing, ghosting, and dimensional inaccuracy. Too tight, and you’ll wear out bearings, strain stepper motors, and introduce a different kind of artifact. Getting belt tension right is one of those fundamental calibrations that separates decent prints from great ones.
In this guide, I’ll explain how to diagnose belt tension problems, the correct way to tension your belts, and how to maintain consistent tension over time.
Signs Your Belts Need Attention
Belt tension issues manifest in very specific ways. Learn to read these symptoms and you’ll save hours of troubleshooting other settings that aren’t the problem:
Loose Belt Symptoms
- Ringing or ghosting: Visible ripple patterns on flat surfaces, especially after sharp direction changes
- Layer shifting: Sudden offsets in the print where layers don’t align (though this can have other causes)
- Rounded corners: Sharp corners in your design come out soft and rounded
- Inconsistent dimensions: Parts are slightly different sizes depending on direction of travel
- Visible backlash: If you can push the print head sideways by hand and feel play, the belt is too loose
- Audible difference: A loose belt makes a lower-pitched thud when plucked, while a properly tensioned one makes a higher-pitched twang
Over-Tensioned Belt Symptoms
- Motor whining: Stepper motors make louder, higher-pitched noises during movement
- Excessive heat: Stepper motors and drivers run hotter than normal
- Premature bearing wear: Linear bearings develop play sooner than expected
- Belt teeth wearing: The toothed side of the belt shows visible wear or fraying
- Skipped steps: Motors skip steps under load because they’re fighting excessive belt tension
Understanding GT2 Belts
Most consumer FDM printers use GT2 timing belts with a 2mm pitch. These are specifically designed for motion control applications and offer a good balance of flexibility, strength, and precision.
Key specs to know:
- Pitch: 2mm (distance between teeth)
- Width: Usually 6mm on most printers, some use 9mm or 10mm
- Material: Rubber with fiberglass reinforcement (standard) or polyurethane with steel cord (premium)
- Expected life: 3,000-10,000+ hours depending on tension and environment
Fiberglass-reinforced rubber belts are standard on most printers. They stretch slightly over time and need periodic re-tensioning. Steel-core polyurethane belts (like Gates PowerGrip GT3) are a popular upgrade — they stretch significantly less and maintain tension much longer.
How to Check Belt Tension
There are several methods, ranging from free to fancy:
The Pluck Test (Free)
This is the quickest and most common method. Pluck the belt like a guitar string and listen to the pitch:
- Low, dull thud: Too loose
- Medium pitch twang with brief sustain: About right
- High pitch ping: Probably too tight
The target frequency depends on your belt length, but most properly tensioned printer belts produce a tone in the 40-80 Hz range. You can use a guitar tuner app on your phone to get a rough measurement.
The Deflection Method
Press down on the belt at its midpoint with a known force (about 1-2 pounds or 5-10 Newtons). A properly tensioned belt should deflect about 1-2mm. Less than 1mm is too tight; more than 3mm is too loose.
Belt Tension Gauges (~$20-50)
Purpose-built belt tension gauges like the Gates Krikit or generic tension meters give you a numerical reading. They’re the most accurate method and eliminate guesswork. Some 3D printing enthusiasts have even designed printable tension gauges, though commercial ones are more reliable.

Frequency Analysis Apps
Several smartphone apps can analyze the frequency of a plucked belt and convert it to tension values. The Gates Carbon Drive app is designed for bicycle belts but works with printer belts too. You’ll need to input your belt specifications for accurate readings.
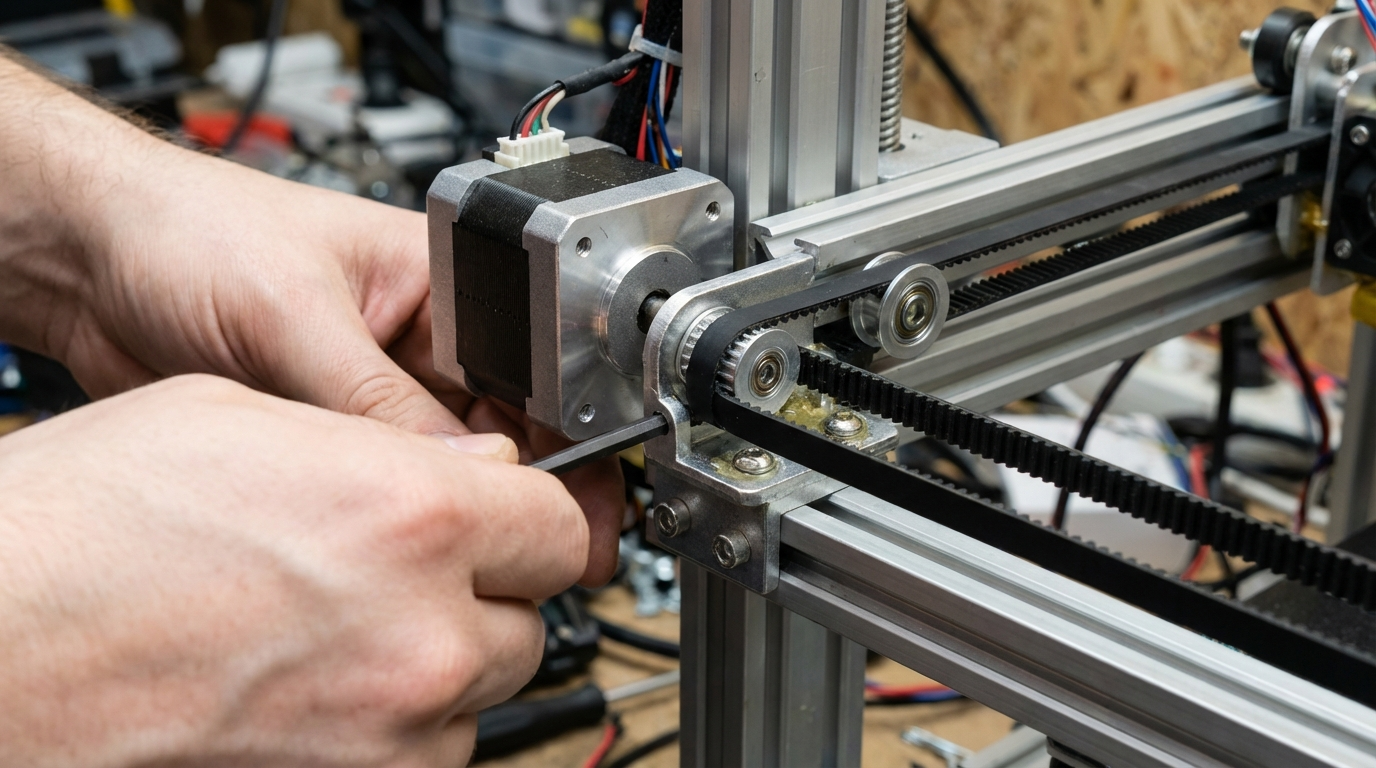
Step-by-Step Belt Tensioning
The exact procedure varies by printer, but the general process is similar across most Cartesian and CoreXY machines:
For Printers with Built-in Tensioners (Ender 3 V2, Prusa, etc.)
- Power off the printer and move the print head to the center of the build plate
- Locate the belt tensioner — usually a knob or screw at one end of the axis
- Turn the tensioner clockwise (usually) to increase tension
- Check with the pluck test or deflection method
- Repeat for the other axis
- Print a calibration cube to verify results
For Printers Without Tensioners
- Power off the printer
- Loosen the motor mount bolts (don’t remove them entirely)
- Pull the motor away from the belt to increase tension
- Hold the motor in position while retightening the bolts
- Check tension and adjust as needed
Important: Always adjust both the X and Y belts to similar tensions. Uneven tension between axes can cause different behavior in X vs. Y directions, leading to dimensional inaccuracy and oval-shaped circles.
CoreXY Belt Tensioning
CoreXY machines (like the Voron series and many newer printers) have a more complex belt path. Both belts need to be equally tensioned, and the interaction between them means adjusting one can affect the other.
For CoreXY machines:
- Tension both belts to roughly equal values
- Check by plucking both belts — they should produce the same pitch
- If one is tighter, loosen it slightly and tighten the other
- Iterate until both belts sound identical
- Print a square and measure the diagonals — they should be equal. Unequal diagonals indicate uneven belt tension
When to Replace Your Belts
Even properly tensioned belts wear out eventually. Replace your belts if you notice:
- Visible tooth wear or missing teeth
- Cracking or fraying along the edges
- Belt stretching that tensioners can no longer compensate for
- Black rubber dust accumulating around pulleys
- Persistent ringing despite correct tension
When replacing, consider upgrading to Gates brand fiberglass belts or polyurethane steel-core belts. The $10-15 cost difference pays for itself in longevity and print quality.
Maintaining Consistent Belt Tension
Good belt tension doesn’t last forever without maintenance. Here’s how to keep things dialed in:
- Check tension monthly. Rubber belts stretch over time, especially new ones. Check more frequently during the first few weeks after installation
- Keep pulleys clean. Debris on idler pulleys can cause uneven belt wear and stretch
- Check pulley set screws. A loose pulley grub screw mimics loose belt symptoms. Tighten them periodically and consider using thread-locking compound
- Monitor temperature. Belts in enclosed printers (especially when printing ABS at high chamber temps) may need different tension than in open-air setups
- Keep a maintenance log. Note when you last checked and adjusted belt tension. It helps you identify patterns and predict when the next adjustment will be needed
Belt Tension and Firmware Settings
Proper belt tension works hand-in-hand with firmware configuration:
Input Shaping: If your printer supports input shaping (Klipper, Marlin with the right board), properly tensioned belts are essential for the resonance measurements to be accurate. Run your input shaper calibration after adjusting belt tension, not before.
Acceleration and Jerk: Well-tensioned belts allow higher acceleration and jerk values without artifacts. If you’re tuning for speed, start with belt tension.
Steps per mm: Belt tension doesn’t change steps/mm in theory (it’s determined by motor steps, pulley teeth, and belt pitch), but a loose belt effectively introduces backlash that makes your actual steps/mm unreliable.
Final Thoughts
Belt tension is one of those fundamentals that’s easy to overlook once your printer is running. But spending five minutes checking and adjusting your belts can resolve print quality issues that no amount of slicer tweaking will fix. Make it part of your regular maintenance routine, and your prints will thank you.