3D Printer Lead Screw Maintenance: Complete Cleaning and Lubrication Guide
Why Lead Screw Maintenance Matters
Your 3D printer’s lead screws are some of the hardest-working components on the machine. Every layer, every print, they’re spinning and lifting the X-axis gantry (or lowering the bed) with sub-millimeter precision. But unlike belts or nozzles, lead screws rarely get attention until something goes wrong — and by then, you’re dealing with banding artifacts, Z-wobble, inconsistent layer heights, or binding that causes layer shifts.
Regular lead screw maintenance takes about 15 minutes every few months and prevents nearly all Z-axis mechanical problems. In this guide, I’ll cover exactly how to clean, lubricate, and inspect your lead screws, what lubricants to use (and which to avoid), and how often to do it.
How Lead Screws Work in 3D Printers
Most consumer FDM printers use trapezoidal lead screws (also called ACME screws or T8 screws) for Z-axis movement. The stepper motor turns the screw, and a brass or POM (plastic) nut rides along the threads, converting rotary motion into linear motion.
The lead (distance traveled per revolution) is typically 2mm, 4mm, or 8mm. A T8x8 lead screw, for example, has an 8mm thread diameter and moves the gantry 8mm per revolution. Lower leads (T8x2) provide finer resolution but are slower; higher leads are faster but less precise.
The key thing to understand is that the lead screw and nut are in constant sliding contact. Metal on metal (or metal on plastic) creates friction, generates wear, and can collect debris. Without proper lubrication, this friction increases over time, leading to a cascade of problems.
Signs Your Lead Screws Need Attention
Before getting into the maintenance procedure, here’s how to tell if your lead screws are overdue:
- Visible Z-banding: Consistent horizontal lines or patterns in your prints that repeat at regular intervals. This often indicates friction variations as the nut moves along dry or dirty sections of the screw
- Grinding or squeaking sounds: The Z-axis makes noise during homing or layer changes. Healthy lead screws are nearly silent
- Stiff manual movement: When the printer is off, you should be able to spin the lead screw by hand with minimal resistance. If it’s stiff, tight, or has rough spots, it needs cleaning and lubing
- Z-axis binding: The gantry gets stuck at certain heights. This is usually debris buildup or a bent screw
- Visible brass dust or debris: Fine brass-colored powder around the nut indicates wear. This is normal over time but accelerated by running dry
- Layer height inconsistencies: First layers are fine but later layers vary in height. Friction changes as the nut moves to different parts of the screw
What You’ll Need
- Paper towels or lint-free cloths
- Isopropyl alcohol (90%+ concentration)
- An old toothbrush or small brush
- The right lubricant (see section below)
- Nitrile gloves (optional but keeps hands clean)
- A flashlight or headlamp (for inspecting the screw)
Choosing the Right Lubricant
This is the part most people get wrong, and the wrong lubricant can actually make things worse. Here’s what works, what doesn’t, and why:
Recommended: PTFE-Based Dry Lubricants
PTFE (Teflon) based dry lubricants are the gold standard for 3D printer lead screws. They go on as a liquid, the carrier evaporates, and they leave a thin, dry PTFE coating on the threads. Brands like Super Lube with PTFE, 3-in-One Dry Lube, and Finish Line Dry Bike Lube all work well.
Why they’re ideal:
- Don’t attract dust and debris (huge advantage in a workshop)
- Compatible with brass and POM nuts
- Provide consistent low friction
- Won’t drip onto your print bed or parts
- Long-lasting between applications
Acceptable: White Lithium Grease
White lithium grease works but attracts dust over time. If you use it, apply very sparingly — a thin film, not globs. You’ll need to clean and reapply more frequently than with dry lubricants. Super Lube Synthetic Grease (PTFE-fortified) is a good middle ground — grease consistency with PTFE benefits.
Avoid: WD-40, Machine Oil, Sewing Machine Oil
WD-40 is a solvent/water displacer, not a lubricant. It provides temporary lubrication that evaporates quickly, leaving the metal dry and actually displacing any existing lubrication. Machine oils and sewing machine oils are too thin — they run off the screw and collect dust, forming an abrasive paste that accelerates wear.
Avoid: Silicone Spray
Silicone spray provides lubrication but can migrate to your print bed, causing adhesion problems. The aerosolized silicone contaminates surfaces it’s not aimed at. If you insist on silicone, use a non-spray silicone grease and apply it directly.
Avoid: Graphite Lubricants
Graphite is messy, makes everything black, and can be electrically conductive. In a 3D printer environment with exposed electronics, this is a risk. It also doesn’t provide the best performance for the sliding contact in lead screw nuts.
Step-by-Step Cleaning and Lubrication
Step 1: Prepare the Printer
Power off the printer and unplug it. Move the Z-axis to the top of its travel (manually if the printer is off, or home Z first and then raise it). This gives you access to the full length of the screw.
Step 2: Clean the Lead Screw
Dampen a lint-free cloth or paper towel with isopropyl alcohol. Wrap it around the lead screw and rotate the screw by hand, moving the cloth up and down the full length. The cloth should pick up old lubricant, debris, and any brass dust.
For stubborn buildup in the thread grooves, use the toothbrush dampened with IPA. Brush along the thread valleys to dislodge compacted debris.
Repeat with clean cloths until no more residue comes off. The screw should look clean and shiny.
Step 3: Inspect the Lead Screw
While it’s clean, shine a light along the screw and look for:
- Bends: Roll the screw on a flat surface (if removable) or sight along its length. Even a slight bend causes Z-wobble artifacts. Bent screws should be replaced — you can’t straighten them reliably
- Wear marks: Bright spots or grooves where the nut rides most often. Light wear is normal; deep grooves mean replacement is needed
- Damaged threads: Nicks, dings, or flattened spots. These cause the nut to catch and bind
- Rust: Orange-brown spots. Clean with IPA and apply lubricant immediately. If rust is deep, replace the screw
Step 4: Clean the Nut
If accessible, clean the inside of the lead nut. Run the nut up and down the cleaned screw a few times to dislodge internal debris. For brass nuts, you can flush them with IPA using a syringe to push old lubricant and debris out.
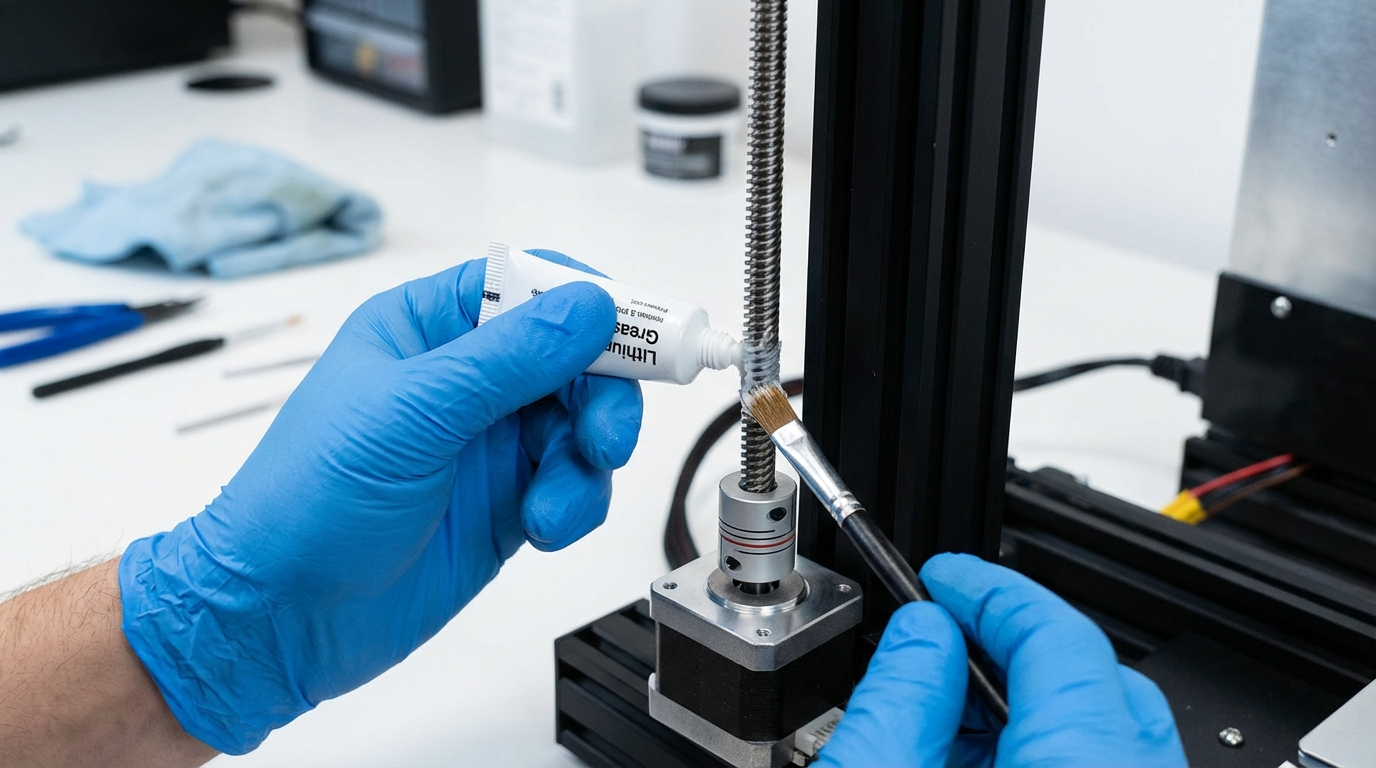
Step 5: Apply Lubricant
For PTFE dry lubricant: Apply a thin line of lubricant along the full length of the screw’s thread. Spin the screw by hand several times to distribute it evenly. The carrier will evaporate in a few minutes, leaving the PTFE coating.
For grease: Apply a very small amount (pea-sized for the full screw length) to your finger and wipe it into the threads. Less is more — excess grease collects dust. Run the nut up and down the full travel to distribute the grease through the nut.
Step 6: Run the Axis
Power on the printer and run the Z-axis through its full travel 3-4 times (home, raise to max, home again). This distributes the lubricant through the nut and confirms smooth operation. Listen for any binding or unusual sounds.
How Often to Maintain Lead Screws
The right interval depends on your usage and environment:
- Light use (a few prints per week): Every 3-6 months
- Moderate use (daily printing): Every 1-3 months
- Heavy use (print farm, near-continuous operation): Monthly
- Dusty environment (workshop, garage): More frequently, and consider covering the screws with bellows or dust covers
If you use PTFE dry lube, the intervals can be on the longer end. If you use grease, check more frequently since it attracts dust.
Anti-Backlash Nuts: Special Considerations
Many upgraded printers use anti-backlash nuts — spring-loaded nuts that press against the lead screw to eliminate play. These need special attention:
- Don’t over-lubricate: The spring tension relies on some friction. Too much lubricant can cause the nut to slip
- Check spring tension: Over time, the spring weakens. If you notice Z-axis slop returning, the anti-backlash nut spring may need replacement
- POM anti-backlash nuts: These are self-lubricating to some extent. They still benefit from light PTFE lubrication, but don’t need as much as brass nuts
Lead Screw Alignment and Coupling
While you’re maintaining the lead screws, check two other things that affect Z-axis performance:
Flexible Coupling
The coupling between the stepper motor shaft and the lead screw should be a flexible coupling (spring type or oldham coupling), not a rigid one. Flexible couplings compensate for minor misalignment between the motor and screw, preventing binding. If your printer came with a rigid coupling and you’re seeing Z-wobble, upgrading to a flexible coupling is a $3-5 fix that makes a noticeable difference.
Screw Alignment
The lead screw should be free to float — not rigidly constrained at both ends. Most printers support the screw at the bottom (in the motor coupling) and let it pass freely through the nut at the top. If you’ve added a bearing or bracket at the top, make sure it’s not constraining the screw laterally, which would amplify any slight bend into Z-wobble.
Dual Lead Screw Printers
Printers with dual Z lead screws (like the Ender 3 S1, CR-10 Smart, and most CoreXY machines) have an additional requirement: both screws must move in sync. If one screw has more friction than the other, the gantry tilts slightly, causing uneven first layers and prints that are thicker on one side.
When maintaining dual lead screws:
- Clean and lubricate both screws identically
- After maintenance, re-level the gantry by running both motors to the top and checking that both sides touch the frame simultaneously
- If your printer has independent Z drivers, run G34 (Marlin) or Z_TILT_ADJUST (Klipper) after maintenance to auto-align
Final Thoughts
Lead screw maintenance is one of those tasks that takes 15 minutes but prevents hours of troubleshooting. The symptoms of a dry or dirty lead screw — banding, binding, inconsistent layers — mimic many other problems, so people often chase the wrong fix. Before you recalibrate your e-steps, adjust flow rates, or replace your hotend, take 15 minutes to clean and lube your lead screws. You might find that your “extrusion problem” was a Z-axis problem all along.
Keep it simple: PTFE dry lube, applied every 2-3 months, with a quick clean before each application. Your prints will be smoother, your motors will run cooler (less friction means less resistance), and your lead screws and nuts will last years longer.