ABS Warping Solutions: The Complete Enclosure Guide for 3D Printing
ABS is one of the most versatile 3D printing materials available. It’s strong, heat-resistant, and can be vapor-smoothed with acetone for a glossy finish. But printing ABS has a reputation for being difficult, and that reputation is largely earned — unless you have an enclosure.
An enclosure transforms ABS from a frustrating material into a reliable one. In this comprehensive guide, I’ll explain why enclosures work, walk you through the best enclosure options at every budget, and share the exact settings I use for consistently successful ABS prints.
Why ABS Warps (And Why Enclosures Fix It)
ABS has a glass transition temperature around 105°C and a relatively high coefficient of thermal expansion. When you extrude ABS at 230-250°C onto a bed heated to 100-110°C, the material starts cooling immediately. As it cools, it contracts.
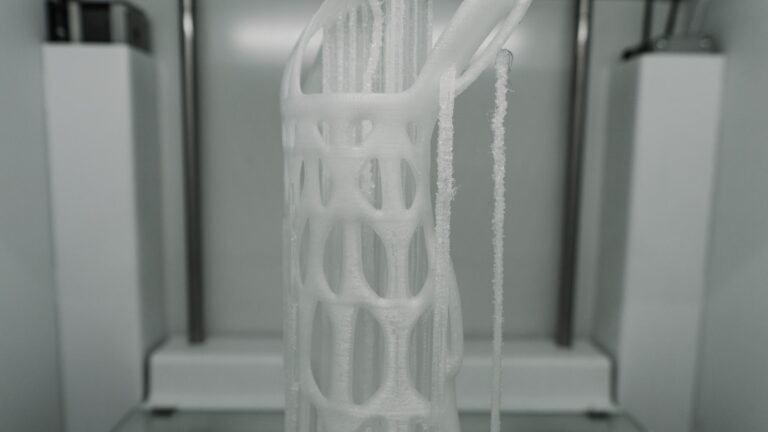
The problem is that the top layers are much hotter than the bottom layers. This temperature gradient creates internal stress — the cooler bottom wants to shrink while the warmer top doesn’t. The result is warping, layer splitting, and corner lifting.
An enclosure solves this by trapping the heat radiated by your heated bed and hotend. Inside an enclosure, the ambient temperature can reach 35-55°C, compared to a typical room temperature of 20-22°C. This dramatically reduces the temperature gradient between layers, which reduces internal stress, which eliminates warping.
It really is that simple. Warm air around the print means less thermal shock means less warping. Let’s look at how to make it happen.
Option 1: The IKEA Lack Enclosure (Budget King)
The IKEA Lack table enclosure is the most popular DIY option in the 3D printing community, and for good reason. Two IKEA Lack side tables ($10-15 each) stacked on top of each other create a near-perfect enclosure frame for most printers up to Ender 3 size.
What you need:
- 2× IKEA Lack side tables ($10-15 each)
- Acrylic or polycarbonate panels for the sides (about $20-40)
- 3D printed corners and hinges (free — search “Lack enclosure” on Thingiverse or Printables)
- Optional: LED strip, filament feed tube, exhaust fan with carbon filter
Total cost: $40-80 depending on panel material and options.
Build process: Stack the two tables, attach acrylic panels to the sides using 3D printed brackets, and add a hinged front door. The top table becomes the ceiling, and you can mount a spool holder on top. The whole build takes 2-3 hours.
Performance: With the heated bed running at 100°C, interior temperatures typically reach 38-45°C. That’s enough for reliable ABS printing. For even better results, add foam insulation panels (available at hardware stores) to the inside of the acrylic panels.
Limitations: The Lack tables are lightweight particle board. They’re not fire-resistant, and they can sag over time under the weight of a heavy printer. Don’t put your Voron 2.4 on one. For an Ender 3 or Prusa Mini, they’re fine.
Option 2: Purpose-Built Enclosures
If you don’t want to DIY, several companies sell ready-made enclosures:
Creality Enclosure ($50-70): A foldable fabric enclosure that fits most printers up to 500mm×500mm×700mm. It’s essentially a tent with a clear front panel. It won’t achieve the same temperatures as a rigid enclosure, but it blocks drafts and raises ambient temperature by 10-15°C. Good enough for casual ABS printing.
Prusa Original Enclosure ($200-300): Designed specifically for the Prusa MK4 and MK3S+. It’s well-built with proper ventilation, LED lighting, and a HEPA+carbon filter option. Expensive but polished.
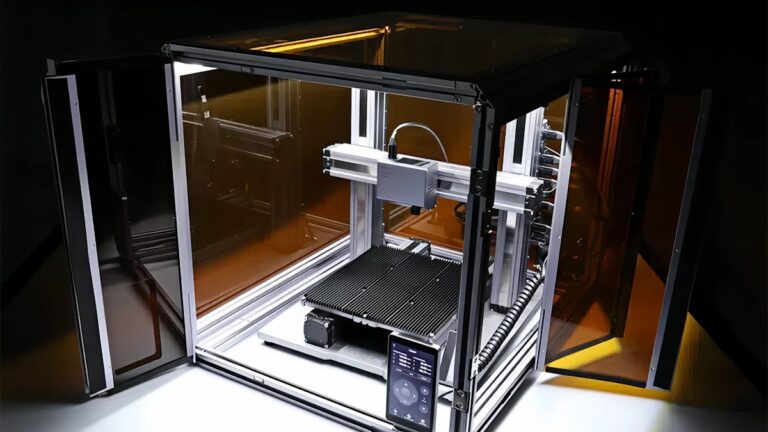
Custom aluminum frame ($100-200): Build your own from 2020 aluminum extrusion and acrylic panels. This is the most flexible option — you can size it to any printer. The rigidity is excellent, and aluminum extrusion is easy to work with using just an Allen wrench.
Option 3: The Cardboard Box (Emergency Fix)
I’m not joking. When you need to print ABS right now and don’t have an enclosure, a large cardboard box draped over your printer works surprisingly well. Cut a window in the front so you can monitor the print, and make sure nothing is touching the heated bed or hotend.
Safety warning: This is a temporary solution only. Cardboard near a 250°C hotend is a fire risk. Never leave a cardboard-enclosed print unattended, and never use this as a permanent setup. It’s for that one emergency print when you need ABS and your enclosure is still in the mail.
Enclosure Settings for ABS
Having an enclosure is only half the battle. You also need the right print settings to take full advantage of it:
Bed temperature: 100-110°C. Higher than you’d use without an enclosure because the trapped heat helps maintain temperature across the entire bed surface. I typically run 105°C for most ABS prints.
Nozzle temperature: 235-250°C. The enclosed environment keeps the ambient temperature higher, which means the filament doesn’t cool as fast. You might find you can run slightly lower nozzle temperatures than without an enclosure. Start at 240°C and adjust.
Print speed: 40-60mm/s. ABS prints well at moderate speeds inside an enclosure. Don’t push beyond 60mm/s unless you have excellent cooling control — and with ABS, you want minimal cooling anyway.
Part cooling fan: OFF or very low (0-15%). This is critical. The part cooling fan actively fights your enclosure by blowing cool air directly onto the print. For ABS, keep it off entirely for most prints. If you’re printing bridges or overhangs that need some cooling, use the minimum fan speed that produces acceptable results — usually 10-15%.
Retraction: 0.5-1mm at 25-35mm/s (direct drive) or 4-6mm at 25-35mm/s (Bowden). ABS is less stringy than PETG but more than PLA. Keep retraction speeds moderate to prevent grinding in the warm environment.
Ventilation and Safety
ABS emits styrene fumes when heated. While the health effects of short-term exposure at hobbyist levels are debated, it’s best practice to manage ventilation properly:
Active carbon filter: Mount a small fan with an activated carbon filter on your enclosure. This scrubs most of the VOCs and styrene from the exhaust air. The Nevermore filter (an open-source design) is popular in the Voron community and works well.
Exhaust to outside: If possible, vent your enclosure exhaust through a window or duct. A 75mm dryer vent hose connected to a small inline fan is the gold standard for home setups.
HEPA filter: ABS printing also produces ultrafine particles (UFPs). A HEPA filter in your exhaust path catches these. Combined with a carbon filter, you’re covering both VOCs and particulates.
Don’t seal it completely: Your enclosure needs some air exchange for the printer’s electronics and stepper motors. These components generate heat and can overheat in a fully sealed enclosure. Leave a small gap at the bottom for intake air, and position your exhaust fan near the top.
Electronics and Heat Concerns
Most consumer 3D printers weren’t designed to operate in a heated enclosure. Some components can overheat:
Stepper motor drivers: These generate significant heat and can thermal-throttle or shut down above 60°C. If your printer’s mainboard is inside the enclosure, consider relocating it outside or adding a dedicated cooling fan blowing on the driver heatsinks.
Stepper motors: Standard steppers are rated to 80°C but lose torque as they heat up. In a hot enclosure, watch for missed steps — this manifests as layer shifting. If you see this, reduce speed or improve motor cooling.
Bowden tubes: Standard PTFE Bowden tubes begin degrading above 240°C and shouldn’t be used in the hot zone for ABS printing. Use an all-metal hotend if you’re printing ABS regularly. If you have a PTFE-lined hotend, the tubing in the enclosure (but away from the hotend) is fine — it won’t get that hot.
Wiring: Check that your printer’s wiring has adequate temperature ratings. Most stock wiring is fine for enclosure temperatures up to 50°C, but cheap aftermarket components might not be.
Testing Your Enclosure
Once you’ve built your enclosure, test it before committing to a long ABS print:
- Temperature test: Turn on your heated bed to 100°C, close the enclosure, and monitor the internal temperature with a thermometer placed near the center of the build volume. You should see 35-50°C after 20-30 minutes.
- Temperature uniformity: Check multiple points inside the enclosure. The temperature near the bed will be higher than near the top. A difference of more than 10°C suggests you need better air circulation — a small fan blowing gently (not on the print) can help distribute heat.
- Print a test cube: A 40mm calibration cube in ABS is the simplest test. Check for warping, layer adhesion, and dimensional accuracy. If the cube comes out flat with no cracking, your enclosure is working.
- Long print test: Try a print that takes 4+ hours. ABS warping often doesn’t appear until several hours into a print when thermal stresses have accumulated. If a long print succeeds, you’re good to go.
Beyond ABS: Other Materials That Benefit from Enclosures
While ABS is the primary driver for enclosure purchases, other materials benefit too:
ASA: Like ABS but with better UV resistance. Warps similarly and benefits equally from an enclosure. Great for outdoor parts.
Nylon (PA): Extremely hygroscopic and prone to warping. An enclosure helps with warping and also reduces moisture absorption during printing (in humid environments).
Polycarbonate (PC): Requires very high temperatures and warps aggressively. An enclosure is essentially mandatory for PC printing.
PLA and PETG: Generally don’t need an enclosure, but they won’t be harmed by one either. However, PLA can become too soft in a very hot enclosure (above 50°C), leading to heat creep in the hotend. If you print PLA in an enclosure, open the door or reduce bed temperature.
My Enclosure Checklist
Here’s what I consider the ideal enclosure setup for serious ABS printing:
- Rigid frame (aluminum extrusion or wood)
- Clear acrylic or polycarbonate side panels (3mm thick minimum)
- Hinged front door for easy access
- LED lighting inside
- Activated carbon + HEPA filter exhaust
- Temperature sensor with external display
- External spool holder with PTFE tube feed-through
- Electronics mounted outside or with dedicated cooling
- Filament dry box integration
You don’t need all of these to get started — even a basic enclosure with panels and a door will transform your ABS printing experience. Add the extras over time as your needs grow.
Final Thoughts
An enclosure is the single best upgrade you can make for ABS printing. It takes a finicky, frustrating material and makes it predictable and reliable. Whether you spend $30 on a Lack table build or $300 on a premium enclosure, the improvement in print quality and success rate is dramatic.
Start simple — even a basic draft shield makes a difference. Then upgrade to a proper enclosure when you’re ready. Your ABS prints will thank you, and you’ll wonder why you didn’t do it sooner.