Bambu Lab X1 Carbon Best Settings and Tips for 2026
The Bambu Lab X1 Carbon has been the benchmark for high-speed, multi-material FDM printing since its launch, and heading into 2026, it remains one of the most capable machines in its price range. But out of the box, there’s room for improvement. The default profiles in Bambu Studio work fine for basic prints, but knowing how to tweak settings for specific materials, speeds, and quality levels is what separates okay prints from outstanding ones.
This guide covers the best Bambu Lab X1C settings I’ve found after hundreds of hours of printing, plus tips and tricks that aren’t in the manual.
The X1C Advantage: What Makes It Different
Before diving into settings, it’s worth understanding what makes the X1C tick. Unlike traditional bed-slinger printers, the X1C uses a CoreXY motion system with carbon fiber rods, allowing it to print at speeds up to 500mm/s with accelerations of 20,000 mm/s². That’s roughly 5–10x faster than a stock Ender 3.
It also comes with:
- Hardened steel nozzle (handles carbon fiber and glass-filled filaments)
- Active chamber heating up to 60°C
- Automatic bed leveling (Lidar-based)
- AMS (Automatic Material System) for multi-color printing
- AI failure detection via built-in camera
These features mean the X1C handles engineering filaments that would be a nightmare on open-frame printers. But they also mean some settings behave differently than what you’re used to.
General Print Settings
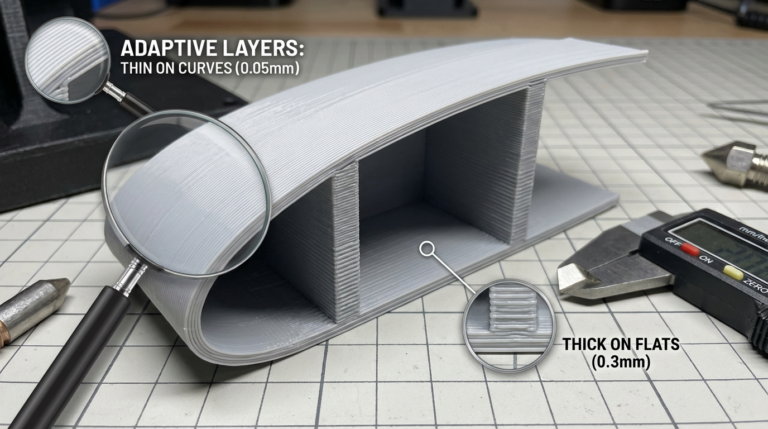
Layer Height
The X1C can print at layer heights from 0.08mm to 0.32mm with a 0.4mm nozzle. Here’s what I recommend for different use cases:
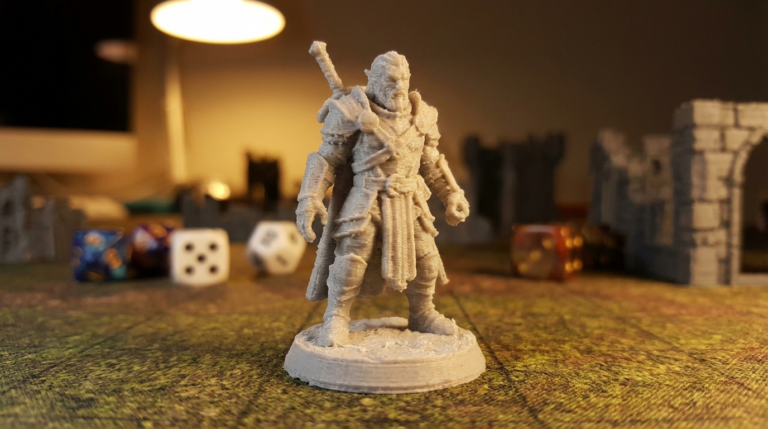
- High detail (miniatures, visible models): 0.12mm — gorgeous detail with manageable print times
- Standard quality: 0.20mm — the sweet spot for most prints
- Fast functional parts: 0.28mm — great strength, dramatically faster prints
- Draft / prototypes: 0.32mm — maximum speed, acceptable quality
Print Speed
This is where the X1C really shines, but there’s a nuance: raw speed (mm/s) matters less than acceleration and volumetric flow rate. The X1C’s stock hotend maxes out around 28–32 mm³/s volumetric flow with PLA, which means at thin layer heights and narrow line widths, you can hit higher linear speeds than with thick layers.
Recommended speed profiles:
- Standard (quality focus): 200 mm/s with 5000 mm/s² acceleration
- Sport (balanced): 300 mm/s with 10,000 mm/s² acceleration
- Ludicrous (speed focus): 500 mm/s with 20,000 mm/s² acceleration — only for PLA/high-flow PLA
For engineering materials like PETG, ABS, or nylon, stick with the standard profile. High-speed printing generates more heat and can cause issues with temperature-sensitive filaments.
Walls and Top/Bottom
- Wall loops: 3 for decorative, 4 for functional parts
- Top layers: 5 minimum (4 can show ghosting from infill pattern)
- Bottom layers: 4 is plenty
- Wall order: Inner-outer for dimensional accuracy, outer-inner for surface finish
Material-Specific Settings
PLA / PLA+ on the X1C
- Nozzle: 210–220°C (most brands work at 215°C)
- Bed: 55–60°C
- Chamber: OFF (PLA doesn’t benefit from chamber heating and can actually get soft)
- Part cooling fan: 100% after first layer
- Speed: Up to 500 mm/s with high-flow PLA, 300 mm/s for regular PLA
PETG on the X1C
- Nozzle: 235–245°C
- Bed: 75–80°C (textured PEI plate recommended)
- Chamber: 35–40°C
- Part cooling fan: 30–50% (too much fan makes PETG brittle and hazy)
- Speed: 150–200 mm/s maximum (PETG doesn’t flow well at high speeds)
- Retraction: 0.8mm at 30 mm/s (minimize stringing without grinding)
ABS / ASA on the X1C
This is where the X1C’s enclosed chamber really pays off:
- Nozzle: 245–260°C
- Bed: 100–110°C
- Chamber: 55–60°C (maximum — prevents warping)
- Part cooling fan: 0–20% (ABS hates cooling)
- Speed: 200–250 mm/s
- Auxiliary fan: OFF (let the chamber stay hot)
PA (Nylon) on the X1C
- Nozzle: 260–280°C
- Bed: 80–90°C with Garolite or glue stick
- Chamber: 50–55°C
- Part cooling fan: 0% (nylon warps with cooling)
- Speed: 100–150 mm/s (nylon is more sensitive to print speed)
- Dry filament: Mandatory — feed from a dryer if possible
AMS Tips and Tricks
The AMS (Automatic Material System) enables multi-color printing but requires some care to work reliably:
- Keep AMS humidity low: The AMS has built-in desiccant slots — use them. Replace desiccant monthly
- Buffer length: Increase purge volume by 20% when switching between dark and light colors
- Retraction in AMS: If you get grinding or failed loads, lubricate the PTFE tubes inside the AMS with a small amount of PTFE dry lubricant
- Color changes on flat surfaces: Enable wipe tower for multi-color. Flushing to infill saves material but can cause color contamination in the infill
- Single-color with AMS: Even for single-color prints, running through the AMS gives you filament runout detection and auto-switching to backup spools
Bed Adhesion on the X1C
The X1C ships with both a textured PEI plate and a smooth plate. Here’s which to use when:
- Textured PEI: Best for PLA, PETG, and PA. Parts release easily when the bed cools. Pro tip: for PETG, use a thin layer of glue stick as a release agent — PETG can bond permanently to bare PEI
- Smooth plate: Best for ABS/ASA (smoother bottom surface) and when you want a glossy finish. Clean with IPA between prints
- Engineering plate (optional): The textured PEI with a higher-grip surface. Great for PA and PC filaments
Advanced Tips for Power Users
1. Calibration Matters Even on the X1C
The X1C auto-calibrates, but the auto routines aren’t perfect. Run these manually every few weeks or after any hardware change:
- Flow rate calibration (per material — different PLAs need different flow)
- Pressure advance (called “dynamic pressure compensation” in Bambu Studio)
- Vibration compensation (runs automatically but can be re-triggered)
2. The 0.6mm Nozzle Trick
Switching to a 0.6mm nozzle on the X1C is a massive quality-of-life upgrade for functional prints. You get 2.25x the volumetric flow capacity, which means dramatically faster prints with thicker walls. The loss in fine detail is minimal for most practical applications.
3. Firmware Updates
Bambu Lab pushes firmware updates frequently. Keep your machine updated — they regularly fix bugs, add features, and improve print quality algorithms. Check Bambu Handy app or the machine’s touchscreen for updates.
4. Noise Reduction
The X1C is quieter than most high-speed printers, but at full speed it’s still noticeable. Placing the printer on a concrete paver or vibration-dampening pad reduces transmitted noise significantly. The “silent mode” in settings limits acceleration but cuts noise by about 40%.
5. Camera and AI Detection
The built-in camera with AI detection catches spaghetti failures and first-layer issues. For overnight prints, enable “stop on failure” in the settings — it can save you from waking up to a blob of wasted filament.
Troubleshooting X1C-Specific Issues
AMS Loading Failures
Clean the AMS buffer tube and the extruder gear. A tiny piece of filament debris in the wrong place causes the majority of load failures. Use compressed air to blow out the path.
Bed Adhesion Problems After Months of Use
PEI sheets lose their grip over time. Restore adhesion by washing the plate with warm soapy water (dish soap), then wiping with IPA. If that doesn’t work, a light scuff with 800-grit sandpaper refreshes the texture.
Nozzle Wear with Abrasive Filaments
The hardened steel nozzle resists abrasive filaments well, but it does wear over time. Check your nozzle every 200–300 hours if you print carbon fiber or glass-filled materials. A worn nozzle shows under-extrusion and larger-than-expected line widths.
Final Thoughts
The Bambu Lab X1C rewards users who take the time to dial in their settings per material. The default profiles are a great starting point, but the real magic happens when you calibrate flow rates, fine-tune pressure advance, and choose the right speed profile for each job. It’s the kind of printer that makes you wonder how you ever tolerated hour-long benchy prints on a stock Ender 3.