BLTouch and CR Touch Auto Bed Leveling: Complete Setup Guide
Why Auto Bed Leveling Changes Everything
If you’ve spent more than a week with a 3D printer, you know the pain of manual bed leveling. Paper under the nozzle, turning knobs, printing a test square, finding one corner is too high while the other is too low, and repeating the whole process until you want to throw the printer out the window. Auto bed leveling sensors like BLTouch and CR Touch exist to end this suffering — and they actually work.
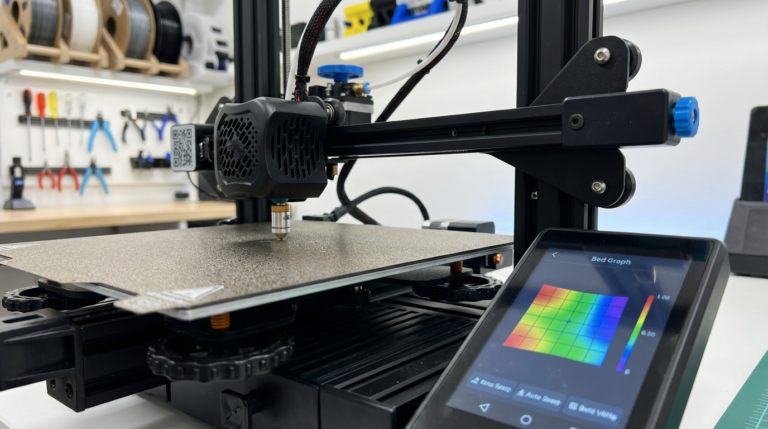
An auto bed leveling probe maps the surface of your print bed before each print, measuring tiny variations in height across multiple points. Your printer’s firmware then compensates for these imperfections in real time, adjusting the Z-axis as the nozzle moves across the bed. The result? A perfect first layer every time, even if your bed isn’t perfectly flat (spoiler: it never is).
BLTouch vs. CR Touch: What’s the Difference?
Both sensors do the same job, but they work slightly differently and have different strengths.
BLTouch
Made by ANTCLABS, the BLTouch was the original aftermarket auto bed leveling sensor that democratized ABL for budget printers. It uses a small metal pin that deploys from the probe body, touches the bed, and retracts. The pin physically contacts the bed surface, which means it works on any bed material — glass, PEI, magnetic flex plates, even BuildTak.
The BLTouch has been around since 2015 and has gone through several versions. The current BLTouch V3.1 is reliable and well-documented, with community support for virtually every printer on the market. It uses a Hall effect sensor to detect when the pin makes contact, giving it accuracy of around ±0.005mm.
CR Touch
Creality’s answer to the BLTouch, the CR Touch uses a metal probe pin instead of the BLTouch’s plastic-tipped one. This makes it slightly more durable — the BLTouch pin can bend if it crashes into the bed too hard. The CR Touch also has an all-metal body that feels more premium than the BLTouch’s plastic housing.
Functionally, the CR Touch is a BLTouch clone with a few refinements. It’s a drop-in replacement on most Creality printers and uses the same wiring and firmware settings. Accuracy is comparable to the BLTouch. The main advantage is the metal probe pin’s durability and the fact that Creality bundles specific mounting hardware for their printers.
Which Should You Buy?
If you have a Creality printer: get the CR Touch. It comes with the right mounting bracket and is tested for your specific machine. If you have any other brand: get the BLTouch. It has broader community support and more documented installations for non-Creality printers. Either way, you’re getting essentially the same functionality.
Installation Guide: Step by Step
What You’ll Need
- BLTouch or CR Touch sensor kit (includes wiring harness and mounting bracket)
- Allen keys (usually 2mm and 2.5mm)
- Small Phillips screwdriver
- Cable ties or spiral wrap for cable management
- A computer with USB cable for firmware flashing (if needed)
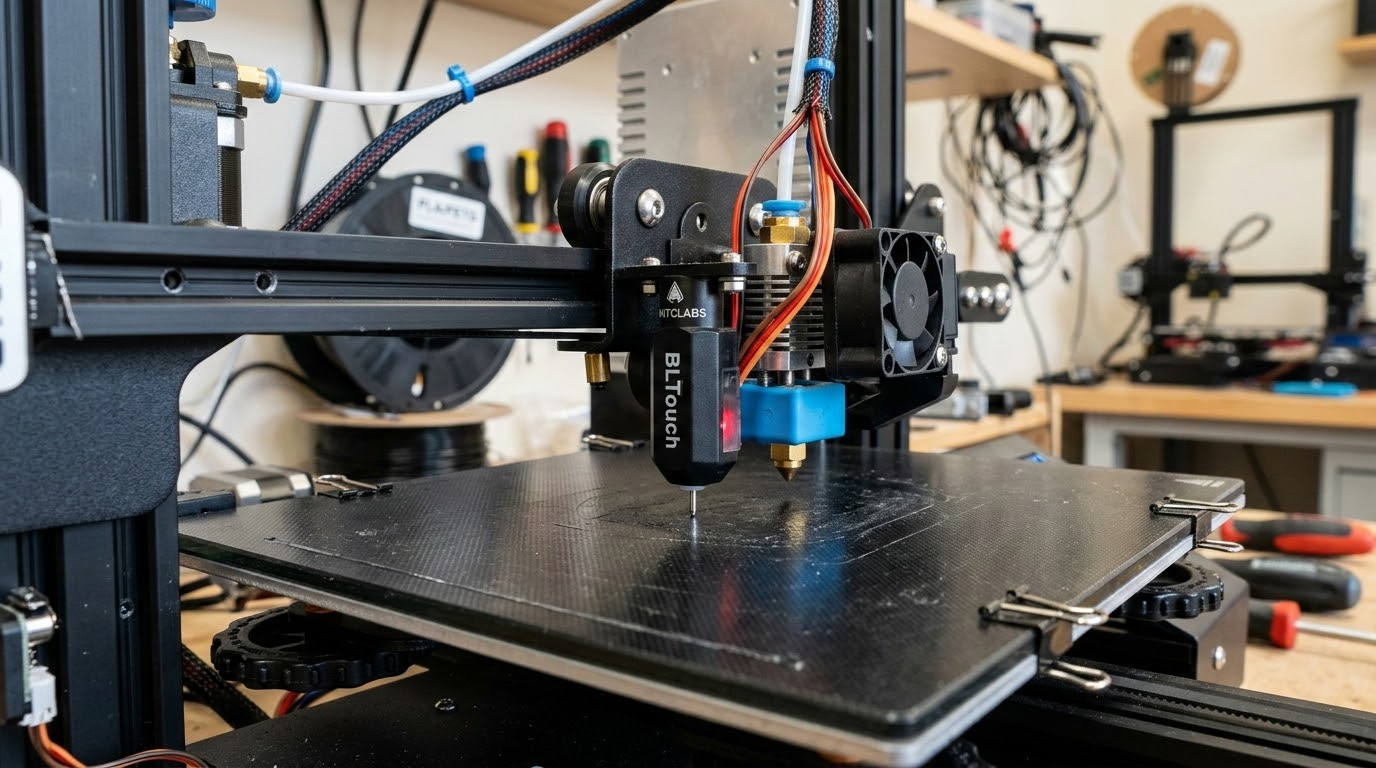
Step 1: Mount the Sensor
The sensor mounts to your print head carriage, next to the hotend. Most kits include a bracket designed for specific printers. The probe tip needs to sit slightly higher than your nozzle when retracted — about 2-3mm above the nozzle tip is standard. Too low and the probe will hit the bed before the nozzle can get close enough to print. Too high and you’ll run out of Z travel for compensation.
Attach the bracket to the carriage using the provided screws. Make sure the sensor is secure and doesn’t wobble. Any movement in the mount will throw off your measurements and defeat the purpose of auto leveling.
Step 2: Wiring
Both the BLTouch and CR Touch use a 5-pin connector. Three pins handle the servo control (deploy/retract the probe pin), and two pins handle the Z-endstop signal (telling the printer when the probe touches the bed).
On most printers, you’ll connect the 3-pin servo connector to the dedicated BLTouch port on the mainboard (if your board has one) and the 2-pin endstop connector to the Z-endstop pins, replacing your existing Z-endstop switch. If your mainboard has a dedicated 5-pin BLTouch port, even easier — just plug in the single connector.
Route the cable along the existing wiring harness, securing it with cable ties. Make sure there’s enough slack for the print head to move to all corners of the bed without pulling the cable taut.
Step 3: Firmware Configuration
This is where most people get tripped up. Your printer’s firmware needs to know about the probe — specifically, its offset from the nozzle and what type of probing routine to use.
For Marlin firmware: You’ll need to edit Configuration.h and enable several defines:
BLTOUCH— enables BLTouch/CR Touch supportNOZZLE_TO_PROBE_OFFSET— the X, Y, and Z distance from your nozzle to the probe pinAUTO_BED_LEVELING_BILINEAR— enables the mesh-based compensation (most common choice)GRID_MAX_POINTS_XandGRID_MAX_POINTS_Y— how many probe points per axis (5×5 is a good balance)Z_SAFE_HOMING— homes Z in the center of the bed instead of the corner (prevents probing off the edge)
Compile and flash the firmware. If you’ve never done this before, there are excellent video tutorials specific to your printer model.
For Klipper firmware: Add a [bltouch] section to your printer.cfg with the sensor and control pins, probe offsets, and probing speed. Then add a [bed_mesh] section defining the probing area and point count. Klipper makes this significantly easier than Marlin since you don’t need to recompile — just edit the config file and restart.
Step 4: Calibrate the Z-Offset
The Z-offset tells your printer exactly how far the nozzle is below the probe trigger point. This is critical — get it wrong and your first layer will either be too high (not sticking) or too low (nozzle grinding into the bed).
Home all axes, then run G28 followed by G29 to probe the bed. Now use the baby-stepping feature or M851 Z-X.XX command to adjust the Z-offset while printing a first layer test. Lower the offset (more negative) if the nozzle is too far from the bed, raise it (less negative) if it’s too close. You want the filament to squish slightly into the bed — not floating above it, not being smeared paper-thin.
Once dialed in, save with M500 (Marlin) or SAVE_CONFIG (Klipper). You shouldn’t need to change this again unless you swap nozzles or change your bed surface.
Setting Up Your Probing Routine
Probe Point Count
More points means a more accurate mesh but longer probing time. A 3×3 grid (9 points) takes about 30 seconds and catches major bed warps. A 5×5 grid (25 points) takes about 90 seconds and maps the bed thoroughly. Going beyond 7×7 offers diminishing returns for most beds.
My recommendation: start with 5×5. If your bed is particularly warped or large (300mm+), go to 7×7. For small beds under 200mm, 3×3 or 4×4 is fine.
Adding Auto Leveling to Your Start G-code
You want the printer to probe the bed automatically before every print. Add G29 after G28 in your slicer’s start G-code. A typical start sequence looks like:
G28— home all axesG29— probe the bed and enable compensation- Heat up nozzle and bed (if not already done)
- Purge line
- Start printing
Some users prefer to store the mesh with M500 and load it with M420 S1 instead of probing every time. This saves a minute per print but won’t account for any changes since the last probe (like a bed that shifts when heated).
Troubleshooting Common Issues
Probe Not Deploying or Retracting
If the pin doesn’t deploy when commanded, check your wiring — the servo pins might be reversed or on the wrong port. Try the BLTouch self-test command (M280 P0 S120 to deploy, M280 P0 S90 to retract). If nothing happens, it’s a wiring issue. If the pin moves but seems sluggish, the signal voltage might be too low — some boards need a voltage jumper set to 5V instead of 3.3V.
Inconsistent Probe Results
If your mesh values change significantly between probes, the sensor mount might be loose, the probe pin might be bent, or the bed surface might be interfering. Clean the bed surface, tighten the mount screws, and check the pin for straightness. Also reduce probing speed — faster probing can trigger early on some surfaces.
First Layer Still Not Perfect After Probing
If the mesh compensation is active but your first layer still varies, your Z-offset probably needs fine-tuning. The probe gives you relative height differences across the bed, but the Z-offset sets the absolute distance from bed to nozzle. Use baby-stepping during the first layer of a real print to dial it in.
Tips for Best Results
- Probe with a heated bed: Beds can warp differently when heated. Probe at your actual printing temperature for the most accurate mesh.
- Clean the probe pin regularly: Filament residue on the pin can affect accuracy. A quick wipe with a cloth between prints helps.
- Don’t forget mechanical leveling: Auto leveling compensates for small imperfections, not major tilts. If your bed is way off level, adjust the manual knobs first to get it roughly flat, then let the probe handle the fine details.
- Update your firmware: BLTouch support has improved significantly in recent Marlin and Klipper releases. Running the latest stable firmware version ensures the best probe behavior.
- Consider a dedicated Z-endstop: Some setups keep the original Z-endstop switch as a safety backup and use the probe only for bed meshing. This prevents nozzle crashes if the probe fails to trigger.
Is Auto Bed Leveling Worth the Upgrade?
Absolutely. For $30-40, a BLTouch or CR Touch eliminates one of the most frustrating aspects of 3D printing. The time you save not manually leveling, the filament you save from failed first layers, and the consistency improvement all add up fast. If you’re still manually leveling with a piece of paper, do yourself a favor and install an ABL sensor. It’s one of those upgrades where you’ll wonder why you didn’t do it sooner.