Cura Retraction Settings for Ender 3 V2: Stop Stringing for Good
Why Retraction Settings Matter So Much on the Ender 3 V2
I remember my first prints on the Ender 3 V2 — every single one had strings hanging between parts like a spider had been at it. And no matter what I tried, the default Cura retraction settings just weren’t cutting it. Took me about two weeks of tweaking and probably a dozen retraction test prints before I nailed down settings that actually eliminate stringing without causing other problems.
The Ender 3 V2 uses a Bowden tube setup, which means the extruder motor sits on the frame and pushes filament through a long PTFE tube to the hotend. That distance between the motor and nozzle is exactly why retraction on this printer needs specific attention — there’s a lot of slack in the system that direct drive printers don’t have to deal with.
My Exact Retraction Settings for the Ender 3 V2
After extensive testing with PLA, PETG, and even some TPU, here are the retraction settings I’ve settled on in Cura for the Ender 3 V2:
- Enable Retraction: Yes (obviously)
- Retraction Distance: 6.5mm
- Retraction Speed: 25 mm/s
- Retraction Extra Prime Amount: 0
- Retraction Minimum Travel: 1.5mm
- Maximum Retraction Count: 10
- Minimum Extrusion Distance Window: 6.5mm
Now let me explain why each of these values matters, because blindly copying numbers without understanding them means you won’t know what to adjust when something goes wrong.
Retraction Distance: The Most Important Setting
Retraction distance controls how far the filament gets pulled back from the nozzle when the printer moves between parts. On a Bowden setup like the Ender 3 V2, you need enough distance to actually pull the melted filament back out of the melt zone.
Too little retraction (under 4mm on a Bowden) and you’ll get stringing everywhere. Too much (over 8mm) and you risk pulling molten filament up into the cold zone of the PTFE tube, where it cools and causes clogs.
I started at 5mm and worked my way up in 0.5mm increments. At 6.5mm, I get virtually no stringing with PLA at 200-210°C. Some people run 7mm, but I’ve had occasional clogs at that distance during long prints with lots of retractions.
For PETG, I actually drop the retraction distance to 5mm. PETG is stickier and more prone to clogging, so less retraction works better even though you might get slightly more stringing.
Retraction Speed: Faster Isn’t Always Better
Retraction speed is how fast the extruder motor pulls the filament back. The default in Cura is usually 45 mm/s, and honestly, that’s too fast for the Ender 3 V2’s stock extruder.
At 45 mm/s, the extruder gear can grind the filament, especially on prints with lots of rapid retractions. I’ve had the extruder chew a flat spot into the filament so bad it lost grip entirely, and the rest of the print came out as a blob of nothing.
25 mm/s gives the motor enough time to retract smoothly without grinding. Some people split the retraction speed into separate retract and prime speeds — I don’t bother with that on the Ender 3 V2. Keeping both at 25 mm/s works reliably.
If you’re still getting stringing at 25 mm/s with 6.5mm distance, bump the speed to 30 mm/s before increasing distance. But don’t go above 40 mm/s on the stock extruder.
Retraction Minimum Travel
This setting tells Cura not to bother retracting for very short travel moves. If the nozzle only moves 1mm, retracting and priming wastes time and can cause under-extrusion from the constant pulling back and forth.
I set mine to 1.5mm. Anything shorter than that, the ooze from the nozzle is negligible and won’t cause visible stringing. Some guides recommend 2mm, and that works fine too. But going below 1mm means you’re retracting for almost every move, which kills your print speed and can grind the filament.
Maximum Retraction Count and Minimum Extrusion Distance Window
These two settings work together to prevent the extruder from grinding your filament to dust. Maximum Retraction Count (I use 10) limits how many times the filament can be retracted within the Minimum Extrusion Distance Window (I match this to my retraction distance at 6.5mm).
What does that actually mean? If the same stretch of filament gets retracted more than 10 times without 6.5mm of new filament being pushed through, Cura stops retracting. This protects against the “grinding flat spot” problem I mentioned earlier.
For most prints, you’ll never hit this limit. But for models with lots of small, separate details close together — like a model with many thin pillars — it can save your print from failing.
Temperature and Retraction: They’re Connected
Here’s something that took me forever to figure out: retraction settings don’t exist in isolation. Your nozzle temperature directly affects how well retraction works.
Higher temperature = more runny filament = more ooze = more stringing even with good retraction. If you’re printing PLA at 215°C and getting stringing despite proper retraction settings, try dropping to 200°C before changing retraction values.
My approach for dialing in a new filament:
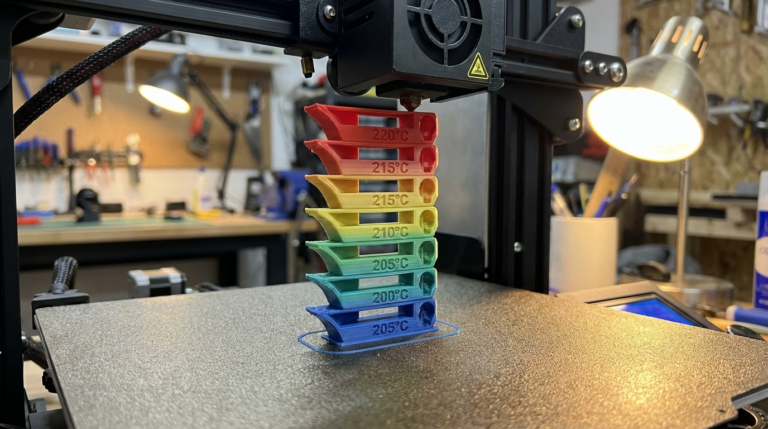
- Print a temperature tower (180°C to 220°C for PLA)
- Find the lowest temperature that still gives good layer adhesion
- Set that as my printing temperature
- Print a retraction test at that temperature
- Adjust retraction distance in 0.5mm increments if needed
This order matters. Getting temperature right first means you need less aggressive retraction, which means less chance of clogs and grinding.
How to Test Your Retraction Settings
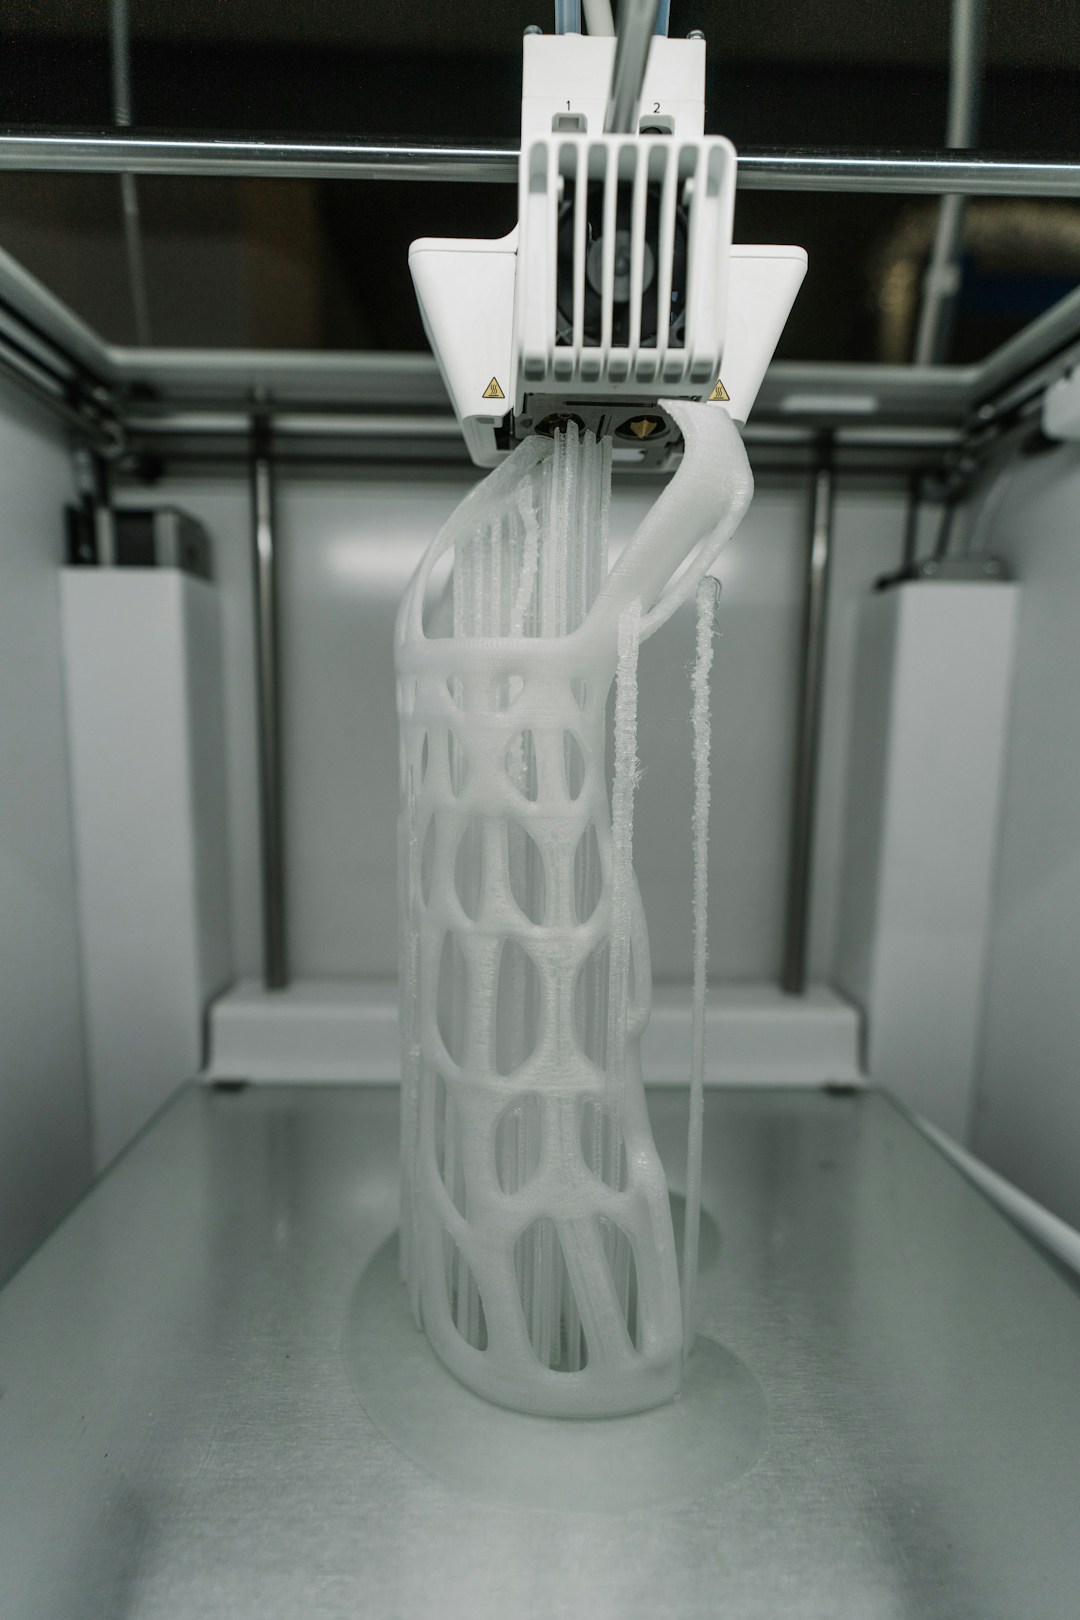
The best retraction test print I’ve found is the basic retraction tower — two pillars with the nozzle traveling between them. You can find these on Thingiverse or Printables by searching “retraction test.”
But honestly, I’ve found a faster way to test. Print a simple calibration cube (20mm x 20mm x 20mm) with a second, smaller cube about 15mm away. If there’s stringing between the two cubes, your retraction needs work. If the surfaces are clean, you’re golden.
This takes about 15 minutes versus 45+ minutes for a full retraction tower, and it gives you a quick pass/fail answer.
Reading Your Test Results
- Thick strings: Retraction distance too low — increase by 0.5mm
- Thin, wispy strings: Temperature might be too high — drop 5°C
- Blobs at start/end of travel: Retraction speed too slow, or try reducing “Extra Prime Amount” (should be 0)
- Under-extrusion after travel: Retraction distance too high or speed too fast — the extruder is grinding
- Clicking extruder: Retraction distance way too high or you have a partial clog
Retraction Settings for Different Materials on the Ender 3 V2
PLA
- Distance: 6.5mm
- Speed: 25 mm/s
- Nozzle temp: 200-210°C
PETG
- Distance: 5mm
- Speed: 25 mm/s
- Nozzle temp: 230-240°C
PETG will always string a little more than PLA. That’s just the nature of the material. Don’t chase zero stringing with PETG by cranking retraction up — you’ll end up with clogs. A heat gun or lighter for a quick pass over the finished print removes PETG strings easily.
TPU (Flexible)
- Distance: 3mm (or disabled entirely)
- Speed: 20 mm/s
- Nozzle temp: 220-230°C
TPU and Bowden tubes don’t get along well. The flexible filament compresses in the tube instead of actually retracting. I honestly run retraction disabled for most TPU prints on my Ender 3 V2 and just accept the stringing, cleaning it up afterward.

Cura’s Hidden Retraction Settings
There are a few Cura retraction settings that aren’t visible by default but can make a difference on the Ender 3 V2:
Combing Mode: Set this to “Within Infill” instead of “All.” Combing makes the nozzle travel within already-printed areas to avoid retractions. Setting it to “Within Infill” means the nozzle won’t travel across visible surfaces, reducing artifacts. But “All” can sometimes cause the nozzle to drag across top surfaces leaving marks.
Wipe Distance: Enable this and set it to about 1mm. After retraction, the nozzle moves slightly while still retracting, which cleans the tip and reduces blobs at the start of the next extrusion.
Z Hop When Retracted: I enable this at 0.2mm. When the nozzle retracts, it also lifts slightly, which prevents it from hitting already-printed parts during travel. This is especially useful for prints with lots of separate islands at the same height.
Upgrading Beyond Stock: The Capricorn Tube
If you’ve dialed in your retraction settings and still want to improve, replacing the stock white PTFE tube with a Capricorn tube is a $10 upgrade that makes a real difference. The Capricorn tube has tighter tolerances, which reduces the amount of play in the filament path.
With a Capricorn tube installed, I was able to drop my retraction distance from 6.5mm to 5.5mm and get the same or better stringing results. Less retraction distance means less chance of grinding and clogs, so it’s a win all around.
And if you’re really committed to eliminating stringing, a direct drive conversion kit (like the Micro Swiss or the Creality Sprite) lets you run retraction at just 1-2mm. But at that point, you’re spending $50-80 and dealing with added weight on the print head. For most people, a Capricorn tube and good Cura settings are more than enough.
Quick Troubleshooting Guide
Still having retraction issues after trying everything above? Run through this checklist:
- Check your PTFE tube fitting: If the tube has come loose from the hotend coupling, you’ll have a gap where filament pools and oozes. Push the tube in firmly and make sure the coupling clip is engaged
- Look for a worn PTFE tube: After a few hundred hours of printing, the inside of the tube gets chewed up. Hold it up to a light — if you can see scoring or it’s not perfectly round inside, replace it
- Clean the nozzle: A partial clog will cause inconsistent retraction. Do a cold pull or swap to a fresh nozzle
- Check the extruder arm: The stock plastic extruder arm on the Ender 3 V2 is known to crack. A cracked arm loses grip on the filament, making retraction ineffective. Check underneath for hairline cracks
- Tighten the extruder gear tension: If the gear isn’t gripping the filament firmly enough, retractions won’t pull the filament back the full distance
Nine times out of ten, stringing issues on the Ender 3 V2 come down to either temperature being too high or retraction distance being too low. Get those two things right and most of your stringing problems disappear.