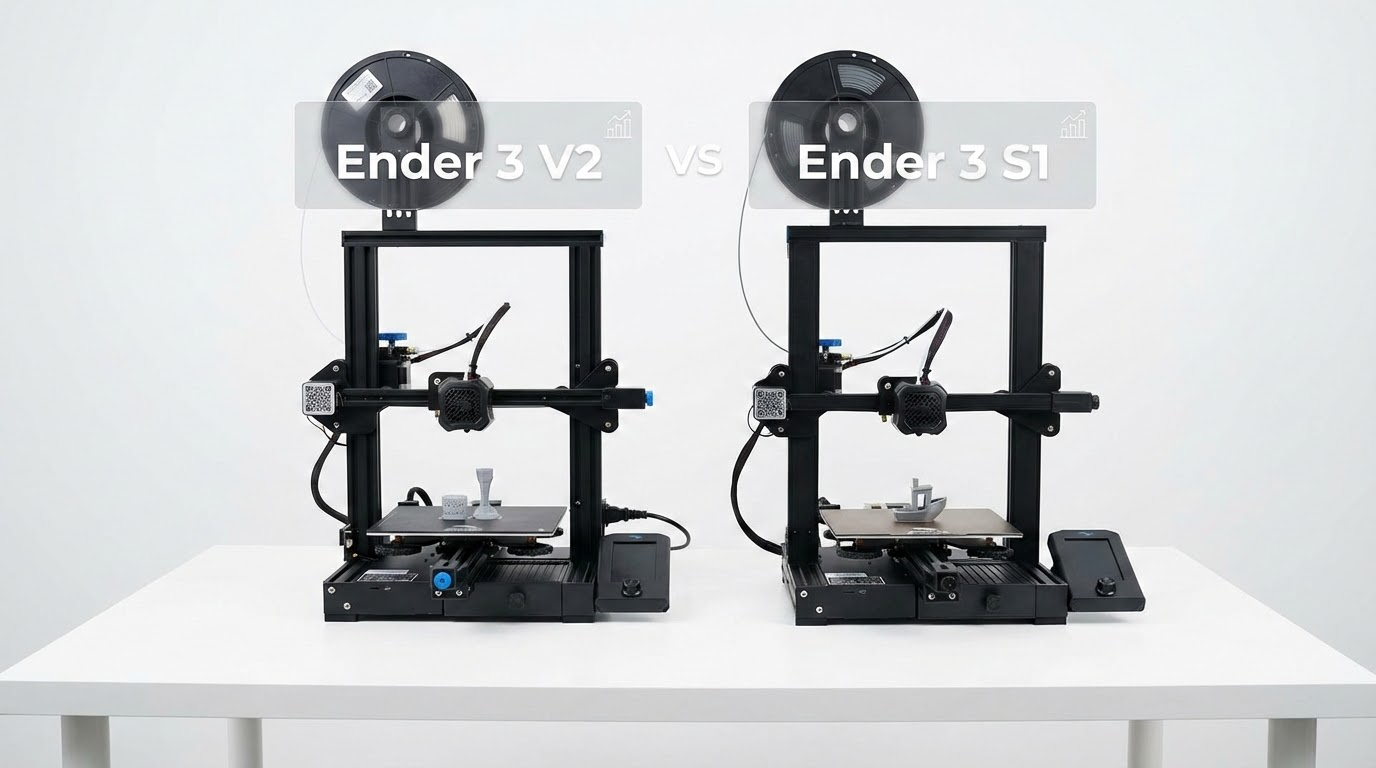
Ender 3 V2 vs Ender 3 S1: Which Should You Buy?
The Ender-3 V2 and Ender-3 S1 sit in Creality’s lineup as two different approaches to the same mission: delivering solid 3D printing at an accessible price. But they’re separated by a generation of engineering improvements, and the differences matter more than the similar naming suggests.
I’ve logged hundreds of hours on both machines. Here’s a detailed, honest comparison covering everything from hardware design to daily usability — so you can figure out which one actually fits your needs.
The Quick Version
The Ender-3 V2 is a refined classic with a Bowden extruder, manual bed leveling, and a proven track record. The Ender-3 S1 is a modernized upgrade with a direct drive extruder, auto bed leveling, and dual Z-axis screws. The S1 costs about $80-100 more, and for most people, the upgrades justify the premium.
Now let’s dig into why.
Hardware Design and Build Quality
Frame and Structure
Both printers use Creality’s signature aluminum extrusion frame, but the S1 includes a key structural improvement: dual Z-axis lead screws. The V2 runs on a single Z screw, which can cause the X gantry to sag slightly on the unsupported side over time. It’s not a deal-breaker — millions of V2 owners print successfully — but the dual Z setup on the S1 provides noticeably better consistency, especially for taller prints.
The S1 also feels slightly more rigid overall. Creality refined the bracket designs and added better bracing at critical stress points. During high-speed printing, the V2 exhibits more frame vibration, which can affect surface quality at speeds above 80mm/s.

Extruder: Bowden vs. Direct Drive
This is the single biggest hardware difference between the two printers, and it affects nearly every aspect of printing.
Ender-3 V2 — Bowden Setup: The extruder motor sits on the frame, pushing filament through a long PTFE tube to the hotend. Advantages: lighter print head means potentially faster movements with less ringing. Disadvantages: the long filament path introduces significant retraction lag, making stringing harder to control. Flexible filaments like TPU are extremely difficult to print because the filament compresses and buckles inside the tube.
Ender-3 S1 — “Sprite” Direct Drive: The extruder motor sits directly above the hotend, with a very short filament path. Advantages: precise retraction control dramatically reduces stringing, flexible filaments print reliably, and filament changes are faster. Disadvantages: heavier print head means more inertia, which can cause ringing artifacts at high speeds without input shaping compensation.
For PLA-only printing, the Bowden setup works fine — you just need to dial in retraction settings more carefully. But the moment you want to print TPU, PETG (which also benefits from shorter retraction), or any flexible material, the direct drive on the S1 becomes nearly essential.
Hotend
The V2 uses a standard MK8-style hotend with a PTFE-lined heat break. This limits the maximum safe temperature to about 240°C — beyond that, the PTFE tube starts to degrade and release harmful fumes. For PLA and PETG, this is fine. For ABS (which prints at 230-250°C), you’re operating near the limit.
The S1’s Sprite extruder includes an all-metal heat break, safely handling temperatures up to 260°C. This opens the door to ABS, ASA, and even some nylons without hardware modifications. It’s a significant upgrade for anyone planning to move beyond basic materials.
Bed Leveling
This is where daily experience diverges sharply.
Ender-3 V2: Manual bed leveling using four corner adjustment wheels and the paper test method. You turn each wheel until a piece of paper drags slightly between the nozzle and bed, then repeat until all four corners and the center are consistent. It takes 5-10 minutes, needs to be redone every few prints (or after any bump to the printer), and is the single biggest frustration for new users.
Ender-3 S1: CR Touch automatic bed leveling probe. The printer probes a grid of points across the bed, builds a mesh compensation map, and adjusts Z height in real-time during printing. You run it once (takes about 2 minutes), and the compensation handles minor bed irregularities automatically. You might need to re-probe every month or after moving the printer.

The auto bed leveling on the S1 is, for many users, reason enough to choose it over the V2. Bed leveling issues cause more failed first prints than any other single factor, and eliminating that variable makes the printing experience dramatically less frustrating.
Can you add a CR Touch to the V2? Yes, for about $40-50 plus some firmware flashing. But at that point, you’ve spent extra money and time getting closer to what the S1 offers out of the box.
Print Quality Comparison
With both printers properly tuned, the print quality difference is smaller than you might expect — but it is there.
PLA at Standard Settings (0.2mm, 50mm/s)
Nearly identical. Both printers produce clean, consistent PLA prints at conservative settings. The V2 might show slightly more stringing on travel moves, but this is easily managed with retraction tuning. Surface quality, dimensional accuracy, and layer adhesion are comparable.
Detailed Prints (0.12mm, 40mm/s)
The S1 pulls ahead here. The direct drive’s precise retraction control means cleaner surfaces on detailed models with lots of travel moves. The dual Z screws provide more consistent layer heights on tall prints. The difference isn’t dramatic, but on prints like miniatures or mechanical parts with tight tolerances, it’s visible.
Flexible Materials (TPU)
The S1 wins decisively. The V2 can technically print TPU with very slow speeds (15-20mm/s) and careful filament path management, but it’s frustrating and unreliable. The S1 prints TPU at 30-40mm/s with minimal issues right out of the box. If flexible filaments are important to you, this alone should drive your decision.
Higher Temperature Materials (ABS, ASA)
The S1 is better equipped thanks to its all-metal hotend. The V2 can print ABS at the lower end of its temperature range, but you’re operating near the PTFE degradation point. Neither printer includes an enclosure, so you’ll want to build or buy one for consistent ABS printing regardless of which machine you choose.
Firmware and Software
The V2 runs on basic Marlin firmware with a simple LCD interface. It works, but it’s limited — no Wi-Fi, no remote monitoring, no web interface. What you see on that little blue screen is what you get.
The S1 also runs Marlin but with a nicer touchscreen interface and slightly more configuration options accessible without reflashing firmware. Neither printer offers Wi-Fi connectivity in stock form (you’d need to add a Raspberry Pi with OctoPrint or Klipper for that).
Both printers work with all major slicers: Cura, PrusaSlicer, OrcaSlicer, and Creality Print. Community slicer profiles are available for both, with the V2 having a larger library due to its longer time on the market.
Upgradeability
The Ender-3 V2 has one of the richest upgrade ecosystems in 3D printing. You can add auto bed leveling, upgrade to a direct drive, install an all-metal hotend, add LED lighting, print upgraded cooling ducts, install Klipper firmware — the list goes on. Thingiverse and Printables are packed with V2 modifications.
The S1 is also upgradeable, but fewer community mods exist because many of the V2’s popular upgrades come standard on the S1. The most common S1 upgrades are Klipper firmware installation (for speed improvement) and enclosure additions.
Here’s the paradox: by the time you upgrade a V2 to match S1 features (CR Touch + direct drive + all-metal hotend), you’ve likely spent more than the S1’s premium — plus invested significant time in installation and troubleshooting.
Reliability and Maintenance
The V2 is a known quantity. Its simpler design means fewer things can go wrong, and when they do, the massive community has documented every possible fix. Common maintenance includes nozzle cleaning, belt tensioning, and occasional bed re-leveling.
The S1 is generally reliable but has more complex components that can fail. The Sprite extruder, while excellent, is harder to service than the V2’s simple Bowden setup. The CR Touch probe occasionally needs recalibration or replacement. However, for day-to-day printing, the S1 is actually less maintenance-intensive because you’re not constantly re-leveling the bed.
Price and Value Analysis
At the time of writing:
Ender-3 V2: $189-219 (frequently on sale for $169-179)
Ender-3 S1: $289-319 (sale prices around $249-269)
The price gap is roughly $80-100. For that premium, the S1 gives you: direct drive extruder, auto bed leveling, all-metal hotend, dual Z screws, and a better touchscreen. Buying those upgrades individually for the V2 would cost $100-150+ and require hours of installation and tuning.
If your budget is genuinely constrained to under $200, the V2 is an excellent printer that will serve you well. But if you can stretch to the S1’s price, the quality-of-life improvements make it the better long-term investment.
The Verdict
Buy the Ender-3 V2 if:
You’re on a tight budget and willing to learn manual bed leveling. You primarily print PLA and don’t need flexible materials. You enjoy tinkering and upgrading over time. You want the biggest community support network possible.
Buy the Ender-3 S1 if:
You want the best out-of-box experience. You plan to print TPU, PETG, or ABS. You value convenience and less maintenance. You’d rather spend a bit more upfront than upgrade incrementally.
Or consider neither:
Both the V2 and S1 now compete against newer machines like the Bambu A1 Mini, Creality K1, and Elegoo Neptune 4 Pro. At the S1’s price point especially, these alternatives offer significantly faster print speeds and more modern features. The Ender-3 line’s biggest advantage remains its unmatched community ecosystem — but the gap is narrowing every month.
Whatever you choose, remember that the printer is just the starting point. Great prints come from understanding your slicer settings, maintaining your machine, and learning from each print. Both of these machines are more than capable of producing excellent results in the right hands.