How to Fix Blobs on Corners and Edges in 3D Printing
What Causes Blobs on Corners and Edges?
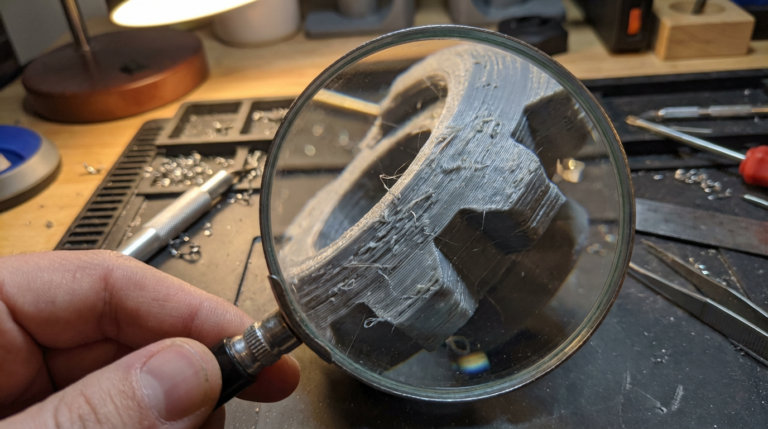
You’ve dialed in your temperatures, leveled your bed, and most of your print looks great — except for those annoying bumps, blobs, and zits that keep appearing on corners and edges. These small material buildups are one of the most common cosmetic issues in FDM 3D printing, and they’re caused by excess material depositing at points where the print head changes direction, starts a new line, or transitions between different move types.
The good news is that blobs on corners are almost entirely a slicer and firmware problem — meaning you can fix them with settings changes alone, no hardware modifications needed. In this guide, I’ll explain exactly why blobs form on corners and edges, and walk through every setting you can adjust to eliminate them.
Why Corners Are Problematic
When your print head moves in a straight line at constant speed, the extruder pushes out a consistent flow of plastic. Everything stays smooth. But at corners, several things happen simultaneously:
- The print head decelerates approaching the corner
- The print head stops momentarily or nearly stops at the corner vertex
- The print head accelerates away from the corner in a new direction
During the deceleration and brief pause, the extruder doesn’t instantly stop pushing material. Molten filament under pressure continues to ooze out, creating a small blob at the corner. This is called pressure-related over-extrusion, and it’s the primary cause of corner blobs.
Additional factors compound the problem: retraction events near corners, coasting settings that aren’t tuned correctly, and linear/pressure advance that’s either not enabled or poorly calibrated.
Fix 1: Enable and Tune Linear Advance / Pressure Advance
This is the single most effective fix for corner blobs. Linear Advance (Marlin firmware) and Pressure Advance (Klipper firmware) compensate for the pressure buildup in the hotend by adjusting extruder commands ahead of time.
When properly tuned, the firmware automatically reduces extrusion before the print head reaches a corner and increases it after the corner, maintaining consistent bead width throughout direction changes.
For Marlin (Linear Advance)
- Enable Linear Advance in firmware (
LIN_ADVANCEin Configuration_adv.h) - Print a K-factor calibration test (search “Marlin K-factor calibration” for the test pattern)
- Find the K value that produces the most consistent line width
- Set it with
M900 K0.XXin your start G-code or slicer’s firmware settings - Typical values: 0.02-0.10 for direct drive, 0.4-1.0 for Bowden
For Klipper (Pressure Advance)
- Add
[extruder] pressure_advance = 0.0to printer.cfg - Run the built-in tuning tower:
SET_VELOCITY_LIMIT SQUARE_CORNER_VELOCITY=1 ACCEL=500 - Print the PA calibration test
- Set the optimal value in printer.cfg
- Typical values: 0.02-0.08 for direct drive, 0.3-0.9 for Bowden
Linear/Pressure Advance alone can eliminate 80%+ of corner artifacts. If you only make one change from this guide, make it this one.
Fix 2: Adjust Acceleration and Jerk Settings
High acceleration means the print head changes speed very quickly. If your firmware’s motion planning is aggressive, the head spends less time decelerating at corners — which reduces the time for ooze to accumulate but can cause other problems like ringing.
Conversely, very low acceleration means the head crawls through corners, giving excess material more time to deposit.
Recommended approach:
- Acceleration: 1000-2000 mm/s² for perimeters (higher reduces corner dwell time)
- Jerk/Square Corner Velocity:
- Marlin: Jerk 8-12 mm/s (higher = sharper corners but more vibration)
- Klipper: Square Corner Velocity 5-8 mm/s
Finding the right balance is key — too high causes ringing and ghosting, too low causes blobs. Start at moderate values and adjust based on your specific printer’s rigidity.
Fix 3: Enable Coasting
Coasting stops extrusion slightly before the end of each line segment, allowing the remaining pressure in the nozzle to naturally deplete. This prevents the blob that forms where one line ends and retraction begins.
In Cura
- Enable Coasting: Check the box
- Coasting Volume: Start with 0.064 mm³ and adjust. This represents the volume of filament to “coast” at the end of each segment
- Minimum Volume Before Coasting: Leave at default (0.8 mm³) — this prevents coasting on very short segments where it would cause under-extrusion
- Coasting Speed: 90-100% of print speed works well
In PrusaSlicer/OrcaSlicer
PrusaSlicer doesn’t have a built-in coasting feature, but you can achieve similar results through:
- Retraction before wipe: Set retraction to occur partway through the wipe movement
- Wipe while retracting: Enable this option under Printer Settings → Extruder
- Wipe distance: 2-5mm
Fix 4: Optimize Seam Position
Every layer has a start/end point — the Z seam — where the nozzle begins and finishes its loop around the perimeter. This point almost always has a small blob or mark. While you can’t eliminate the seam entirely, you can control where it appears:
- Aligned/Nearest: Places seams in the same spot on every layer, creating a visible line but hiding random blobs
- Sharpest Corner: Hides the seam at the sharpest corner of the model where it’s less noticeable. This is often the best option for models with defined corners
- Random: Distributes seam points randomly. Eliminates the visible seam line but creates scattered blobs across the surface
- Rear/Custom: Places the seam at the back or a specified angle — useful for display pieces
For models with corners, “Sharpest Corner” or “Aligned” typically gives the cleanest results since the blob gets tucked into the corner geometry where it’s less visible.
Fix 5: Reduce Retraction-Related Blobs
Retraction events near corners can cause blobs in two ways: material buildup before retraction (the blob) and material deficit after retraction (the gap or pit). Fine-tuning retraction helps:
- Extra Restart Distance: Set to a small negative value (-0.02 to -0.05mm) to slightly reduce the amount of filament pushed back after retraction. This counteracts the blob that forms when extrusion restarts
- Retraction Speed: Higher speeds (40-60mm/s) reduce the time the nozzle dwells at the retraction point, leaving less time for ooze
- Minimum Travel for Retraction: Increase this to prevent unnecessary retractions on short moves near corners. 1.5-2mm is usually good
Fix 6: Temperature and Flow Adjustments
Small tweaks to temperature and flow can reduce the tendency for blobs:
- Lower nozzle temperature by 5°C: Slightly cooler material is more viscous and less likely to ooze at corners. Stay within your material’s recommended range
- Reduce flow rate by 2-3%: Slight under-extrusion (97-98% flow) can help with blobs without noticeably affecting wall strength. Calibrate your e-steps first to make sure 100% isn’t already over-extruding
- Reduce outer wall speed: Slower outer walls (20-30mm/s) produce smoother surfaces and cleaner corners since the direction changes happen more gradually
Fix 7: Outer Wall Wipe Distance
This setting moves the nozzle along the already-printed wall at the end of each perimeter loop, wiping off excess material before moving to the next feature. It’s essentially coasting applied specifically to outer walls.
- Cura: “Outer Wall Wipe Distance” — set to 0.2-0.4mm
- PrusaSlicer: “Wipe while retracting” + wipe distance 2-5mm
- OrcaSlicer: “Wipe on loops” — enable and set distance
Fix 8: Print Outer Walls First
By default, most slicers print inner walls first and outer walls last. Switching this order can improve corner quality because:
- The outer wall prints onto clean, undisturbed surface rather than potentially blobby inner perimeter tops
- Pressure dynamics are more consistent when the outer wall prints first
- However, this can slightly reduce dimensional accuracy in tight tolerances
Try it for cosmetic prints where appearance matters more than dimensional precision.
Systematic Approach to Eliminating Corner Blobs
Don’t change everything at once. Follow this order for systematic improvement:
- Calibrate Linear/Pressure Advance — biggest single improvement
- Optimize seam placement — hide what you can’t eliminate
- Enable coasting — reduce end-of-line blobs
- Tune acceleration/jerk — minimize corner dwell time
- Adjust retraction — fine-tune start/stop behavior
- Temperature/flow — minor tweaks for final refinement
Print a calibration cube (20x20x20mm) after each change so you can see the effect of each individual adjustment.
Material-Specific Tips
- PLA: Most forgiving. Responds well to all fixes above. Lower temp (195-205°C) helps with corner blobs
- PETG: Naturally blobby and stringy. Coasting and Linear Advance are essential. Consider slightly higher retraction (1-2mm direct drive, 5-6mm Bowden)
- ABS: Less prone to corner blobs due to lower viscosity at print temp. Focus on acceleration tuning
- TPU: Corner blobs are nearly unavoidable on Bowden setups. Direct drive with very slow speed (15-25mm/s) and zero retraction gives the best results
Final Thoughts
Corner blobs are a pressure management problem, and the tools to fix them already exist in your firmware and slicer. Linear Advance or Pressure Advance is the foundation — without it, you’re fighting physics. Layer the other fixes on top for progressively cleaner corners until you’re happy with the result.
For most printers, properly calibrated pressure advance plus reasonable acceleration settings and coasting will get you 95% of the way to blob-free corners. The remaining 5% comes from seam placement and minor temperature tweaks. Take the time to calibrate once, save your profile, and enjoy clean prints going forward.