How to Fix Uneven Bed Heating and Hot Spots on Your 3D Printer
Symptoms of Uneven Bed Heating
Your first layer looks perfect in the center of the bed but keeps peeling up at the edges. Or you’ve dialed in your Z offset perfectly at one corner, but the opposite corner either scratches the bed or doesn’t stick at all. Before you blame your leveling, check your bed temperature — because there’s a good chance the problem isn’t your mesh or your Z offset. It’s hot spots.
Uneven bed heating is one of those problems that masquerades as half a dozen other issues. You’ll chase bed leveling, Z offset, first layer settings, and adhesion solutions for hours before realizing that the temperature across your build surface varies by 10-15°C from center to edge. And no amount of leveling can compensate for a section of the bed that’s simply too cool to bond with your filament.
Here’s how to diagnose, measure, and fix uneven bed heating on any 3D printer.
Why Heated Beds Have Hot Spots
A perfectly uniform heated bed would have exactly the same temperature at every point on its surface. In practice, this is impossible for several reasons:
Heating Element Design
Most budget 3D printers use a PCB heater — a thin circuit board with resistive traces that generate heat when current flows through them. The heating traces are typically arranged in a spiral or zigzag pattern, and the density of these traces determines how much heat each area of the bed receives. Manufacturing variations and design choices mean some areas get more heating than others.
More expensive printers use silicone AC heaters that can be designed with more uniform trace patterns and deliver more power. These are inherently more uniform, but even they have some variation.
Edge Losses
The edges and corners of any heated bed lose heat faster than the center. This is basic thermodynamics — the center is surrounded by other heated material on all sides, while the edges are exposed to ambient air on one or more sides. Without insulation, corners can be 5-15°C cooler than the center on some printers.
Bed Material and Thickness
The bed itself acts as a heat spreader. Thick aluminum plates spread heat more evenly than thin ones because there’s more material to conduct heat from hot areas to cool areas. A 6mm aluminum plate will have significantly more uniform temperature than a 3mm plate with the same heater.
Mounting Hardware
Bed leveling screws, mounting clips, and silicone spacers all create thermal bridges that conduct heat away from the bed at specific points. If you’ve ever noticed that adhesion is particularly bad near one of your bed leveling screws, this is likely why — the metal screw is pulling heat away from the bed surface at that exact spot.
Build Surface Differences
Your build surface — whether it’s glass, PEI, textured spring steel, or something else — sits on top of the heater and adds another layer of thermal resistance. If the surface isn’t making perfect contact with the heated bed (air gaps from warped glass, dirty surfaces, or misaligned magnetic sheets), those air gaps act as insulation and create cool spots.
How to Measure Bed Temperature Uniformity
You can’t fix what you can’t measure. Here are three methods to map your bed’s temperature, from cheapest to most accurate:
Method 1: Infrared Thermometer ($15-30)
A handheld IR thermometer lets you spot-check temperatures at various points on the bed. Heat your bed to your normal printing temperature, wait 10 minutes for it to stabilize, then measure at a grid of points: all four corners, the center of each edge, and the center. Record the readings and note the spread.
A temperature spread of 3-5°C is normal and acceptable. More than 5°C is problematic, and more than 10°C will cause visible print quality differences across the bed.
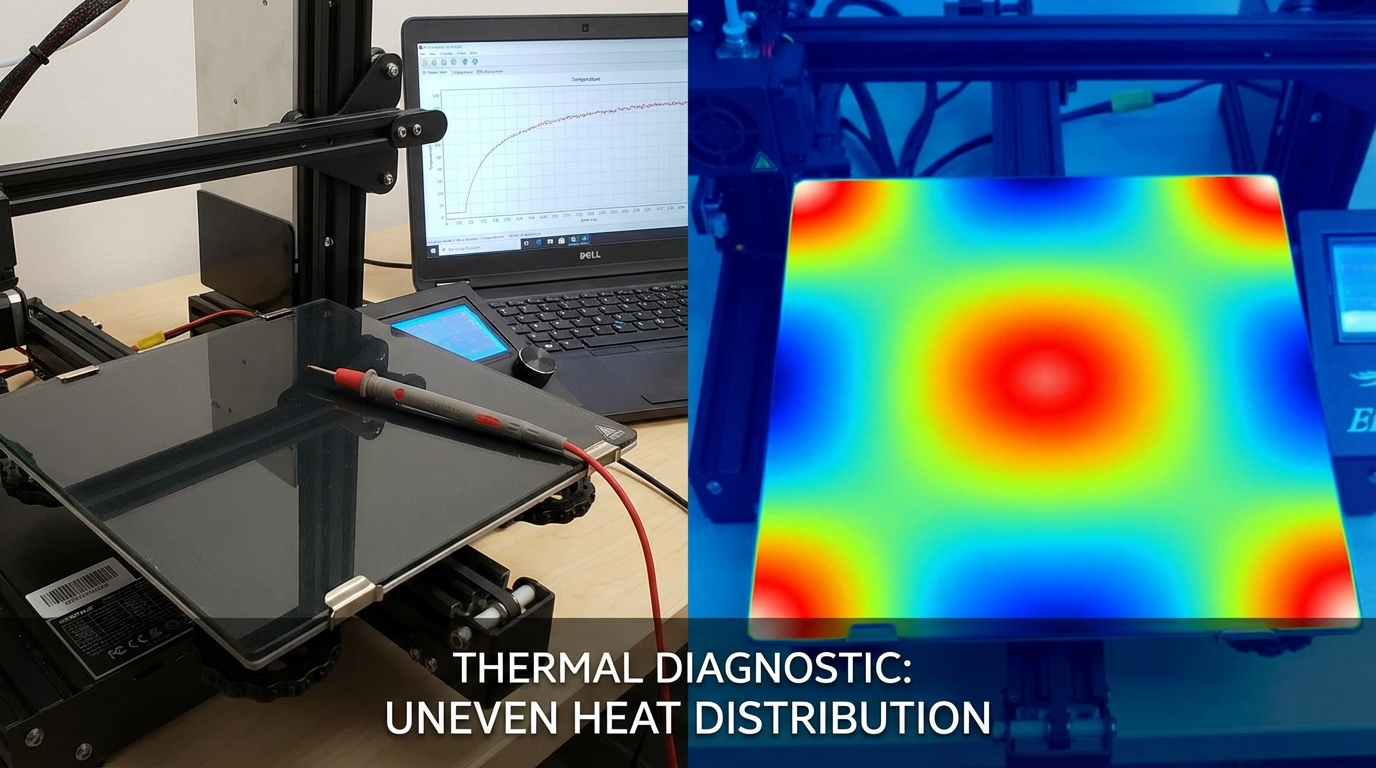
Method 2: Thermal Camera ($200+ or phone attachment)
A thermal camera gives you a complete picture of your bed’s temperature distribution in a single image. FLIR and Seek make phone attachments starting around $200 that produce adequate resolution for this purpose. The thermal image will clearly show hot spots, cool edges, and any unusual patterns.
If you don’t want to buy one, check your local library or makerspace — many now lend thermal cameras as part of their tool library.
Method 3: Multiple Thermistor Test
Tape a loose thermistor (the same type your printer uses, available for $2-3 on Amazon) to different points on the bed surface and read the temperature through your printer’s firmware. This is the most accurate method because it uses the same type of sensor your printer uses for its bed temperature reading.

How to Fix Uneven Bed Heating
Fix 1: Add Bed Insulation (Easiest, Most Effective)
The single most effective fix for uneven bed heating is adding insulation to the underside of the heated bed. A layer of cork, silicone insulation mat, or even kapton-faced insulation foam reduces heat loss through the bottom of the bed, which:
- Reduces the temperature difference between center and edges
- Decreases heat-up time by 30-50%
- Reduces power consumption
- Helps maintain temperature stability during printing
Self-adhesive cork sheets (3-5mm thick) are the most popular option and cost under $10. Cut them to fit the underside of your bed, peel and stick, and cut holes for any mounting hardware. The improvement is usually dramatic — a printer with a 12°C center-to-edge difference might drop to 4-5°C with proper insulation.
Fix 2: Upgrade to a Better Heated Bed
If your printer has a particularly cheap or thin heated bed, upgrading to a higher-quality option can solve uniformity issues at the source. Options include:
- Thicker aluminum plate: Replacing a 3mm plate with a 5-6mm plate improves heat spreading. Make sure to account for the additional weight in your bed leveling and Z offset.
- AC silicone heater: Significantly more uniform than PCB heaters and more powerful. Requires a Solid State Relay (SSR) and mains wiring, so only attempt this if you’re comfortable with electrical work. Improper AC wiring can be lethal.
- Keenovo heaters: A popular aftermarket AC heater brand with excellent uniformity and various sizes. Available pre-wired with thermistors.
Fix 3: Ensure Good Build Surface Contact
If you’re using a removable build surface (magnetic PEI sheet, glass, etc.), make sure it’s making full contact with the heated bed:
- Clean both surfaces thoroughly — any debris creates air gaps
- Replace worn or weak magnetic sheets that don’t hold the surface flat
- Check glass plates for warping — hold a straight edge against the surface and look for light gaps
- Consider using thermal paste or thermal pads between the heater and the build surface for better thermal transfer
Fix 4: Use Firmware Compensation
Some advanced firmware options can partially compensate for uneven heating:
- Klipper’s “heater_bed” with multiple thermistors: You can add additional thermistors to monitor different bed zones, though this doesn’t directly fix the heating — it gives you better information.
- Bed mesh compensation: While primarily for physical bed flatness, a properly calibrated bed mesh can also account for thermal expansion differences across the bed. If one area is cooler and therefore less expanded, the mesh probing will capture this difference.
- First layer temperature boost: Setting your bed temperature 5-10°C higher for the first layer ensures that even the coolest spots on the bed reach adequate adhesion temperature.
Fix 5: Reduce Draft Exposure
If your printer is near a window, air vent, or doorway, drafts can cool one side of the bed more than the other. This creates asymmetric heat loss that’s difficult to fix with hardware alone. Solutions:
- Move the printer away from drafts
- Add an enclosure or at least side panels to block airflow
- Use a draft shield in your slicer settings — this prints a thin wall around your model that blocks air movement
Material-Specific Impact
The impact of uneven bed heating varies significantly by material:
PLA (50-60°C bed): PLA is relatively forgiving of temperature variations. A 5°C spread usually causes no visible issues. Problems start above 8-10°C variation, mainly manifesting as edge adhesion failures.
PETG (70-80°C bed): PETG is moderately sensitive. Variation above 5°C can cause inconsistent adhesion across the bed, with some areas sticking too well (hard to remove) and others not enough.
ABS/ASA (90-110°C bed): ABS is extremely sensitive to bed temperature uniformity. Even a 3-5°C variation can cause warping on the cooler side. This is why ABS printers benefit most from upgraded heaters and insulation.
Nylon (70-80°C bed): Nylon is also quite sensitive, though it manifests differently — cooler spots tend to cause the nylon to detach and curl rather than warp gradually.
Prevention: Best Practices for Bed Temperature Management
- Always preheat. Give your bed at least 5 minutes at temperature before starting a print. The surface temperature lags behind the thermistor reading because the thermistor is typically mounted on the underside of the bed.
- Use a PID-tuned bed heater. Run a PID tune for your bed heater if your firmware supports it. This reduces temperature oscillation and improves steady-state accuracy.
- Check your thermistor mounting. If your bed thermistor is loosely attached or positioned poorly, it may report inaccurate temperatures, causing the heater to overshoot or undershoot. Make sure it’s securely attached to the bed with thermal tape or pressed firmly into a dedicated pocket.
- Monitor with OctoPrint or Mainsail. These interfaces show bed temperature graphs over time. Look for excessive oscillation (more than ±2°C) which indicates PID tuning issues or inadequate insulation.
- Print in the center when possible. The center of the bed is almost always the most temperature-stable area. If you’re printing a small part, place it in the center rather than a corner.
Quick Diagnostic Checklist
If you suspect uneven bed heating, work through this checklist:
- Heat bed to printing temperature and wait 10 minutes
- Measure temperature at 9 points (4 corners, 4 edge centers, center)
- If spread is > 5°C: add underside insulation
- If spread is > 10°C: consider upgrading the heater
- Check build surface contact — clean both surfaces, replace worn magnetic sheets
- Check for drafts — feel for air movement around the printer
- Run PID tune for the bed heater
- If problem persists after all fixes: restrict printing to the central 70% of the bed
Uneven bed heating is a hardware problem that no amount of slicer tuning can fully overcome. But the fixes are straightforward and inexpensive — a $10 cork insulation sheet solves the problem for most printers, and ensuring good build surface contact costs nothing but a few minutes of cleaning. Identify the issue, apply the right fix, and your first layers will thank you.