How to Paint & Finish 3D Prints: Complete Guide (2026)
Why Post-Processing Matters
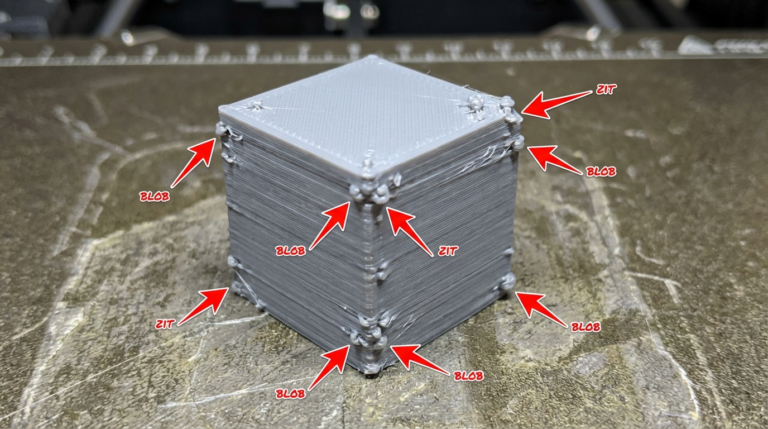
A freshly printed FDM part has visible layer lines, a slightly rough texture, and a uniform plastic appearance. With proper finishing, that same part can look injection-molded, hand-crafted, or indistinguishable from a commercially manufactured product.
Post-processing transforms functional prints into display-worthy pieces and is essential for cosplay props, architectural models, gifts, and any project where appearance matters.
Tools and Materials You Need
Sanding: Sandpaper (120, 220, 400, 600, 800, 1000 grit), sanding sponges for curved surfaces, detail files or needle files for tight areas.
Filling: Spot putty or lightweight filler (Bondo Glazing Putty), CA (super glue) + baking soda for quick fills, XTC-3D epoxy coating (optional).
Priming: Filler primer spray (Rust-Oleum Filler Primer or Tamiya Surface Primer), gray primer for most colors, white primer for bright or light colors.
Painting: Acrylic spray paint or airbrush paint, small brushes for detail work, clear coat (matte, satin, or gloss).
Safety: N95 respirator (essential when sanding and spraying), safety glasses, disposable gloves, ventilated workspace or spray booth.
Step 1: Sanding
Sanding removes the worst layer lines and creates a surface that primers and paints can grip. This is the most time-consuming step but also the most important.
Wet vs Dry Sanding
Dry sanding removes material faster and is best for the initial rough grits (120-220). Wet sanding (with water) produces a smoother finish and is best for fine grits (400+). It also reduces dust and prevents clogging the sandpaper.
Sanding Progression
- 120 grit — Remove the most prominent layer lines and blemishes. Do not press hard; let the sandpaper do the work.
- 220 grit — Smooth out the scratches left by 120 grit. The surface should start feeling uniform to the touch.
- 400 grit (wet) — Transition to wet sanding here. The surface should now appear smooth under normal lighting.
- 600-800 grit (wet) — Only necessary if you want a very smooth base. Most paint jobs look excellent starting from 400 grit.
Tips for Effective Sanding
- Sand in one direction, not in circles, to avoid swirl marks
- Use sanding sponges on curved surfaces to maintain the shape
- Rinse the part frequently when wet sanding to check progress
- Do not over-sand edges and corners — PLA is soft and details disappear quickly
- Wear a respirator — PLA dust is fine and irritating to lungs
Step 2: Filling Layer Lines
For prints where sanding alone is not enough (large layer heights, visible gaps), filling compounds speed up the process dramatically.
Option A: Spot Putty
Apply a thin layer of spot putty (like Bondo Glazing Putty) over remaining layer lines. Let it cure for 20-30 minutes, then sand smooth starting at 220 grit. Repeat if needed. Best for localized problem areas, seams between glued parts, and deep layer lines.
Option B: CA Glue + Baking Soda
Apply thin CA glue to the surface, then sprinkle baking soda on top. The reaction creates an instant hard filler that sands easily. Best for quick spot repairs, filling small gaps, and reinforcing thin sections.
Option C: XTC-3D Epoxy Coating
XTC-3D is a two-part epoxy specifically designed for 3D prints. Brush it on, and it self-levels to fill layer lines. One coat typically eliminates visible layers on prints at 0.2mm layer height. Best for large parts where sanding every surface is impractical. Caution: XTC-3D softens fine details, so mask off areas you want to keep sharp.
Step 3: Priming
Primer serves three purposes: it reveals surface defects you missed, it provides a uniform base color for paint adhesion, and it fills micro-scratches from sanding.
Applying Filler Primer
- Clean the part — wash with soap and water to remove sanding dust and oils. Let it dry completely.
- Shake the can for 2 full minutes. Under-shaking causes uneven texture.
- Apply thin coats — hold the can 20-25cm from the surface and sweep in steady passes. Two thin coats beat one thick coat.
- Wait 15-20 minutes between coats.
- Inspect after drying — primer reveals every remaining imperfection. Mark problem areas and re-sand or fill as needed.
Primer Color Choice
- Gray primer — works with most paint colors, best all-purpose option
- White primer — essential under yellow, red, orange, and other bright colors
- Black primer — useful for dark final colors and metallic finishes
Light Sanding After Primer
After the primer is fully cured (24 hours for best results), lightly sand with 600-800 grit wet sandpaper. This removes any primer texture and creates an ultra-smooth base. Wipe clean with a damp cloth.
Step 4: Painting
Spray Paint (Easiest Method)
- Shake vigorously for 2+ minutes
- Apply light coats — sweep across the part in smooth passes
- Keep distance at 20-30cm from the surface
- Apply 3-4 thin coats with 10-15 minutes between each
- Build coverage gradually — rushing leads to drips and orange peel
Recommended brands: Rust-Oleum 2X, Montana Gold, Tamiya TS series (for precision work).
Airbrush (Best Quality)
An airbrush gives the most professional results with smooth gradients and precise control. Use acrylic airbrush paint (Vallejo, Createx, or Badger), thin to milk-like consistency, spray at 15-25 PSI, and apply multiple light passes. Entry-level setup cost: $50-80 for a basic compressor and gravity-feed airbrush.
Hand Brushing (Most Accessible)
Brush painting works well for small parts and detail work. Use quality acrylic paints (Citadel, Vallejo, or Army Painter), apply thin coats, brush in one direction to minimize brush strokes, and let each coat dry fully before the next.
Painting Techniques
Dry brushing: Load paint on a brush, wipe most of it off on a paper towel, then lightly drag across raised details. This highlights texture and edges for a weathered look.
Washing: Thin dark paint to a watery consistency and apply over the entire surface. It pools in recesses, adding depth and shadow. Wipe excess from raised surfaces.
Masking: Use painter’s tape or liquid masking fluid to protect areas while painting adjacent sections. Essential for multi-color paint jobs.
Step 5: Clear Coating
A clear coat protects your paint job from scratches, UV damage, and handling wear. It also sets the final appearance:
- Matte clear coat — no shine, hides minor imperfections, looks natural
- Satin clear coat — subtle sheen, the most versatile option
- Gloss clear coat — high shine, looks professional but reveals every flaw
Apply 2-3 thin coats of clear coat with the same technique as paint. Allow 24-48 hours for full cure before handling.
Special Finishing Techniques
Acetone Vapor Smoothing (ABS Only)
ABS can be smoothed by exposing it to acetone vapor. Place the part in a sealed container with a small amount of acetone, and the vapor dissolves the surface layer, eliminating layer lines entirely. Warning: acetone is flammable, and over-exposure melts details. Start with 30-second exposures.
Hydro Dipping
Spray a design onto water surface, then dip your primed part through the paint film. This transfers complex patterns (wood grain, carbon fiber, camouflage) onto 3D-printed surfaces.
Metallic Finishes
For realistic metal effects: prime in black, apply metallic base coat (silver, gold, or bronze), dry brush highlights with lighter metallic shades, apply dark wash to add depth, and seal with matte or satin clear coat.
Common Mistakes to Avoid
- Skipping primer — paint adheres poorly to bare plastic and scratches off easily
- Thick coats — cause drips, orange peel texture, and extended drying times
- Painting in high humidity — moisture causes cloudiness in clear coats
- Not wearing a respirator — spray paint and sanding dust are serious health hazards
- Rushing between coats — insufficient drying time causes paint to lift or wrinkle
- Ignoring temperature — spray paint works best at 15-25°C; cold paint sputters
Conclusion
Finishing a 3D print is where the magic happens. A methodical approach — sand, fill, prime, paint, clear coat — transforms raw plastic into something that looks manufactured or hand-crafted. Start with a simple project like a single-color prop, master the fundamentals, and then experiment with advanced techniques like dry brushing, washing, and metallic effects.
The investment in supplies is modest (under $50 for a complete starter kit), and the skills transfer to any future printing project. Once you see the difference proper finishing makes, you will never want to leave a print bare again.