How to Stop 3D Print Warping With Brims and Mouse Ears: Settings and Strategies for Every Material
Why Brims and Mouse Ears Exist
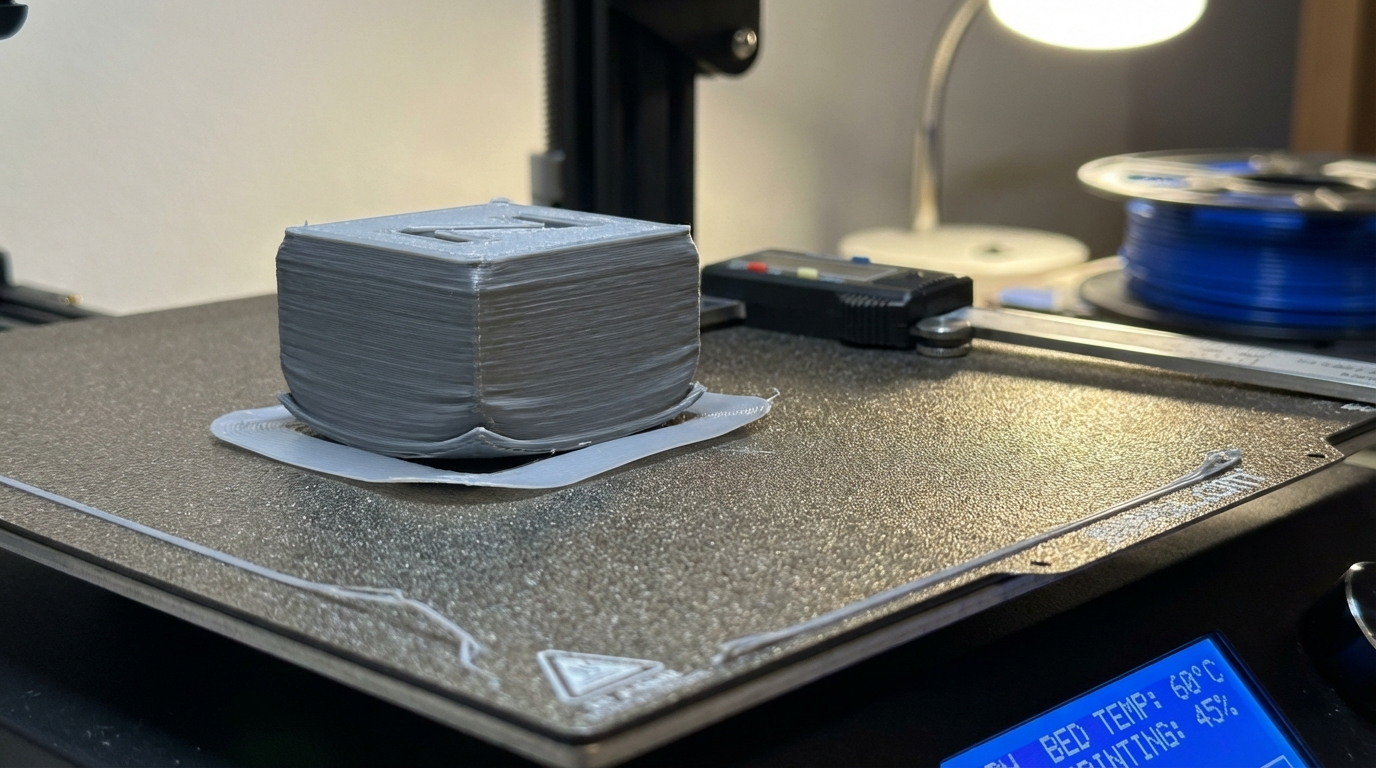
Warping is the oldest enemy in 3D printing. Your beautifully designed part starts peeling off the bed mid-print, corners curl upward like dried leaves, and you come back to find a bird’s nest of spaghetti instead of a finished part. The root cause is differential cooling — the bottom of your print is warm and stuck to the bed, while the top layers cool and contract, pulling the corners up with considerable force.
Brims and mouse ears are your first line of defense. They work by increasing the contact area between your print and the bed surface, essentially giving the part more “grip” to resist the curling forces. But they’re not interchangeable, and using the wrong one (or the wrong settings) can waste time and material without solving the problem.
Understanding Why Prints Warp
Before diving into solutions, it helps to understand the physics. All thermoplastics shrink as they cool. The shrinkage rate varies by material:
- PLA: ~0.3–0.5% shrinkage — minimal warping, rarely needs brims
- PETG: ~0.5–0.8% — moderate warping on large parts
- ABS: ~0.7–1.1% — notorious for warping, especially without an enclosure
- Nylon: ~1.0–1.5% — extreme warping, almost always needs adhesion aids
- Polycarbonate: ~0.5–0.7% — warps less than ABS but still significant
The warping force concentrates at corners and edges because that’s where the temperature differential is greatest. The center of a large, flat part is insulated by surrounding material, but corners are exposed to cooling on three sides. This is why you see corners lift first, even when the center of the print is fine.
Brims: Your All-Purpose Anti-Warp Shield
A brim is a flat, single-layer extension that surrounds the base of your print. Think of it as a temporary skirt that’s attached to the part. It increases the bed contact area dramatically, distributing the warping forces over a much larger surface.
When to Use a Brim
- Large flat parts with thin cross-sections
- Tall, narrow parts with small footprints (high center of gravity)
- Any ABS, nylon, or PC print without an enclosure
- Parts with sharp corners or points that lift
- Prints on surfaces with mediocre adhesion (cold bed, worn PEI)
Optimal Brim Settings
Every major slicer supports brims, but the default settings are rarely optimal. Here’s how to configure them for maximum effectiveness:
Brim width (number of lines): This is the most important parameter. More lines = more adhesion, but also more cleanup.
- 5 mm (3–4 lines): Light duty. Good for PLA parts that barely need help.
- 8–10 mm (5–7 lines): Standard. Handles most PETG and moderate ABS warping.
- 15–20 mm (10–14 lines): Heavy duty. For large ABS/nylon parts or known problem prints.
Brim only on outside: Most slicers default to adding brim around the entire part, including inside holes. Turn on “brim only on outside” (called “Brim Ears Only” in some slicers) to avoid brims in holes that are hard to clean up.
Brim gap: Some slicers let you add a tiny gap (0.1–0.2 mm) between the brim and the part. This makes removal dramatically easier while barely affecting adhesion. In Cura, this is “Brim Distance.” In PrusaSlicer, it’s “Brim Separation.”
Brim layer count: Usually 1 layer. Increasing to 2–3 layers helps on extremely warpy parts but makes cleanup harder. Only use multi-layer brims as a last resort.
Brim Removal Tips
A well-configured brim should snap off cleanly with your fingers or a quick pass with a craft knife. If removal is difficult:
- Add a 0.1 mm brim gap in your slicer settings
- Use a sharp deburring tool rather than pliers (cleaner edge)
- Remove the brim before the part fully cools — slightly warm plastic breaks more cleanly
- For PLA, a quick swipe with a heat gun softens the brim-to-part junction for easy snapping
Mouse Ears: Surgical Precision Anti-Warp
Mouse ears (also called corner tabs or warp pads) are small discs placed at specific corners where warping occurs. Unlike brims that surround the entire perimeter, mouse ears target only the problem areas. They’re named for their resemblance to — you guessed it — tiny round ears sticking out from the corners of your part.
When Mouse Ears Beat Brims
- Parts with both flat edges and detailed features: A full brim covers everything, including areas that don’t need it and areas where cleanup would damage details. Mouse ears go only where needed.
- Parts with internal holes or complex perimeters: Brims inside holes are a nightmare to remove. Mouse ears skip these entirely.
- Time-sensitive prints: Less material = faster printing and faster cleanup.
- Aesthetic parts: Mouse ear marks are limited to corners where they’re less visible.
How to Add Mouse Ears in Your Slicer
Cura — Tab Anti-Warping Plugin: Go to Marketplace → search “Tab Anti Warping.” Once installed, you can click on corners of your model in the prepare view to place circular tabs. Adjustable tab size (5–15 mm diameter) and height (one layer).
PrusaSlicer/OrcaSlicer — Paint-on Brim: Use the “Paint-on supports” tool but select “Enforce brim” modifier. Paint brim regions onto specific corners where warping is expected. This gives surgical control over where adhesion helpers go.
Manual Method (Any Slicer): In your CAD program, add 10–15 mm diameter, 0.2 mm thick discs at each corner of your part. Boolean-merge them to the base. This method works universally but requires modifying your model.
Optimal Mouse Ear Dimensions
- Diameter: 10–15 mm for standard parts, up to 20 mm for heavy-warping materials
- Thickness: One layer height (usually 0.2 mm). Thicker ears don’t help and are harder to remove.
- Placement: Center each ear on the sharp corner or point where lifting occurs. For rectangular parts, place one at each of the four corners.
Advanced Anti-Warp Strategies
Combining Brims and Mouse Ears
For extreme cases (large ABS parts, nylon, or prints on cold beds), you can combine both techniques. Use a moderate brim (8 mm) along straight edges and add mouse ears at sharp corners. This is overkill for PLA but can save a 12-hour ABS print from failing at hour 10.
Brim Overrides Per Material
If you frequently switch between PLA (no brim needed) and ABS (always needs a brim), set up material-specific profiles in your slicer. In Cura, link brim settings to your material profile. In PrusaSlicer, use filament-specific overrides. This prevents you from wasting time adding and removing brim settings with every material change.
Raft as a Last Resort
Rafts are the nuclear option. A full multi-layer platform printed under your part provides maximum adhesion but comes with severe downsides:
- Significant material waste (often more filament in the raft than the part)
- Rough bottom surface from raft separation
- Increased print time
- Difficult to remove without damaging the part
Only use rafts when brims and mouse ears have failed AND you can’t fix the root cause (usually insufficient bed temperature or missing enclosure). Rafts are a bandaid, not a solution.
Fixing the Root Cause: Why Brims Shouldn’t Be Permanent
Brims and mouse ears are symptoms treatments. They manage warping without eliminating it. For a permanent fix, address the underlying causes:
- Enclosure: Eliminates drafts and maintains ambient temperature. Reduces ABS warping by 80%+.
- Bed temperature: Often set too low. ABS needs 100–110°C, not the 60°C default.
- First layer settings: Slower speed, wider lines (120% width), and slightly higher temperature for the first few layers.
- Bed surface: PEI sheets (textured or smooth) provide dramatically better adhesion than bare glass or BuildTak for most materials.
- Draft elimination: Even without a full enclosure, blocking direct airflow from AC vents or open windows makes a difference.
- Part orientation: Rotating the part 45° on the bed can redistribute warping forces and eliminate corner lifting.
Material-Specific Brim and Mouse Ear Recommendations
PLA
Rarely needs brims. For large flat parts (>150 mm), a 5 mm brim or corner mouse ears are sufficient. Most PLA warping is actually caused by bed temperature being too high (above 65°C), not too low.
PETG
Moderate warping on parts wider than 100 mm. Use 8–10 mm brim with 0.1 mm gap. PETG sticks aggressively to PEI, so the gap prevents the brim from fusing permanently to the bed surface.
ABS
Almost always needs adhesion help without an enclosure. Use 15 mm brim minimum, no gap (you want maximum adhesion). With an enclosure and proper bed temp (105–110°C), you can often get away with mouse ears only.
Nylon
The warping king. Use maximum brim width (20 mm), consider multi-layer brims (2 layers), and add mouse ears on top of that for sharp corners. Nylon also benefits from a PVA glue stick on the bed surface for additional mechanical adhesion.
TPU/Flexible
Rarely warps due to its flexibility absorbing shrinkage stresses. If you’re seeing TPU lift, the problem is almost certainly bed adhesion, not warping. Clean your bed surface instead of adding brims.
Slicer-Specific Settings Reference
Cura
- Build Plate Adhesion Type → Brim
- Brim Width → set in mm
- Brim Line Count → alternative to width (in number of lines)
- Brim Only on Outside → Yes (recommended)
- Brim Distance → 0.1 mm for easy removal
PrusaSlicer / OrcaSlicer
- Print Settings → Brim type → Outer brim only
- Brim width → set in mm
- Brim separation → 0.1 mm (called “Brim-object gap” in some versions)
- Brim ears → Enabled (auto-places mouse ears at corners instead of full brim)
- Brim ears maximum angle → 125° (only adds ears at sharp corners)
Wrapping Up
Warping doesn’t have to ruin your prints. A well-configured brim handles 90% of adhesion problems, and mouse ears give you surgical precision for the remaining edge cases. Start with the minimum intervention needed — a 5 mm brim or corner mouse ears — and escalate only if the problem persists. And always work toward eliminating the root cause so brims become optional, not mandatory.
The perfect brim is the one you barely notice was there — easy on, easy off, and your corners stay firmly planted on the bed where they belong.