How to Tell If Your 3D Printer Filament Is Wet (3 Easy Tests)
Why Wet Filament Ruins Your Prints
Here’s a dirty secret about 3D printing that nobody tells beginners: your filament is hygroscopic. That means it absorbs moisture from the air like a sponge. And when you try to print with wet filament, the water inside turns to steam as it passes through the hot nozzle — causing bubbles, pops, rough surfaces, and weak parts.
The frustrating part? Wet filament symptoms often look like other problems. You might spend hours tuning retraction settings to fix what looks like stringing, when the real culprit is moisture. Or you might replace a “clogged” nozzle that was actually just struggling with steam-filled filament.
In this guide, you’ll learn exactly how to tell if your filament is wet, which materials are most vulnerable, and three reliable testing methods you can use right now.
Which Filaments Absorb the Most Moisture?
Not all filaments are created equal when it comes to moisture absorption. Here’s how common materials rank from most to least hygroscopic:
- Nylon (PA): Extremely hygroscopic. Can absorb 1.5–2.5% of its weight in water within 24 hours in humid conditions. Needs to be dried before almost every print session.
- PVA: Water-soluble by design, so it absorbs moisture incredibly quickly. Should always be stored in a dry box with desiccant.
- PETG: Moderately hygroscopic. Absorbs enough moisture in a few days of open-air storage to cause noticeable quality issues.
- TPU: Moderate moisture absorption. Flexible filaments are particularly annoying because moisture makes them even harder to print.
- ABS: Low to moderate absorption. Can tolerate some humidity but will eventually develop problems.
- PLA: Low absorption rate. Can sit out for weeks in dry climates with minimal issues, but will eventually absorb enough moisture to matter.
- ASA: Similar to ABS. Relatively resistant but not immune.
The 5 Telltale Symptoms of Wet Filament
Before we get into formal testing methods, here are the warning signs that your filament has absorbed too much moisture:
1. Popping and Crackling Sounds
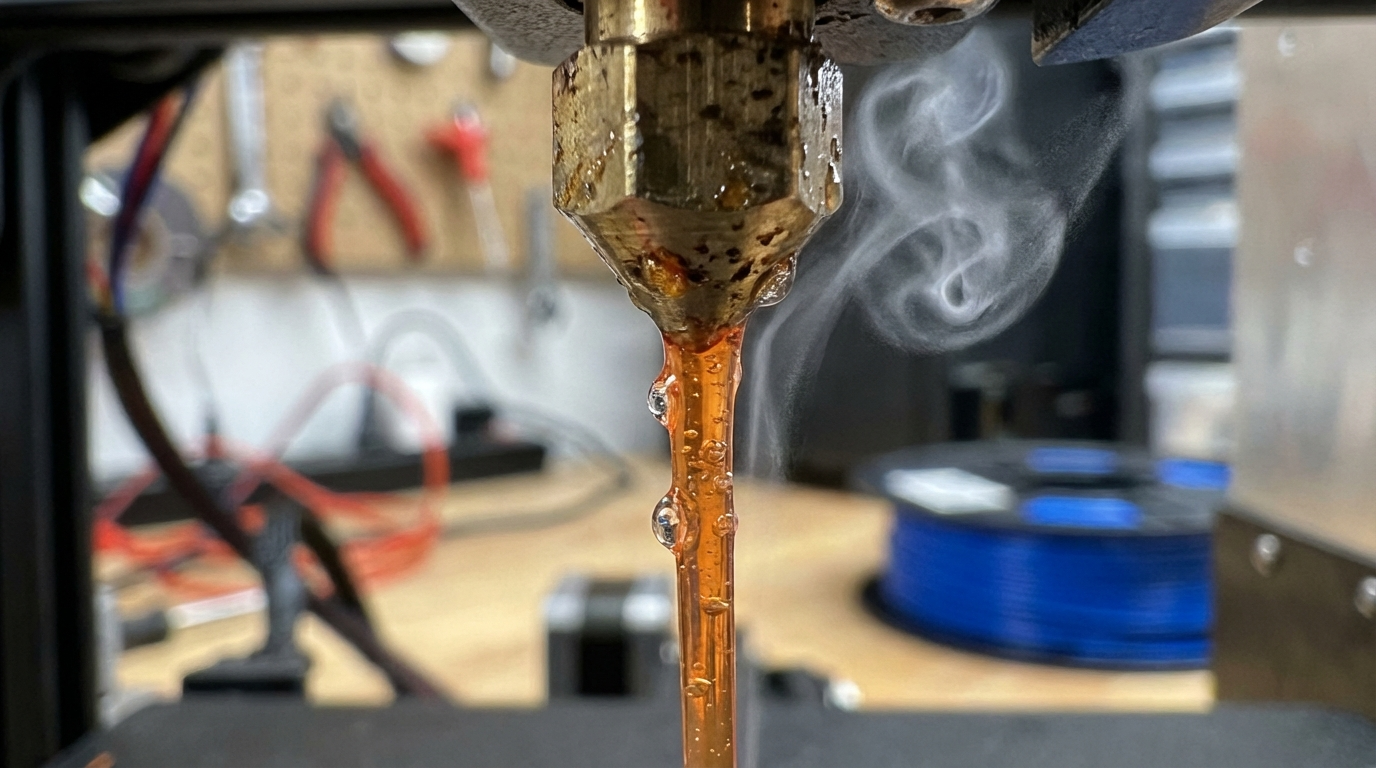
This is the most obvious symptom. If you hear snapping, popping, or sizzling sounds coming from the nozzle while printing, moisture inside the filament is boiling off as steam. Fresh, dry filament should extrude almost silently.
2. Tiny Bubbles on the Surface
When steam escapes through the molten plastic, it leaves behind small craters or bubbles on the print surface. These look like tiny pockmarks or zits scattered randomly across your walls — different from the regular pattern of z-seam artifacts.
3. Excessive Stringing
Moisture disrupts the melt flow characteristics of the filament. This often shows up as increased stringing and oozing between travel moves, even with well-tuned retraction settings. If your stringing suddenly got worse without changing settings, moisture might be the culprit.
4. Rough, Inconsistent Surface Texture
Wet filament produces an uneven extrusion flow because steam bubbles interrupt the smooth flow of plastic through the nozzle. The result is a surface that looks textured, rough, or “hairy” instead of smooth and glossy.
5. Weak Layer Adhesion and Brittle Parts
Steam bubbles create microscopic voids between layers, weakening the bond between them. If your prints are snapping apart easily along layer lines, moisture contamination is a likely suspect — especially with Nylon and PETG.
Test Method 1: The Extrusion Listening Test
This is the quickest and most practical test. It takes about 30 seconds and requires no special equipment.
How to Do It
- Load the filament into your printer normally
- Heat the nozzle to the filament’s recommended temperature
- Manually extrude 100–200 mm of filament (use your printer’s menu or send
G1 E100 F100) - Listen carefully while it extrudes
What to Listen For
- Dry filament: Quiet extrusion with a smooth, consistent flow. The extruded line should be clean and even.
- Slightly wet: Occasional faint pops or clicks. The extruded line might have small bumps.
- Very wet: Frequent loud popping, crackling, or sizzling. You might see steam. The extruded line will be bubbly, uneven, and rough.
Test Method 2: The Visual Extrusion Test
This method gives you a physical reference you can examine closely.
How to Do It
- Heat your nozzle and extrude about 200 mm of filament into the air (not onto the bed)
- Let the extruded strand cool and examine it closely
- Compare with the reference guide below
What to Look For
- Dry filament: The strand is smooth, glossy, and consistent in diameter. It hangs straight down from the nozzle in a clean line.
- Slightly wet: The strand has small bumps or rough patches. It may curl slightly as steam escapes unevenly.
- Very wet: The strand is rough, bubbly, and inconsistent. It may come out foamy or with visible voids. It often curls and coils erratically.
Test Method 3: The Weight-Loss Drying Test (Most Accurate)
If you want hard numbers, this method tells you exactly how much moisture your filament has absorbed. You’ll need a kitchen scale accurate to 0.1 grams.
How to Do It
- Cut a sample of filament (about 1 meter / 3 feet)
- Weigh it and record the weight (e.g., 3.2g for 1m of 1.75mm PLA)
- Dry it in a filament dryer or oven at the appropriate temperature for 4–6 hours
- Weigh it again immediately after drying
- Calculate the percentage:
(before - after) / before × 100
Interpreting Results
- < 0.1% weight loss: Filament is dry. Good to go.
- 0.1% – 0.3%: Slightly moist. May cause minor issues with sensitive materials like Nylon.
- 0.3% – 1.0%: Moderately wet. Will cause visible quality issues with most filaments.
- > 1.0%: Very wet. Needs thorough drying before printing.
How to Dry Your Filament
Once you’ve confirmed your filament is wet, here’s how to fix it:
Option 1: Dedicated Filament Dryer
The easiest and safest option. Popular models like the Sunlu S2, EIBOS Cyclopes, or eSun eBox handle temperature control automatically. Just set the material type, load the spool, and wait 4–8 hours.
Option 2: Food Dehydrator
A cheaper alternative that works well. Look for one with adjustable temperature settings. Set it to the appropriate drying temperature and run for 6–12 hours.
Option 3: Oven (Use With Caution)
If you’re using an oven, be very careful with temperature accuracy. Most kitchen ovens fluctuate ±10°C, which can melt PLA or deform spool holders. Use an oven thermometer to verify actual temperature, and keep the spool on a cookie sheet to catch any potential mess.
Recommended Drying Temperatures
- PLA: 45–50°C for 4–6 hours
- PETG: 65°C for 4–6 hours
- ABS/ASA: 80°C for 4–6 hours
- Nylon: 80°C for 8–12 hours
- TPU: 55°C for 4–6 hours
- PVA: 45°C for 4–6 hours
- Polycarbonate: 80°C for 8–12 hours
How to Keep Filament Dry: Prevention
Drying filament is a pain. Prevention is much easier. Here’s how to keep your spools dry in the first place:
- Vacuum-sealed bags with desiccant: The cheapest option. Resealable vacuum bags with silica gel packets work great for storage.
- Dry boxes with active dehumidification: Airtight containers with rechargeable desiccant or electric dehumidifiers. Great for filament you’re actively using.
- Print from a dry box: Many makers feed filament directly from a sealed dry box to the printer through a PTFE tube. This keeps the spool dry even during long prints.
- Monitor humidity: Keep a small hygrometer in your storage container. Aim for below 15% relative humidity.
Real-World Humidity Guidelines
How fast your filament absorbs moisture depends heavily on your local climate:
- Dry climate (<30% RH): PLA can sit out for weeks. Nylon and PETG should still be stored properly but aren’t urgent.
- Moderate climate (30–60% RH): Most filaments should be stored in sealed containers when not in use. Nylon needs active drying before each session.
- Humid climate (>60% RH): Everything needs sealed storage. Even PLA will develop issues within a few days. Strongly consider printing from a dry box.
Bottom Line
Wet filament is the hidden saboteur of print quality. Before you blame your slicer settings, hardware, or the alignment of the planets, run a quick extrusion test. If you hear pops or see bubbles, dry your filament before troubleshooting anything else. You’ll be amazed how many “mysterious” print quality issues disappear once your filament is properly dried and stored.
Get a filament dryer, pick up some vacuum bags and desiccant, and make dry storage part of your workflow. Your prints — and your sanity — will thank you.