How to Use a Temperature Tower for 3D Printing Calibration
What Is a Temperature Tower and Why Do You Need One?
If you’ve ever wondered why your 3D prints look great with one filament but terrible with another, the answer usually comes down to temperature. Every roll of filament — even from the same brand — can behave differently depending on pigments, additives, and manufacturing variations. A temperature tower is the single most effective way to dial in the perfect nozzle temperature for any material you throw at your printer.
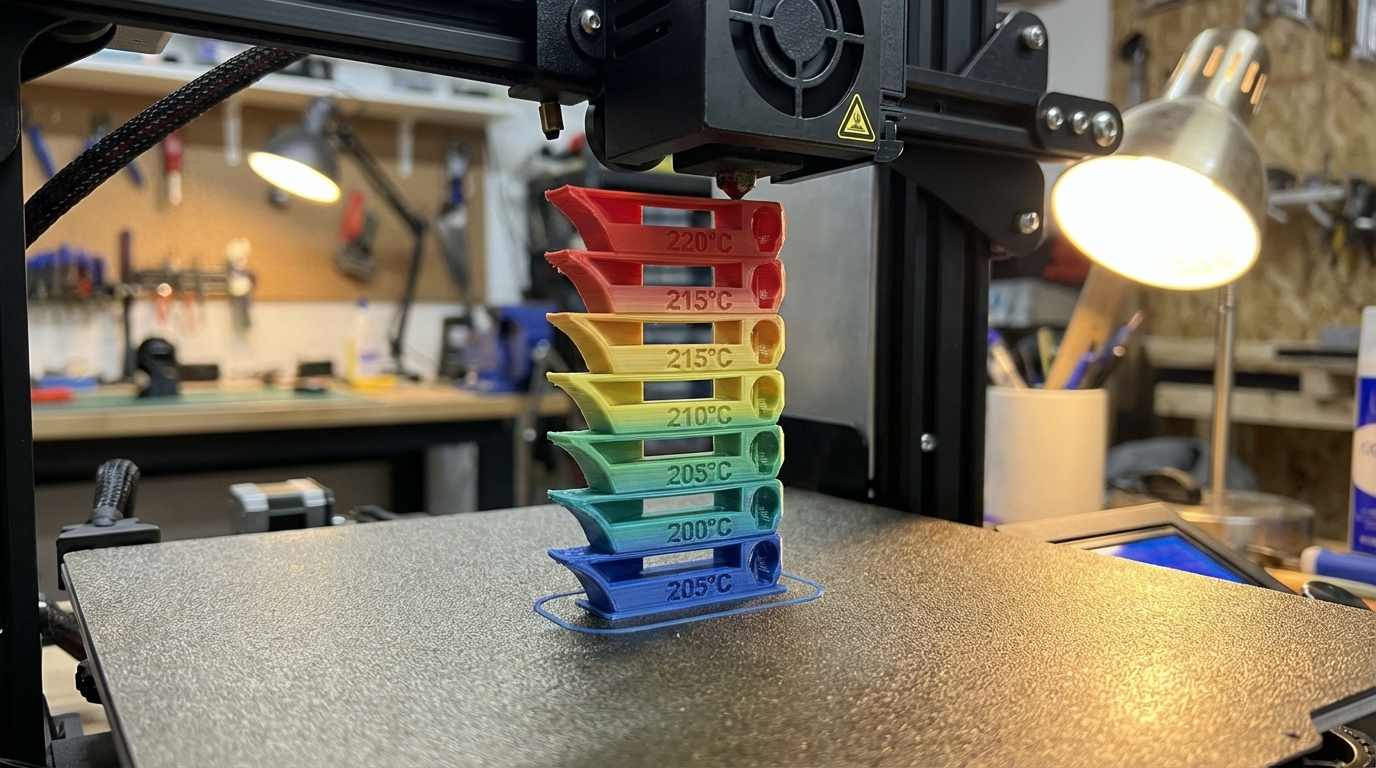
A temperature tower is a calibration print that stacks identical sections on top of each other, each printed at a different temperature. As the tower grows taller, the temperature drops (or rises) in set increments — typically 5°C per section. When the print finishes, you visually inspect each section to find the sweet spot where your filament looks best: clean bridges, minimal stringing, smooth surfaces, and strong layer adhesion.
When Should You Print a Temperature Tower?
The short answer: every time you open a new roll of filament. Here’s the slightly longer version:
- New filament brand or type — Different manufacturers use different formulations. A roll of Hatchbox PLA might print perfectly at 200°C while eSUN PLA+ prefers 215°C.
- New color from the same brand — Pigments affect flow behavior. Black and white filaments from the same manufacturer often need different temperatures.
- Seasonal changes — If your printing environment gets significantly colder or warmer, it can shift optimal temperatures by a few degrees.
- After hardware changes — New hotend, nozzle, or thermistor? Recalibrate everything, starting with temperature.
- Persistent quality issues — Stringing, poor bridging, weak layer adhesion, or rough surfaces often trace back to temperature being off by just 5-10°C.
How to Set Up a Temperature Tower in Cura
Cura has a built-in temperature tower feature that makes the process straightforward. Here’s the step-by-step process:
Step 1: Load the Temperature Tower Model
Go to Extensions → Part for Calibration → Add a Temp Tower. Cura will automatically place a temperature tower model on your build plate. If you’re running an older version without this feature, you can download temperature tower STL files from Thingiverse or Printables — just search for “temperature tower” and pick one with the range you need.
Step 2: Configure Your Starting Temperature
Set your nozzle temperature to the highest value in your range. For PLA, a typical range is 230°C at the bottom down to 190°C at the top. For PETG, try 260°C down to 220°C. The tower prints from bottom to top, so the first (hottest) section prints first.
Step 3: Add the Temperature Change Script
Go to Extensions → Post Processing → Modify G-Code. Click Add a script and select ChangeAtZ (or “Tweak at Z” in some versions). You’ll need to add one script for each temperature change. For a tower with 5°C increments and 8mm sections:
- Change at Z = 8.0mm → Temperature = 225°C
- Change at Z = 16.0mm → Temperature = 220°C
- Change at Z = 24.0mm → Temperature = 215°C
- Continue for each section…
The exact Z heights depend on your tower model, so check the model description for section heights.
Step 4: Slice and Print
Use your normal print settings for everything else — layer height, speed, infill. The only variable should be temperature. Slice the model and send it to your printer. The print typically takes 45-90 minutes depending on tower size and speed.
How to Set Up a Temperature Tower in PrusaSlicer and OrcaSlicer
PrusaSlicer and OrcaSlicer don’t have the same built-in calibration menu as Cura, but you can achieve the same result using height-based modifier ranges or custom G-code at layer changes.
In OrcaSlicer, the process is even simpler — go to Calibration → Temperature from the top menu. OrcaSlicer generates the tower automatically with the correct temperature changes baked into the G-code. Just enter your filament type, starting temperature, and end temperature, and it handles the rest.
For PrusaSlicer, you’ll use the height range modifier approach:
- Import your temperature tower STL
- Right-click the model → Add height range modifier
- Set the height range for each section
- For each range, right-click → Add settings → Temperature
- Set the desired temperature for that section
Reading Your Temperature Tower Results
Once your tower is done, take it off the build plate and examine each section under good lighting. Here’s what to look for:
Stringing
Look at the gaps between sections or any test pillars. Higher temperatures generally produce more stringing because the melted filament is less viscous. If you see heavy stringing at the bottom (highest temp) that cleans up toward the top, you’re on the right track — just note where stringing becomes acceptable.
Bridging Quality
Most temperature tower designs include a bridging test — a horizontal span between two supports. The ideal temperature produces clean, straight bridges with minimal sagging. Too hot and the bridges droop badly. Too cold and you might see gaps or broken bridges because the material doesn’t bond well enough to stretch.
Surface Quality
Run your fingers over each section. The best temperature gives you smooth, consistent walls without roughness or blobbing. Sections that are too hot often feel rough or show small bumps. Sections that are too cold might show gaps between layers or a matte, rough texture from poor layer bonding.
Layer Adhesion
Try to break each section by bending it. Higher temperatures generally produce stronger layer bonds. If a section snaps cleanly between layers with little force, the temperature is too low. The ideal temp range usually shows some resistance before breaking and fractures through the layers rather than between them.
Overhangs
If your tower has overhang tests (angled surfaces at 30°, 45°, 60°), check which temperature produces the cleanest overhangs. Lower temperatures usually win here because the material solidifies faster and droops less.
Temperature Recommendations by Filament Type
While a temperature tower gives you the definitive answer, here are typical starting ranges to use when setting up your tower:
| Filament | Typical Range | Tower Range | Sweet Spot (Common) |
|---|---|---|---|
| PLA | 190-220°C | 230-190°C | 200-210°C |
| PLA+ | 200-230°C | 235-195°C | 210-220°C |
| PETG | 220-250°C | 260-220°C | 230-240°C |
| ABS | 230-250°C | 260-220°C | 235-245°C |
| TPU | 210-230°C | 240-200°C | 220-225°C |
| Nylon | 240-270°C | 280-240°C | 250-260°C |
| ASA | 240-260°C | 270-230°C | 245-255°C |
Common Mistakes When Printing Temperature Towers
Even a simple calibration print can go wrong if you’re not careful. Here are the pitfalls I see most often:
1. Forgetting to Apply Post-Processing Scripts
This is the number one mistake. You load the model, slice it, and print — but forget to add the temperature change scripts. The result is a tower printed entirely at one temperature, which tells you nothing. Always preview your G-code after slicing and look for temperature commands (M104 or M109) at the expected layer heights.
2. Using the Wrong Section Height
If your temperature change heights don’t match the actual section heights of the model, the temperature transitions happen mid-section. This makes it impossible to evaluate each temperature cleanly. Double-check the model description for exact section heights.
3. Testing Too Narrow a Range
Testing 200-210°C in 2°C increments won’t teach you much. Start with a wide range (40°C span) and 5°C increments to find the general sweet spot. If you want to fine-tune further, print a second tower with a narrow range around your best result.
4. Printing Too Fast
If you print the tower at high speed, the temperature effects become harder to read because speed also affects quality. Print at a moderate, consistent speed — around 50mm/s for most filaments — so temperature is the only variable.
5. Ignoring the First Section
The bottom section of the tower is affected by first-layer settings and bed adhesion. Don’t use it as your reference. Focus on sections 2 through the end for your evaluation.
Beyond Temperature: Other Calibration Towers Worth Printing
Once you’ve nailed your temperature, consider printing these calibration models to fully optimize your settings:
- Retraction tower — Similar concept but varies retraction distance or speed between sections. Essential for eliminating stringing after you’ve locked in temperature.
- Speed tower — Tests different print speeds to find the maximum speed that maintains acceptable quality.
- Flow rate calibration cube — A simple cube to measure wall thickness and fine-tune your extrusion multiplier or flow rate.
- Overhang test — Tests your printer’s ability to handle various overhang angles from 20° to 70°.
My Recommended Calibration Workflow
After years of dialing in filaments, here’s the order I follow every time I open a new roll:
- Temperature tower — Find the ideal nozzle temperature first, since it affects everything else.
- Flow rate calibration — Print a single-wall cube and measure thickness with calipers. Adjust flow multiplier until wall thickness matches your nozzle diameter × number of walls.
- Retraction test — Using your calibrated temperature and flow, print a retraction test to eliminate stringing.
- Speed test (optional) — If you want to push speed, test it after the above are locked in.
- Pressure advance / linear advance (optional) — For Klipper or Marlin users looking for the sharpest corners and best dimensional accuracy.
This whole workflow takes about 3-4 hours and uses maybe 30-40g of filament. But it can save you days of frustration and wasted material on failed prints. Temperature towers aren’t glamorous, but they’re the foundation of consistent, high-quality 3D printing. Make them a habit, and your prints will thank you.