Klipper vs Marlin: Which Firmware Is Right for Your 3D Printer?
If you’ve spent any time in 3D printing communities, you’ve seen the debate. Someone posts a gorgeous benchy printed at 200mm/s, and the comments immediately split into two camps: Klipper enthusiasts telling everyone to switch, and Marlin veterans saying it’s perfectly fine as-is.
Both sides have valid points. But the right choice depends entirely on what you’re trying to do, what printer you own, and how much time you’re willing to spend configuring things.
I’ve run both firmwares extensively — Marlin on stock machines and heavily modified ones, Klipper on everything from an Ender 3 to a Voron 2.4. Here’s what actually matters when choosing between them.
What Is Marlin Firmware?
Marlin is the grandfather of open-source 3D printer firmware. It’s been around since 2011, and it runs on the vast majority of consumer 3D printers out of the box. When you unbox a Creality Ender 3, an Anycubic Kobra, or most budget machines — they’re running Marlin.
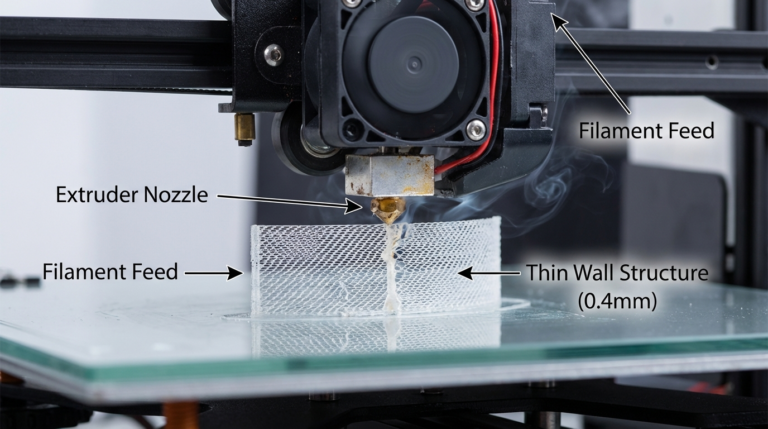
Marlin runs entirely on the printer’s mainboard. The microcontroller (typically an 8-bit ATmega or 32-bit ARM chip) handles everything: reading G-code, calculating stepper movements, managing temperatures, processing input from the LCD screen. Everything is self-contained.
Marlin’s Key Strengths
It just works. Most printers ship with Marlin pre-configured. You can print straight out of the box without touching firmware at all. For people who want to make things — not tinker with software — this matters a lot.
Massive community and documentation. Marlin has over a decade of community knowledge behind it. Every weird edge case, every obscure board configuration, every sensor compatibility question — someone has already solved it and posted about it. The Marlin configuration files are extensively commented and the documentation is thorough.
Standalone operation. Your printer doesn’t need to be connected to anything else. Slice your file, put it on an SD card, walk to the printer, press print. No network dependency, no additional hardware, no points of failure beyond the printer itself.
Universal slicer compatibility. Every slicer on the market supports Marlin G-code natively. Cura, PrusaSlicer, OrcaSlicer, SuperSlicer — all output Marlin-compatible code by default.
Marlin’s Limitations
Speed ceiling. On 8-bit boards (still common on budget printers), Marlin hits computational limits when you push print speeds above 80-100mm/s. The processor simply can’t calculate step timings fast enough for complex curves at high speeds. 32-bit boards help significantly, but Marlin’s architecture still processes G-code commands sequentially on the mainboard, which creates a bottleneck.
Configuration requires recompilation. Want to change your steps-per-mm, enable a BLTouch, or tweak your PID values permanently? You need to edit the firmware source code, recompile it, and flash the new binary to your board. For someone comfortable with PlatformIO and C++ configuration files, this is routine. For a newcomer, it’s intimidating.
Limited input shaping. Marlin has added some input shaping features in recent versions, but the implementation is constrained by running everything on the mainboard’s processor. You’re limited in how much computational overhead you can add.
What Is Klipper Firmware?
Klipper takes a fundamentally different approach. Instead of running everything on the printer’s mainboard, it splits the workload: a lightweight firmware runs on the microcontroller (handling real-time stepper control), while a separate computer — usually a Raspberry Pi — handles all the heavy computation.
This architecture means the Pi’s much more powerful processor handles G-code parsing, kinematics calculations, and advanced features, while the microcontroller just executes precise motor movements as instructed.

Klipper’s Key Strengths
Raw speed. This is Klipper’s headline feature, and it delivers. Because a Raspberry Pi handles the computation, Klipper can process complex movement calculations at speeds that would choke an onboard microcontroller. People regularly print at 200-300mm/s with good quality on Klipper. The Voron community — where Klipper is essentially standard — routinely pushes 500mm/s or more on well-built machines.
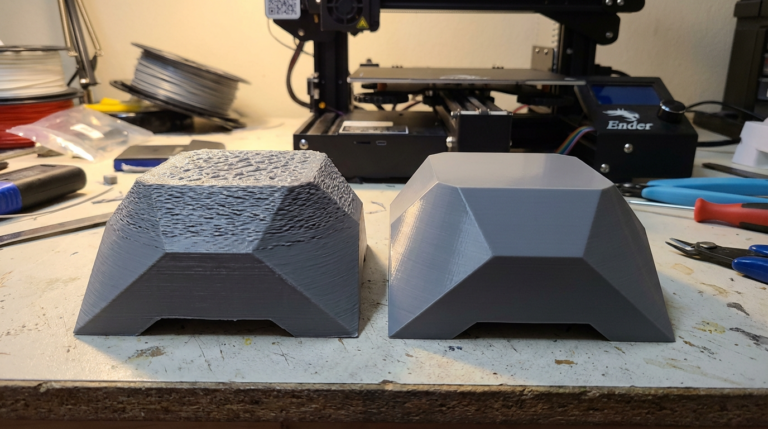
Input shaping. Klipper’s input shaper is a game-changer. It uses an accelerometer (usually an ADXL345) to measure your printer’s resonant frequencies, then applies filters that cancel out the ringing artifacts you’d normally see at high speeds. The result: you can print fast without the ghosting and ripples that plague high-speed Marlin prints.
Pressure advance. While Marlin has linear advance (which does a similar job), Klipper’s pressure advance implementation is more refined and easier to tune. It compensates for the pressure buildup in the nozzle, giving you sharper corners and more consistent extrusion — especially noticeable at higher speeds.
Configuration without recompilation. Klipper uses a plain-text configuration file (printer.cfg) that you edit directly. Change a value, save the file, restart the firmware — done. No compiling, no flashing. This makes tuning dramatically faster. I can adjust my rotation distance, test, adjust again, and have things dialed in within minutes instead of waiting for compilation cycles.
Web interface. Through Mainsail or Fluidd (web frontends for Klipper), you get a full browser-based control panel. Monitor temperatures, watch print progress via webcam, adjust settings mid-print, manage files — all from your phone or computer. It’s a genuinely better experience than poking at a tiny LCD screen with a rotary encoder.
Macros. Klipper supports powerful G-code macros with variables, conditionals, and loops. You can automate practically anything — custom start sequences, automatic Z-offset calibration, filament change routines, bed mesh compensation. The macro system is closer to a scripting language than traditional G-code.
Klipper’s Limitations
Setup complexity. There’s no way around it — setting up Klipper is more involved than Marlin. You need a Raspberry Pi (or similar SBC), you need to flash the microcontroller firmware, configure printer.cfg from scratch (or find a community config for your printer), set up Mainsail/Fluidd, and troubleshoot the inevitable issues that come up. Budget an afternoon for your first Klipper install.
Requires a host computer. The Raspberry Pi must be running for the printer to operate. If the Pi crashes, loses power, or the USB connection drops mid-print — your print fails. This is an additional point of failure that doesn’t exist with standalone Marlin. You’ll want a reliable power supply and a quality USB cable.
Steeper learning curve. Klipper’s configuration is powerful but verbose. The printer.cfg file can be hundreds of lines long, and understanding what each section does takes time. The documentation is good but assumes a certain level of technical comfort.
Raspberry Pi cost and availability. A Raspberry Pi 4 or 5 adds $35-80 to your setup cost, depending on availability and which model you choose. During the Pi shortage of 2022-2023, this was a real barrier. Availability has normalized since then, but it’s still an additional expense.
Head-to-Head Comparison
Print Speed
Winner: Klipper, convincingly.
On identical hardware, Klipper lets you print faster with better quality at speed. The combination of offloaded computation, input shaping, and pressure advance means you can push 150-300mm/s on a well-tuned Klipper setup while maintaining quality that would require 60-80mm/s on Marlin.
That said — if you’re printing at 50-80mm/s and happy with the results, the speed advantage is irrelevant to you.
Print Quality at Normal Speeds
Winner: Tie.
At moderate speeds (40-80mm/s), both firmwares produce essentially identical results with proper tuning. Firmware doesn’t change the physics of melting plastic through a nozzle. The quality differences only emerge when you start pushing speed.
Ease of Setup
Winner: Marlin, by a mile.
Marlin comes pre-installed. Even if you need to flash a custom build, the process is well-documented with countless YouTube tutorials for every major printer model. Klipper requires additional hardware, more configuration, and more technical knowledge.
Ease of Ongoing Configuration
Winner: Klipper.
Once Klipper is running, making changes is trivially easy — edit a text file and restart. Marlin requires editing source, recompiling, and reflashing for most permanent changes (though some settings can be saved to EEPROM via terminal commands).
Hardware Compatibility
Winner: Marlin.
Marlin supports virtually every 3D printer mainboard ever made, including ancient 8-bit boards. Klipper supports most popular boards, but the list is narrower. If you have an unusual or very old board, Marlin is more likely to support it.
Advanced Features
Winner: Klipper.
Input shaping, pressure advance, multi-MCU support, resonance testing, powerful macros, web interface — Klipper offers more advanced features out of the box. Marlin has been adding similar features (input shaping, linear advance), but the implementations are generally less mature.
Quick Comparison Table
| Feature | Marlin | Klipper |
|---|---|---|
| Max practical speed | 80-150mm/s | 200-500mm/s |
| Setup time | Minutes (pre-installed) | Hours (first time) |
| Additional hardware | None | Raspberry Pi required |
| Configuration changes | Recompile + reflash | Edit text file + restart |
| Input shaping | Basic (newer versions) | Advanced with accelerometer |
| Web interface | OctoPrint (add-on) | Mainsail/Fluidd (native) |
| Standalone operation | Yes | No (needs host) |
| Board support | Virtually all | Most popular boards |
| Community size | Massive | Large and growing |
| Best for | Stock/simple setups | Speed-focused/modified builds |
When to Stick with Marlin
You’re happy with your print quality and speed. If your printer does what you need at its current settings, switching firmware is a solution looking for a problem. I printed great parts on Marlin for years before touching Klipper.
You want zero additional complexity. Marlin on an SD card is the simplest possible printing workflow. No network, no Pi, no web interface — just slice and print.
You’re running a heavily customized Marlin build. Some people have spent months fine-tuning their Marlin configuration with custom thermistor tables, specialized kinematics, or unusual hardware combinations. If it works well, there’s no compelling reason to start over.
You’re on an 8-bit board and don’t want to upgrade. While Klipper technically supports some 8-bit boards, the experience is better on 32-bit. Marlin on an 8-bit board at moderate speeds is a proven, stable combination.
When to Switch to Klipper
You want to print faster without sacrificing quality. This is the number one reason people switch, and it’s legitimate. If you’ve hit the speed ceiling on Marlin and want more, Klipper is the answer.
You’re building a Voron or other high-speed printer. The Voron community standardized on Klipper for good reason. If you’re building a CoreXY speed machine, Klipper is the expected firmware. The documentation, community configs, and tuning guides all assume Klipper.
You’re tired of recompiling for every change. If you frequently tinker with your printer’s configuration, Klipper’s edit-and-restart workflow saves enormous amounts of time compared to Marlin’s compile-and-flash cycle.
You want a proper web interface. Mainsail and Fluidd are significantly more capable than most LCD interfaces. Remote monitoring, webcam integration, macro buttons, real-time graphing of temperatures and speeds — it transforms the printing experience.
You have multiple printers. Klipper can control multiple printers from a single Raspberry Pi, and the web interface makes managing a fleet much more practical than walking between machines to check LCD screens.
The Migration Path
If you decide to try Klipper, here’s the realistic path:
- Get a Raspberry Pi 4 or 5 (2GB RAM minimum, 4GB recommended). Install MainsailOS or FluiddPi — these are pre-built Raspberry Pi images that include everything you need.
- Find a community printer.cfg for your exact printer model. The Klipper GitHub, the Klipper subreddit, and various Discord servers have configs for most popular printers. Starting from a known-good config saves hours of frustration.
- Flash Klipper firmware to your mainboard. This replaces Marlin on the microcontroller. The process varies by board, but KIAUH (Klipper Installation And Update Helper) automates most of it.
- Tune your printer. Run PID tuning for the hotend and bed, calibrate your extruder rotation distance, run a bed mesh, and do the pressure advance and input shaping calibrations. Klipper’s documentation walks through each step.
- Keep your old Marlin firmware binary. If things go sideways, you can always flash Marlin back. The switch isn’t permanent, and knowing you have a fallback reduces the stress.
Budget a full weekend for your first Klipper setup. It’ll probably take less, but having the time available means you won’t rush through troubleshooting.
My Honest Take
I run Klipper on my main workhorse printers and Marlin on a stock Ender 3 that lives in the corner for quick PLA jobs. Both firmware options are excellent — the “which is better” framing misses the point.
Marlin is a mature, reliable firmware that works well for most people. If you print functional parts at reasonable speeds and value simplicity, Marlin serves you perfectly.
Klipper is a more powerful platform that rewards the time investment with higher speed capability and easier ongoing configuration. If you enjoy optimizing your printer and want to push the performance envelope, Klipper is worth the setup effort.
The worst choice is switching to Klipper because someone on Reddit told you to, spending a frustrating weekend configuring it, and then printing the same models at the same speeds you were printing before. Know why you’re switching before you switch.