Layer Height vs Print Quality: Finding the Perfect Speed-Quality Tradeoff
The Layer Height Dilemma Every Maker Faces
You’re about to slice a new model and the very first decision stares you in the face: layer height. Set it low for smooth surfaces and crisp details, or crank it up to finish the print before dinner? It sounds simple, but layer height affects everything — surface quality, print strength, fine detail resolution, and total print time.
After printing thousands of parts across dozens of machines, I’ve developed a practical framework for choosing layer height that balances quality and speed for any project. No more guessing.
What Layer Height Actually Controls
Layer height is the thickness of each horizontal slice your printer lays down. A 0.2mm layer height means each pass of the nozzle deposits a strip of plastic 0.2mm tall. Stack enough of these layers and you get a three-dimensional object.
The key thing to understand: your layer height should be between 25% and 75% of your nozzle diameter. With a standard 0.4mm nozzle, that means 0.1mm to 0.3mm. Go lower than 25% and the nozzle presses too close to the previous layer, causing grinding and poor adhesion. Go above 75% and the extruded line becomes too round, creating weak interlayer bonding.
Most slicers default to 0.2mm for a 0.4mm nozzle, and that’s a solid general-purpose choice. But matching layer height to your specific print makes a noticeable difference.
How Layer Height Affects Print Quality
Surface Smoothness
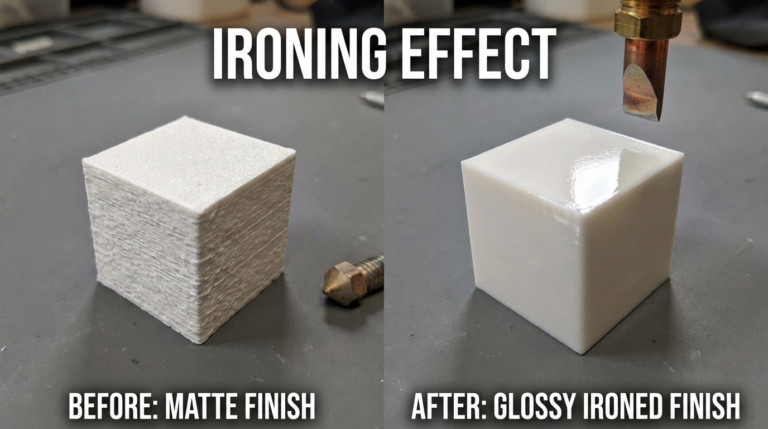
This is the most visible effect. Lower layer heights produce smoother surfaces because the “staircase” stepping effect between layers is smaller. At 0.1mm, layer lines are barely visible to the naked eye. At 0.3mm, you can clearly see and feel each layer.
The difference is most dramatic on curved and angled surfaces. A sphere printed at 0.1mm looks nearly smooth; the same sphere at 0.3mm has obvious horizontal banding. Vertical walls, on the other hand, look virtually identical regardless of layer height because there’s no stepping on a perfectly vertical surface.
Fine Detail and Small Features
Layer height determines the minimum vertical detail your printer can reproduce. Small text, engravings, and fine texture details require low layer heights to resolve properly. If you’re printing a model with 0.5mm text, a 0.3mm layer height will produce at most one or two layers of vertical resolution for that text — it’ll be a blob. At 0.1mm, the same text gets five layers of vertical resolution and reads clearly.
Similarly, small horizontal features like thin walls, pins, and snap-fit clips print more reliably at lower layer heights because each layer provides more precise Z-axis positioning.
Dimensional Accuracy
Your print’s Z-axis dimensions can only be accurate to the nearest layer height. A part designed to be 10mm tall will be exactly 10mm only if 10 divides evenly by your layer height. At 0.3mm layers, the nearest actual height is either 9.9mm (33 layers) or 10.2mm (34 layers). At 0.1mm, you hit exactly 10.0mm (100 layers).
For functional parts with tight tolerances, this matters. Use layer heights that divide evenly into your critical dimensions, or design your parts with layer height in mind.
How Layer Height Affects Print Time
This is the big tradeoff. Halving your layer height roughly doubles your print time because you need twice as many layers to reach the same height. A model that takes 4 hours at 0.2mm will take approximately 8 hours at 0.1mm and about 2.5 hours at 0.3mm.
Notice I said “roughly” doubles — it’s not exact because some operations (travel moves, z-hops, retractions) take the same time regardless of layer height. Also, lower layer heights typically require slower print speeds to maintain quality, which further increases the time difference.
For context, here’s what a typical print (a 60mm tall calibration cube) takes at different layer heights on an Ender 3 at standard speeds:
0.12mm: ~2 hours 45 minutes
0.16mm: ~2 hours 10 minutes
0.20mm: ~1 hour 40 minutes
0.24mm: ~1 hour 25 minutes
0.28mm: ~1 hour 10 minutes
That’s a 2.3x time difference between the finest and coarsest settings. For large prints that already take 10+ hours, this multiplier gets painful.
How Layer Height Affects Strength
Here’s where things get interesting. Conventional wisdom says thicker layers are stronger because each layer bonds to more surface area below it. Research and real-world testing show this is partially true, but the picture is more nuanced.
Thicker layers generally provide better interlayer adhesion because the extruded plastic stays hotter for longer (more thermal mass), giving it more time to bond with the layer below. This means parts printed at 0.3mm are typically stronger in the Z-axis (vertical direction) than the same part at 0.1mm.
However, thinner layers provide more precise material placement, which can improve strength for parts with complex geometries, overhangs, and thin walls. A thin wall printed at 0.1mm with proper line width has more uniform material distribution than the same wall at 0.3mm.
For maximum strength: use the thickest layer height that gives you acceptable surface quality and dimensional accuracy. For most functional parts, 0.2mm or 0.24mm is the sweet spot.
The Magic Numbers: Stepping Motor Math
Most 3D printers use stepper motors with lead screws on the Z-axis. These motors move in discrete steps, and certain layer heights align with these steps better than others. Using a “magic number” layer height eliminates Z-axis rounding errors that can cause inconsistent layers.
For printers with a standard M8 lead screw (most Ender 3 variants, CR-10, etc.) with 1.8-degree steppers, the magic numbers are multiples of 0.04mm:
0.04, 0.08, 0.12, 0.16, 0.20, 0.24, 0.28, 0.32
For printers with T8x2 lead screws (Prusa MK3S+, many CoreXY machines), multiples of 0.04mm also apply.
You don’t have to use magic numbers — modern stepper drivers with microstepping handle arbitrary layer heights fine. But if you want the absolute cleanest layer consistency, sticking to these values eliminates one variable.
Variable Layer Height: Best of Both Worlds
Modern slicers offer variable (or adaptive) layer height, which is genuinely one of the best features available. The concept is simple: use thin layers where detail matters (curved surfaces, fine features) and thick layers where it doesn’t (straight vertical walls, hidden surfaces).
In PrusaSlicer, click the layer height editing tool in the preview and paint thinner or thicker layers wherever you want. Cura offers “Adaptive Layers” that automatically adjusts based on the model geometry — enabling it alone can cut 20-30% off print time with negligible quality loss.
Variable layer height is especially effective for prints with a mix of detailed and simple sections. A chess piece, for example, might use 0.1mm for the detailed top portion and 0.24mm for the simple cylindrical base — saving 40% of the total print time compared to 0.1mm throughout.
My Layer Height Decision Framework
Here’s the quick-reference guide I use for every print:
0.08-0.12mm: Miniatures, display models with fine details, parts with small text or engravings. When surface quality is the top priority and you don’t mind the time.
0.16mm: A good compromise for detailed prints that need to finish in reasonable time. Cosplay pieces, artistic models, gifts.
0.20mm: The universal default. Works for nearly everything — functional parts, prototypes, household items. My go-to unless there’s a specific reason to change.
0.24mm: When speed matters more than aesthetics. Prototypes for fit-checking, internal components, jigs and fixtures.
0.28-0.32mm: Maximum speed for rough prototypes, large structural parts, and prints where appearance doesn’t matter at all. Expect visible layer lines but significant time savings.
Layer Height and Different Filaments
Different materials interact with layer height in different ways:
PLA: Handles all layer heights well. Excellent at fine layers (0.1mm) due to low thermal shrinkage. Go as fine as you want for detail.
PETG: Performs best at 0.2mm or above. Very thin layers (0.1mm) can cause PETG to over-squish and develop a rough, bumpy texture. If you need fine layers with PETG, reduce flow by 3-5%.
ABS/ASA: Works at all layer heights but benefits from thicker layers (0.2-0.28mm) because better interlayer adhesion reduces warping and delamination tendency.
TPU: Stick to 0.2mm or above. Flexible filaments struggle with very thin layers because the compression in the extruder becomes unpredictable at low layer heights.
Pro Tips for Layer Height Optimization
Print speed should scale with layer height. Thinner layers generally allow slightly faster speeds because volumetric flow is lower. At 0.12mm layers, you can often push wall speed 20-30% higher than at 0.28mm.
Adjust temperature slightly. Thicker layers benefit from 5-10°C higher nozzle temperature to ensure full melting at higher flow rates. Thinner layers can run cooler.
First layer is always special. Regardless of your print’s layer height, the first layer should be 0.2-0.3mm for reliable bed adhesion. Most slicers handle this automatically with the “initial layer height” setting.
Top and bottom layers count in layers, not mm. If you set 4 top layers at 0.1mm, that’s only 0.4mm of solid top surface. At 0.3mm, it’s 1.2mm. Adjust your top/bottom layer count when you change layer heights to maintain similar solid shell thickness — aim for at least 0.8mm total.
The Bottom Line
Layer height is a tool, not a quality setting with a “best” value. Low layer heights give you detail and smoothness at the cost of time. High layer heights give you speed and strength at the cost of surface finish. The best approach is to match your layer height to each specific print’s requirements rather than using one setting for everything.
When in doubt, 0.2mm works for almost anything. But when you have a print that matters — a gift, a functional part, a competition piece — take the time to think about what layer height serves it best. That small decision at the start makes a bigger difference than almost any other setting in your slicer.