Nozzle Scraping the Print: Causes and Fixes
Nozzle Scraping the Print: Causes, Fixes, and How to Stop It for Good
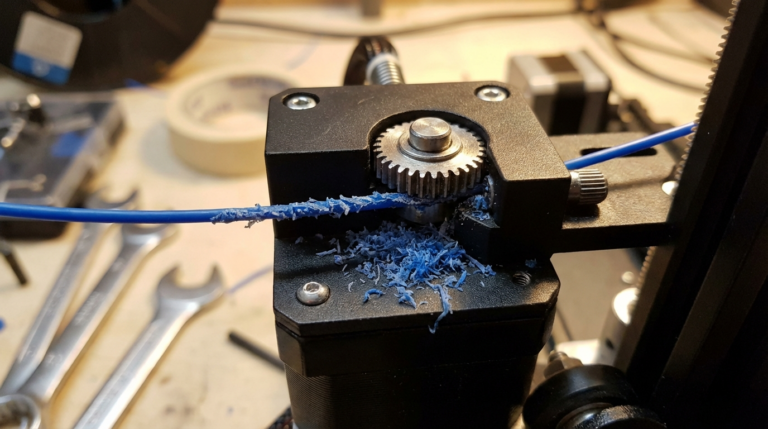
If you hear the nozzle dragging across your print, stop and fix it. I’m Mike Reynolds, and nozzle scraping is one of the fastest ways to ruin a build and damage a hotend. It usually means the print is higher than expected—either from over-extrusion, warping, or incorrect Z offset.
This guide explains why the nozzle scrapes, how to diagnose the exact cause, and what settings to change so it never happens again.
What Nozzle Scraping Looks and Sounds Like
- A scratching or tapping sound during travel moves
- Visible gouges on the top surface of the print
- Lines that look “smeared” or flattened
- Layer shifts caused by collisions
Step 1: Check Z Offset and Bed Leveling
If the nozzle is too low, it will scrape every layer. Recalibrate your Z offset:
- Home the printer.
- Use a feeler gauge or paper test to set the gap.
- Confirm the first layer has a smooth, slightly squished line.
Step 2: Look for Over-Extrusion
Over-extrusion makes the print taller than it should be, so the nozzle collides on upper layers. Check your flow rate and E-steps, then reduce flow by 2–5% if needed.
Step 3: Fix Warping or Curling
If the edges of the print lift, the nozzle will hit the high spots. Warping often comes from poor bed adhesion or insufficient bed heat. Use a brim, adjust bed temp, and make sure the bed surface is clean.
Step 4: Enable Z-Hop
Z-hop lifts the nozzle during travel moves. It doesn’t fix the root cause, but it reduces collisions. Start with 0.2–0.4 mm and adjust as needed.
Step 5: Reduce Print Speed and Acceleration
High speed can cause slight Z wobble or ringing that makes the nozzle skim the surface. Reducing speed and acceleration stabilizes motion.
Baseline Settings to Prevent Scraping
- First layer speed: 15–25 mm/s
- Z-hop: 0.2–0.4 mm
- Flow: 95–100%
- Bed temp: PLA 55–60°C, PETG 70–80°C
Diagnostic Flow: Find the Cause Fast
- Scraping only on the first layer: Z offset too low or bed not level.
- Scraping after several layers: Over-extrusion or warping lifting the print.
- Scraping during travel moves only: Enable Z-hop and reduce travel speed.
- Scraping in tall prints: Z-axis wobble or uneven lead screw motion.
Leveling Procedure That Actually Works
- Clean the bed with isopropyl alcohol.
- Heat bed and nozzle to printing temperature.
- Level using a paper test at all four corners and center.
- Print a first-layer test and adjust live Z offset until lines merge smoothly.
Leveling cold or skipping the center check is one of the most common reasons scraping returns.
Mechanical Issues That Cause Collisions
Sometimes the printer is mechanically lifting the nozzle relative to the bed:
- Loose Z coupler: Z height drifts, causing collisions.
- Lead screw binding: Z steps are inconsistent, making layers too tall.
- Loose bed screws: The bed shifts upward during printing.
Slicer Settings That Help
- Avoid crossing perimeters: Reduces travel over tall features.
- Combing mode: Keeps travel within infill where heights are lower.
- Outer walls first: Gives a cleaner surface and reduces accidental bumps.
Calibrate Flow to Eliminate Over-Extrusion
Over-extrusion is a silent cause of scraping. A quick flow calibration helps:
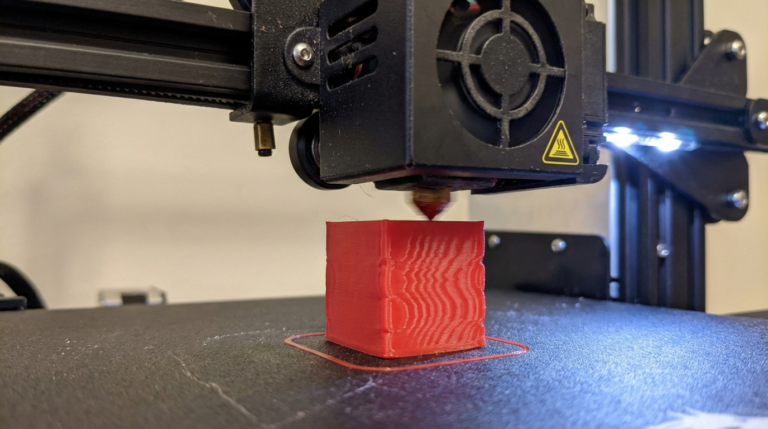
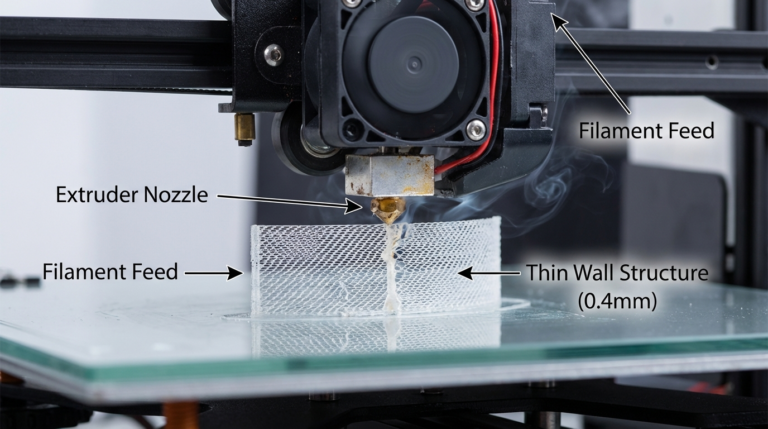
- Print a single-wall cube at 0.4 mm line width.
- Measure wall thickness with calipers.
- Adjust flow until measured thickness matches expected.
This ensures the nozzle isn’t laying down extra plastic that builds up and causes collisions.
Material-Specific Notes
- PLA: Warping is less common; scraping is usually from Z offset or over-extrusion.
- PETG: Tends to curl on edges if cooling is too strong.
- ABS: Warping is frequent—use an enclosure and higher bed temps.
Preventive Maintenance
- Check bed screws and springs monthly.
- Clean the build plate so adhesion is consistent.
- Lubricate Z lead screws to prevent binding.
Case Study: The Mystery Scrape on Only One Side
A common complaint is “it scrapes only on the left side.” That’s usually a warped bed or an X-gantry that isn’t level. If the gantry is tilted, one side prints taller and the nozzle hits on the high side. Re-level the gantry to the bed, then re-run bed leveling. The scraping disappears because the nozzle height is consistent across the whole surface.
Quick FAQ
Can slicer Z-hop replace proper leveling? No. Z-hop avoids collisions on travel moves, but it doesn’t fix a bad first layer.
Why does scraping start after I change filament? Different filaments need different flow settings. A profile tuned for PLA can over-extrude PETG and cause scraping.
Should I sand the nozzle? Don’t. A damaged nozzle makes flow worse. Replace it if it’s gouged.
Extended Checklist (Use This If Scraping Persists)
- Re-level the bed hot, not cold.
- Recalibrate Z offset with a first-layer test.
- Verify flow using a single-wall cube.
- Inspect for warping and add a brim if needed.
- Enable Z-hop for tall or detailed prints.
- Reduce travel speed and acceleration if collisions continue.
This list gives you a systematic approach instead of chasing random settings.
Warping Prevention = Collision Prevention
Warping creates high spots that the nozzle hits. Prevent it with:
- Proper bed temperature for the material
- Clean surface and good adhesion (brim, glue stick if needed)
- Lower cooling for ABS and PETG on the first layers
Infill and Top Layers Can Create High Ridges
If the top surface has ridges or “pillowing,” the nozzle can drag across it. Increase top layers, reduce top layer speed, and consider a slightly lower flow rate on the top surfaces. That smooths the top and prevents contact.
Travel Strategy Matters
Many slicers allow “avoid crossing perimeters.” Turn it on. It keeps the nozzle from traveling over tall outer walls, which reduces the chance of collisions. Combing also helps, as it keeps travel inside already-filled areas.
Checklist for Tall Prints
- Enable Z-hop for travel moves.
- Reduce acceleration and jerk to minimize head movement.
- Increase cooling slightly to keep top layers flat.
- Use a brim if the base is narrow.
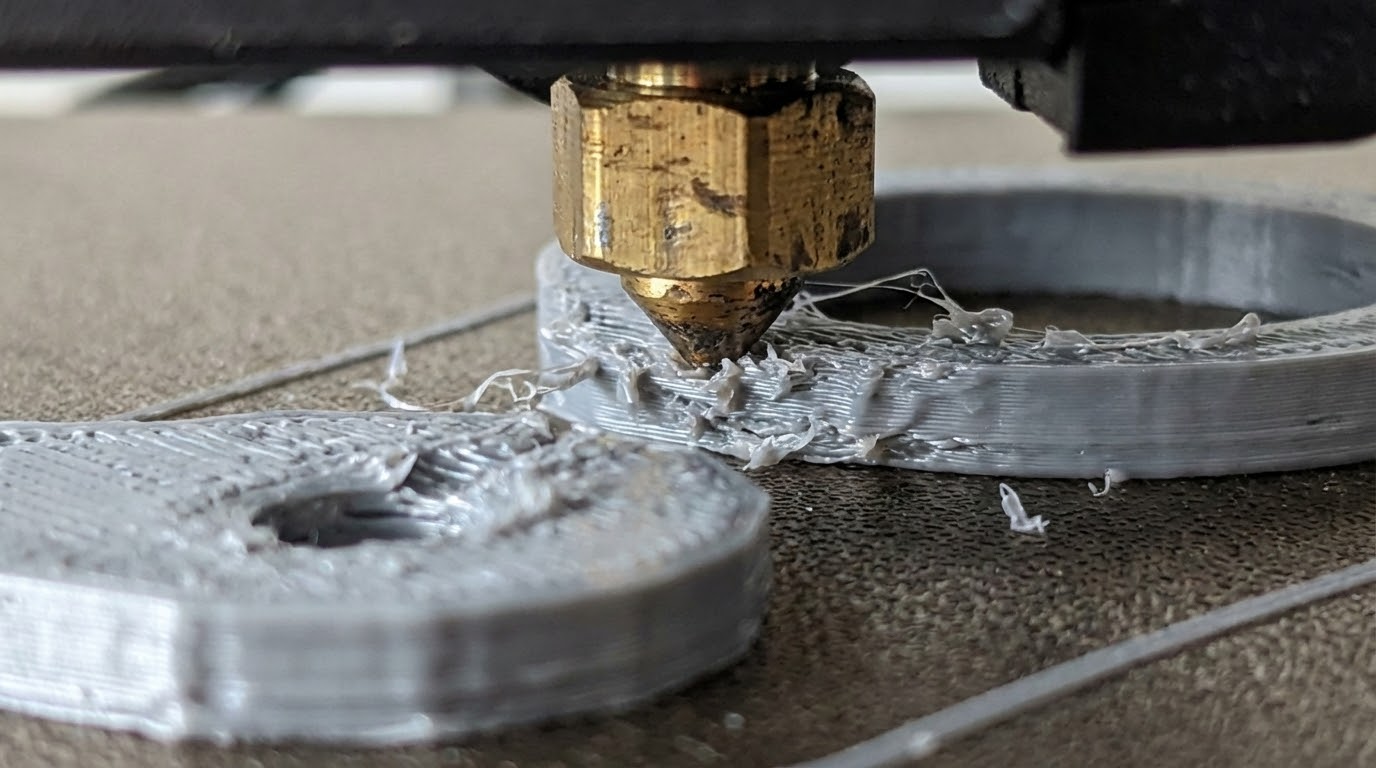
When to Replace the Nozzle
If the nozzle has been dragging across prints, it can become deformed. A damaged nozzle increases surface roughness and makes scraping worse. If you see scratches on the brass tip or inconsistent extrusion after collisions, replace it.
Preventing Collisions in Slicer Profiles
Create a “safe” profile for tall or delicate prints:
- Lower travel speed by 20–30%.
- Increase Z-hop to 0.4–0.6 mm.
- Reduce infill overlap to avoid ridges.
- Increase top layers for a flatter surface.
These settings trade speed for safety and eliminate most collision-induced failures.
Example Troubleshooting Sequence
If you hear scraping mid-print, pause and follow this order:
- Pause and raise Z 10 mm.
- Inspect the top surface for ridges or lifted edges.
- Lower flow by 3–5% and slow top layers.
- Resume with Z-hop enabled.
This sequence often saves the print and also points you to the root cause.
Mesh Bed Leveling Helps, But Only If It’s Calibrated
If your printer supports mesh leveling, use it. But re-run the mesh after changing nozzles, swapping build plates, or moving the printer. An outdated mesh can cause the nozzle to drift too close or too far, which leads to scraping or poor adhesion.
First Layer Height Matters
If you set a very low first layer height (like 0.1 mm with a 0.4 mm nozzle), your margin for error shrinks. Bumping the first layer height to 0.2 mm gives you more tolerance and reduces scraping on the first few layers.
Support Settings Can Reduce Collisions
If supports are too dense or too tall, the nozzle can hit them during travel. Lower support density slightly and make sure the support interface layers are smooth. That reduces tall spikes that the nozzle might catch.
Extra Tip: Watch for Tall, Thin Features
Thin towers and posts wobble as they print. When they wobble, they rise into the nozzle’s travel path and cause scraping. Slow the print for those sections, increase cooling, or add a small brim to stabilize them. This simple change prevents a surprising number of nozzle collisions on miniatures and decorative prints.
In short: if it looks tall and skinny, slow it down.
It’s the simplest way to prevent the nozzle from catching on moving parts.
Safe motion beats fast motion when surfaces are close.
Give the nozzle room and it behaves.
That extra clearance saves prints and keeps the hotend from digging into plastic.
It’s worth the tiny speed trade-off every time, especially on tall prints, really.
Final Thoughts
Nozzle scraping is a sign the print is taller than expected. Fix bed leveling, correct over-extrusion, and prevent warping. Once those are stable, the nozzle will glide safely above the surface and the prints will look cleaner.
If you need a quick band-aid while troubleshooting, enable Z-hop and slow the print down. But don’t ignore the root cause.