PEEK Filament Temperature Guide 2026: Hotend, Bed, Chamber
Why PEEK Demands the Highest Temperatures of Any Common 3D Filament
Polyether ether ketone (PEEK) sits at the top of the engineering thermoplastic ladder for 3D printing. It’s a semi-crystalline polymer with a melting point of 343°C and a glass transition temperature (Tg) of 143°C. To print it well, every thermal zone of the printer — nozzle, bed, and chamber — needs to operate at temperatures where most consumer printers physically cannot. This is why PEEK printers cost $4,000 and up, and why even those printers require careful tuning to produce structurally sound parts.
The temperatures aren’t arbitrary. Each one targets a specific physical state of the polymer: complete melting in the nozzle, controlled crystallization in the bed and chamber, and post-print stability of the finished part. Skip any one of them and the print either fails immediately or produces a part with a fraction of PEEK’s specified mechanical properties.
This guide breaks down each temperature zone, what it controls, and what goes wrong when it’s too high or too low. The numbers below are starting points — your specific PEEK brand and grade may shift them by ±10°C.
Hotend Temperature: 380–410°C
PEEK melts at 343°C, but melting it is not enough — you need it fully fluid and homogeneous as it exits the nozzle. The minimum effective hotend temperature for PEEK is 380°C; the maximum before thermal degradation begins is around 415°C. Most quality PEEK filaments (Apium, Stratasys ULTEM-Plus PEEK, 3DXTECH PEEK 450G) print best at 390–400°C.
Inside the melt zone, PEEK requires a longer dwell time than PLA or ABS. Where PLA spends maybe 1–2 seconds in the heater block before extrusion, PEEK needs 3–5 seconds for full fluidity. This is why high-flow hotends with extended melt zones (Mosquito Magnum+, Phaetus Rapido HF, the proprietary hotends in Apium and Intamsys printers) outperform standard E3D V6-style hotends for PEEK — the extra dwell time produces measurably stronger interlayer bonding.
What fails at the wrong hotend temperature:
- Below 380°C: Underextrusion, weak layer adhesion, parts delaminate under load. The filament technically melts but doesn’t fully homogenize.
- 380–390°C: Acceptable for thin-walled parts but mechanical properties run 30–50% below datasheet values.
- 390–410°C: Optimal range. Full crystallinity development, layer adhesion within 90% of injection-molded equivalent.
- Above 415°C: Thermal degradation begins. Color shifts toward brown, mechanical properties degrade, fumes become noticeably more pungent.
The hotend itself must be all-metal with a hardened steel nozzle. Brass nozzles wear visibly within 2–4 hours of PEEK printing because PEEK’s melt viscosity scrapes against the nozzle bore. PTFE-lined hotends (any V6 with a Capricorn liner) cannot be used — PTFE decomposes at 280°C and releases toxic fumes well below PEEK’s printing temperature.
Bed Temperature: 130–145°C
The bed temperature for PEEK serves three functions simultaneously: hold the first layer in place during printing, provide thermal stability across the print’s lifetime on the bed, and — most importantly — manage the polymer’s crystallization rate as the part cools.
PEEK is semi-crystalline. As it cools from melt, polymer chains organize into crystalline domains. Crystallization happens fastest in the temperature range 200–280°C, and slows below 160°C. If the bottom of your print cools too fast (e.g., bed at room temperature), the bottom layers solidify in an amorphous state with much lower mechanical strength than the rest of the part. The bed needs to hold near 140°C to allow controlled crystallization throughout the part — including the bottom.
What fails at the wrong bed temperature:
- Below 130°C: First-layer warping. Bottom of part is amorphous, brittle. Visible color difference between bottom and bulk of print.
- 130–145°C: Optimal. Even crystallization, good first-layer adhesion, minimal warping.
- Above 150°C: Bed adhesion may become too strong (parts difficult to remove). Some surfaces may glaze or scorch slightly.
The bed surface for PEEK is almost always PEI sheet or proprietary high-temp coating. Glass beds with adhesives (PVA glue, hairspray) work but are inconsistent. The Apium P220 uses an interchangeable PEI build plate; Intamsys uses a proprietary plate; DIY builds typically run 1.5mm PEI sheet on a kapton-heated aluminum bed. Whatever the surface, it must tolerate 145°C indefinitely without degrading.
Chamber Temperature: 90–110°C
The chamber temperature is the variable most beginners underestimate, and the one that determines whether PEEK prints become functional engineering parts or expensive paperweights. PEEK’s glass transition temperature is 143°C; if the part’s interior cools below ~80°C while later layers are still being deposited at 400°C, the temperature differential causes warping, layer separation, and internal stress that produces brittle, weak parts.
A heated chamber at 90–110°C keeps the entire part warm enough that crystallization continues uniformly throughout the build, layer thermal cycling is minimized, and the finished part has roughly uniform mechanical properties top to bottom.
What fails at the wrong chamber temperature:
- Unheated chamber (room temperature): Severe warping after 5–10mm of build height. Parts crack or separate from bed during print. Final mechanical properties unusable.
- 40–80°C chamber: Marginal. Small parts (under 30mm) may print, but anything taller develops internal stress. Cooled parts often crack during machining or load testing.
- 90–110°C chamber: Production-grade results. Even crystallization, minimal warping, mechanical properties within 80–90% of injection-molded PEEK.
- Above 120°C chamber: Print head electronics and stepper motors begin failing. Most consumer printers can’t tolerate ambient temperatures this high without component damage.
Achieving 100°C+ ambient chamber temperature requires a fully enclosed printer with active heating (not just passive insulation), and it requires print head electronics rated for high-temp operation. The Apium P-Series, Intamsys Funmat HT, Roboze ARGO, and a handful of DIY builds based on the Voron 2.4 with chamber heaters are the realistic options in 2026. Putting a Voron without chamber heating into a heated enclosure does not produce usable PEEK parts — the chamber temperature gradient is too uneven without proper air circulation.
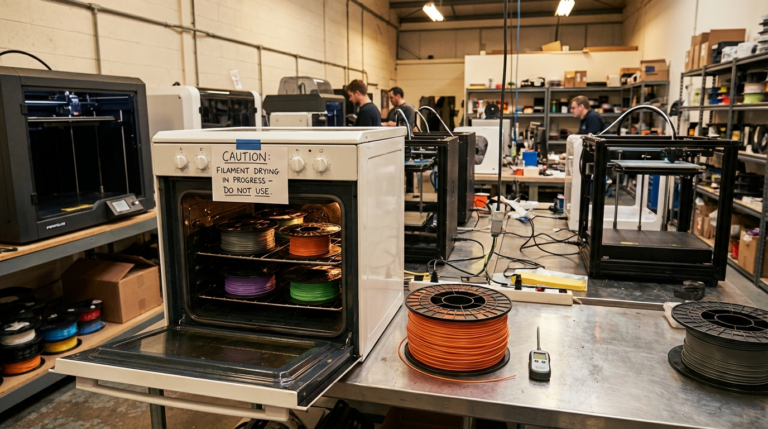
Filament Drying: 160°C for 6 Hours Before Every Print
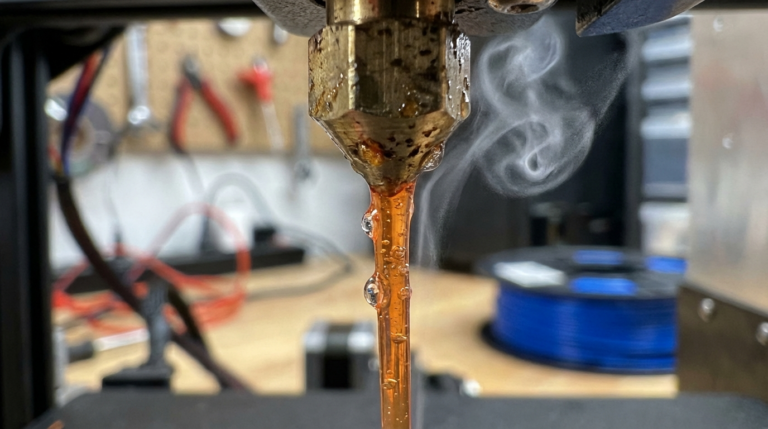
PEEK is hygroscopic. It absorbs water from the air at a rate that becomes measurable within 12 hours of opening a vacuum-sealed spool, and within 48 hours, water content can reach levels that visibly degrade print quality. Wet PEEK prints with porosity (water flashes to steam in the melt zone), reduced layer adhesion, and lower crystallization rates.
The drying requirement for PEEK is unlike anything else in consumer 3D printing. Standard filament dryers (Polymaker PolyDryer, Sunlu S2) max out at 70°C — useless for PEEK. PEEK requires drying at 160°C for 4–6 hours, which means a dedicated industrial dryer (Polymaker PolyDryer Pro, Sunlu S4 Pro, or a converted oven with PID temperature control).
The drying must happen immediately before printing — PEEK that has been dried but sat in open air for more than 4 hours has reabsorbed enough moisture to matter. The standard production workflow is to dry PEEK overnight, then keep it inside a heated dry box (maintained at 60–80°C) feeding directly into the printer’s hotend. Dry boxes with desiccant only (no heating) are inadequate for PEEK.
If you skip drying, you’ll see steam puffs from the nozzle, popping noises during extrusion, and finished parts with visible porosity in cross-section. The mechanical properties of un-dried PEEK can run 50–70% below the spec sheet — not a small loss, but a catastrophic one for any part that needs to perform near its design loads.
Cool-Down: Annealing Improves Crystallinity
PEEK printed and immediately cooled to room temperature reaches roughly 70–80% of its possible crystallinity. To unlock the remaining mechanical performance, the finished part should be annealed: held at 200°C for 3–6 hours after printing, then cooled slowly to room temperature.
Annealing increases crystallinity from ~30% to ~35–40%, which translates to:
- Tensile strength: +15–25%
- Heat deflection temperature (HDT): +20–30°C
- Chemical resistance: improved against most solvents
- Dimensional stability: significantly improved at elevated service temperatures
The catch: annealing causes 0.5–1.5% dimensional shrinkage. If your part has tight tolerances, design with this shrinkage in mind from the start (e.g., scale critical dimensions by 1.01x in the slicer before slicing).
For non-critical parts, skip annealing — the as-printed PEEK is still better than almost any other 3D-printable filament. For aerospace, medical, or chemical-process parts where the full PEEK performance envelope matters, annealing is part of the standard workflow.
Hardware Reality Check: Who Can Actually Print PEEK in 2026
The hardware that consistently delivers good PEEK parts in 2026:
- Apium P220, M220: Purpose-built PEEK printer. Heated chamber (up to 180°C), 500°C hotend, mature workflow. ~$25,000.
- Intamsys Funmat HT, Pro 410: Heated chamber, all-metal hotend rated to 500°C. ~$10,000–25,000.
- Roboze ARGO 500, 1000: Industrial-scale PEEK printers, chamber up to 180°C. ~$80,000+.
- Stratasys F900, F770: ULTEM-class production printers; some configurations support PEEK. ~$200,000+.
- DIY Voron 2.4 with chamber heater + Mosquito Magnum+ hotend: Possible for advanced users with $3,000+ in upgrades on top of the base build. Inconsistent results without careful tuning.
If your budget is under $5,000, PEEK is realistically out of reach. The closest substitute that works on prosumer hardware is PEKK (slightly lower temps, slightly easier to print) or PA-CF (much lower temps, very different mechanical profile but similar use cases). Both are honest alternatives — PEEK on inadequate hardware is a money pit.
The Bottom Line
PEEK demands 380–410°C hotend, 130–145°C bed, and 90–110°C heated chamber, plus 160°C/6-hour pre-drying and optional 200°C/3-hour post-anneal. Each temperature serves a specific physical purpose — full melt homogeneity, controlled crystallization, uniform thermal history, full crystallinity development. Hit them all and you get parts with mechanical properties within 80–90% of injection-molded PEEK. Miss any one and the part will fail short of expectations, often catastrophically. The hardware to deliver these conditions consistently costs $10,000+, and the filament costs $300–$800/kg. For most users, knowing what PEEK demands is more valuable than trying to print it on inadequate hardware — pick PA-CF or PEKK as a substitute, or send the file to a service bureau that already has the equipment dialed in.