Silicone Spacers vs Springs for 3D Printer Bed Leveling: The Complete Upgrade Guide
Why Replace Your 3D Printer Bed Springs?
If you’ve been 3D printing for more than a few weeks, you’ve probably noticed something annoying: your bed keeps going out of level. You spend five minutes carefully adjusting each corner, print a few parts, and then the next day everything is off again. The culprit? Those cheap metal springs that come with most budget 3D printers.
Stock bed springs are made from thin steel wire wound into a basic compression spring. They work, technically, but they have a fatal flaw — they lose tension over time. Every vibration from the printer, every heat cycle, and every time you press down on the bed to remove a print, those springs gradually weaken. The result is a bed that slowly drifts out of level, usually unevenly, leaving you chasing the same calibration problem over and over.
Silicone spacers (also called silicone solid mounts or leveling columns) are the single most popular upgrade in the budget 3D printing community, and for good reason. They solve the spring fatigue problem entirely by replacing a compressible metal coil with a solid piece of high-temperature silicone rubber.
How Silicone Spacers Work
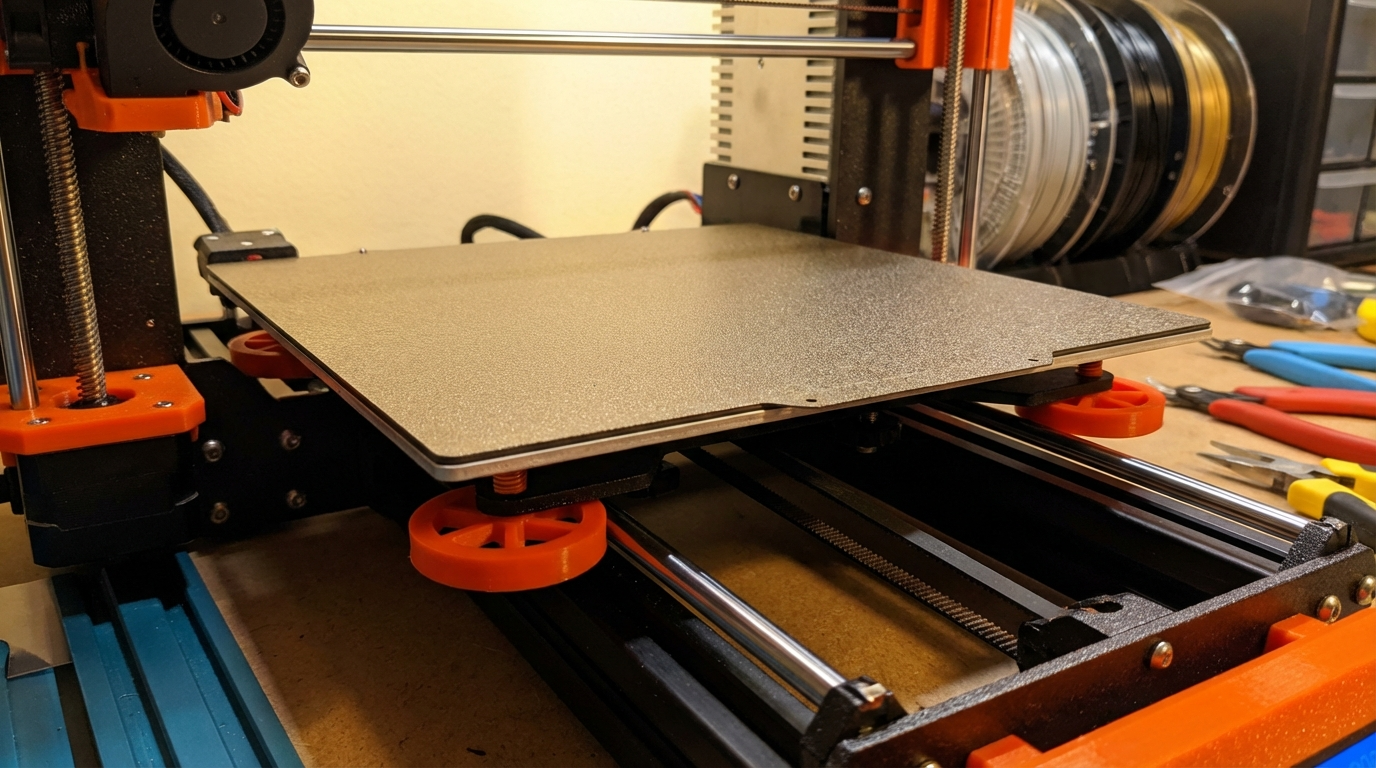
Silicone spacers are simple cylindrical plugs, typically 16mm to 18mm in diameter and 16mm to 25mm tall, made from heat-resistant silicone rubber rated to at least 200°C. They drop into the same mounting posts as your stock springs — same bolt, same knob, same location.
The key difference is in how they behave under load. A metal spring compresses linearly: push it a little, it moves a little. Push it harder, it moves more. This means any vibration or thermal expansion can shift the spring’s resting point. Silicone, on the other hand, has a much higher resistance to small deflections. It takes significant force to compress a silicone spacer, and when that force is removed, it returns to almost exactly the same height every time.
This property means your bed stays where you put it. Once leveled, a silicone-mounted bed can go weeks or even months without needing readjustment. For printers with manual leveling (no ABL sensor), this is a game-changer.
Silicone Spacers vs Metal Springs: Direct Comparison
Let’s break down the real-world differences between these two options:
Stability and Level Retention
Metal springs: Need re-leveling every few prints, sometimes after every print on printers with heavy bed movements. The springs compress unevenly as they age, so one corner might drop more than another.
Silicone spacers: Hold level for weeks or months. The silicone doesn’t develop a memory or fatigue the way metal does. You level once and essentially forget about it.
Vibration Dampening
Metal springs: Actually amplify certain vibration frequencies. The bed can resonate on its springs, especially at higher print speeds, contributing to ringing and ghosting artifacts.
Silicone spacers: Absorb vibrations significantly better. Silicone is a natural damper, and many users report measurably reduced ringing after switching. If you’re chasing surface quality at higher speeds, this matters.
Thermal Stability
Metal springs: Steel springs expand and contract with temperature. When you heat the bed to 60°C for PLA, the springs are at one height. Heat it to 100°C for ABS, and they’ve expanded slightly. This means your level can shift between filament changes.
Silicone spacers: Rated for temperatures well above any bed temperature you’ll use (typically 200°C+). Their dimensional change across the 20-110°C range of bed temperatures is negligible.
Cost
Both options are cheap. A set of four silicone spacers costs $3-8 on Amazon or AliExpress. A set of upgraded springs (yellow/blue heavy-duty springs) runs about the same. There’s no meaningful cost difference.
Installation Guide: Swapping Springs for Silicone
The installation process takes about 10 minutes and requires no special tools beyond what you already used to assemble your printer.
Step 1: Remove the Bed
Power off the printer and let the bed cool completely. Unclip any wiring (be gentle with the heated bed cable). Remove the four leveling knobs from underneath — they just unscrew by hand. Lift the bed off the mounting posts.
Step 2: Remove the Old Springs
Slide the old springs off the bolts or posts. If your printer uses a bolt-through design (like the Ender 3), the bolt, spring, and knob all come apart as a unit.
Step 3: Install the Silicone Spacers
Thread the bolt through the spacer just as it went through the spring. The spacer has a hole through the center that fits standard M3 or M4 leveling bolts. Place it in the same position and hand-tighten the knob until the spacer is slightly compressed — you want it snug but not crushed.
Step 4: Re-Level the Bed
With silicone spacers, you have less adjustment range than with springs, so get the knobs roughly even before fine-tuning. Use a piece of paper or a feeler gauge and level all four corners. With spacers, you’ll notice the knobs feel firmer and more precise — small turns make small changes, without the springy bounce of metal coils.
Step 5: Print and Verify
Print a first-layer test pattern (a large, thin square or a dedicated bed level test print). Check all corners and the center. Adjust if needed. This should be the last time you need to level for a long while.
When to Stick With Springs (or Upgrade Them)
Silicone spacers aren’t perfect for every situation. Here’s when you might want to keep springs:
- If you have auto bed leveling (ABL): A BLTouch, CR Touch, or inductive probe compensates for bed unevenness in firmware. Springs that drift slightly don’t matter because the probe re-maps the bed before every print. That said, silicone spacers still help by reducing the compensation range the ABL needs to work with.
- If your bed is badly warped: Springs give you more adjustment range to compensate for a warped aluminum bed. Silicone spacers have a smaller range of compression, so a severely warped bed might not be fully compensatable.
- If you frequently swap build plates: Some spring setups make it easier to pop on a magnetic plate and re-level quickly. Silicone spacers work fine here too, but the reduced adjustment range means your plates need to be very consistent in thickness.
If you decide to upgrade springs instead of going silicone, look for “upgraded bed springs” — they’re usually yellow or blue, made from thicker wire, and have much better tension retention than stock springs. They’re a middle-ground option: better than stock, but still not as stable as silicone.
Common Issues After Installing Silicone Spacers
“I Can’t Get the Bed Low Enough”
Silicone spacers are slightly thicker than compressed springs. If your Z-endstop or probe is set for the thinner spring height, the nozzle might not reach the bed. Fix: lower your Z-endstop switch or adjust your Z-offset in firmware.
“The Bed Feels Too Stiff”
That’s actually the point. The reduced give means vibrations don’t translate into bed movement. It takes some getting used to if you’ve been adjusting bouncy springs, but the stiffness is a feature, not a bug.
“One Corner Is Higher Than the Others”
This usually means one spacer is slightly taller or the knob isn’t tightened evenly. Silicone spacers from cheap sets can vary by 0.5mm in height. If you find a persistent high corner, you can sand the spacer down slightly or add a thin washer under one of the others.
The Verdict: Silicone Spacers Are Worth It
For under $5 and ten minutes of work, silicone spacers eliminate one of the most common frustrations in 3D printing. If you’re tired of re-leveling your bed every other print, this is the upgrade to make. It’s not glamorous, it won’t make your prints look dramatically different, but it removes a recurring annoyance from your workflow — and that’s worth more than most upgrades that cost ten times as much.
The only printers where this upgrade is truly unnecessary are those with automatic tramming (like the Bambu Lab series) or printers with three-point leveling systems that use rigid mounts by default. For everyone else — especially Ender 3 owners and similar budget printers — silicone spacers should be the first $5 you spend after unboxing.