3D Print Heat-Set Threaded Inserts: Complete Installation Guide
If you’ve ever tried to bolt something to a 3D printed part, you know the pain: screws strip out of plastic, threads crack under load, and the whole assembly feels flimsy. Heat-set threaded inserts solve this problem completely. These small brass inserts melt into your 3D printed parts using a soldering iron, creating strong, reusable metal threads that can handle real mechanical loads.
In this comprehensive guide, I’ll cover everything from choosing the right inserts and designing your parts correctly to installing them perfectly every time. Whether you’re building functional prototypes, enclosures, or production parts, threaded inserts will transform the quality of your 3D printed assemblies.
What Are Heat-Set Threaded Inserts?
Heat-set inserts (also called hot-melt inserts or thermal inserts) are small brass cylinders with external knurled patterns and internal machine threads. They’re designed to be pressed into a pre-sized hole in a plastic part using heat — typically from a soldering iron with a specialized tip.
When the hot insert contacts the plastic, it melts a thin layer around it. The knurled exterior pattern pushes the melted plastic into its grooves, and when everything cools, you have a permanently bonded metal thread that won’t strip, crack, or wear out.
Why Use Them Instead of Alternatives?
- vs. Self-tapping screws: Self-tappers work once or twice, then the plastic threads strip. Inserts give you unlimited assembly/disassembly cycles.
- vs. Printed threads: FDM threads are weak, imprecise, and prone to cross-threading. Inserts provide real M3/M4/M5 threads with proper tolerances.
- vs. Nuts and bolt-through: Inserts are cleaner, more compact, and don’t require access to both sides of the part.
- vs. Press-fit inserts: Heat-set inserts bond to the plastic for a much stronger hold than cold press-fit alternatives.
Choosing the Right Inserts
Thread Sizes
The most common sizes for 3D printing applications are:
- M2 / M2.5: Small electronics, sensor mounts, delicate assemblies
- M3: The most popular size — perfect for most 3D printed enclosures and functional parts
- M4: Medium-duty applications, panel mounts, structural connections
- M5: Heavy-duty applications, load-bearing connections
Insert Length
Most inserts come in lengths from 3mm to 10mm. For general use:
- Short (3-4mm): Thin walls, surface-mount applications
- Standard (5-6mm): Best all-around choice for most parts
- Long (8-10mm): Heavy-load applications, thick-wall parts
Recommended Brands
Not all inserts are equal. I’ve tested dozens of brands, and quality varies significantly:
- CNC Kitchen inserts — Specifically designed for 3D printing, excellent knurl pattern, great documentation
- McMaster-Carr 94180A series — Industrial quality, consistent dimensions
- Ruthex inserts — Good quality at a lower price point, popular in the maker community
Designing Parts for Threaded Inserts
The most critical step happens in CAD, long before you heat up the soldering iron. Getting the hole dimensions right is the difference between inserts that hold forever and inserts that fall out.
Hole Diameter
The hole should be slightly smaller than the outer diameter of the insert. This ensures the insert pushes plastic aside and creates a strong bond. General guidelines:
| Insert Size | Insert OD | Recommended Hole Diameter |
|---|---|---|
| M2 | 3.2mm | 3.0-3.1mm |
| M2.5 | 3.5mm | 3.3-3.4mm |
| M3 | 4.0mm | 3.8-3.9mm |
| M4 | 5.0mm | 4.8-4.9mm |
| M5 | 6.0mm | 5.8-5.9mm |
Important: These dimensions can vary between insert brands. Always check the manufacturer’s recommended hole size. CNC Kitchen provides exact dimensions for each of their insert variants.
Hole Depth
Make the hole 1-2mm deeper than the insert length. This gives the displaced plastic somewhere to go and ensures the insert sits flush with the surface.
Wall Thickness
This is where people often make mistakes. The wall around the insert hole needs to be thick enough to absorb the melted plastic without deforming the outer surface.
- Minimum wall thickness: 1.5x the insert outer diameter
- Recommended wall thickness: 2x the insert outer diameter
- For M3 inserts (4mm OD): minimum 6mm wall, recommended 8mm wall
Orientation Matters
Design your parts so inserts go in perpendicular to the layer lines, not parallel. Inserts installed along the Z-axis (pressed in from the top of a vertically printed part) have much better pull-out strength than inserts pressed in from the side.
Installation: Step-by-Step Guide
Tools You Need
- Soldering iron — Temperature-controlled, set to 200-230°C for PLA, 250-270°C for PETG/ABS
- Insert tip — A tapered tip that fits the thread size (M3 tip for M3 inserts). These prevent the insert from tilting during installation.
- Optional: installation jig — A 3D printed guide that keeps the insert perfectly vertical
Temperature Settings
| Material | Iron Temperature | Notes |
|---|---|---|
| PLA | 200-220°C | Low and slow — PLA scorches easily |
| PETG | 240-260°C | Slightly above print temp |
| ABS/ASA | 250-270°C | ABS is forgiving on temperature |
| Nylon | 260-280°C | Higher for glass-filled variants |
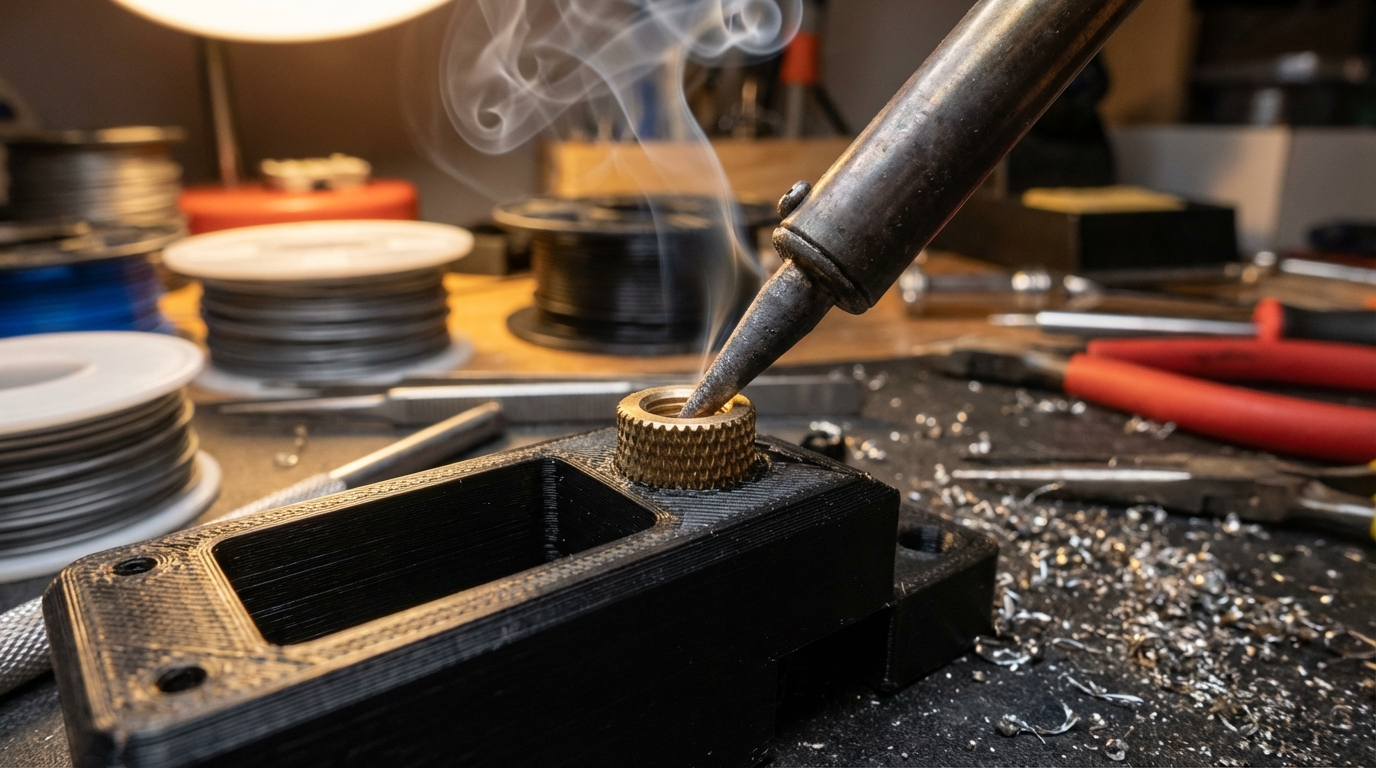
Installation Process
- Preheat the iron to the correct temperature for your material. Wait until it stabilizes.
- Place the insert on top of the hole, threaded end up (the end without the chamfer goes into the hole).
- Position the iron tip inside the insert threads and apply light, steady downward pressure. Let the heat do the work — don’t force it.
- Press slowly — the insert should sink into the plastic over 3-5 seconds. You’ll see a small ring of melted plastic rise around the edges.
- Stop when flush — the top of the insert should be level with or slightly below the surface of the part.
- Remove the iron straight up — don’t wiggle it, as this can tilt the insert.
- Let it cool completely before touching or threading a screw in — at least 30 seconds.
Common Mistakes and How to Avoid Them
Insert Goes in Crooked
The most common problem. Solutions:
- Use a proper insert installation tip — they’re tapered to self-center
- Print a simple alignment jig
- Start the insert before applying heat — seat it in the hole first, then bring the iron
Insert Pushed Too Deep
Once an insert is too deep, it’s very difficult to fix. Prevention:
- Go slowly and watch the depth carefully
- Use a depth stop or mark on the installation tip
- Design a counterbore in your CAD model that acts as a physical stop
Plastic Flows Into Threads
If the iron is too hot or you apply too much pressure, melted plastic can flow into the internal threads.
- Lower the iron temperature
- Use less pressure — let heat transfer do the work
- Thread a screw in immediately after installation while the plastic is still soft (this clears any debris)
Weak Pull-Out Strength
If inserts pull out under load:
- Check your hole diameter — it might be too large
- Increase wall thickness around the insert
- Use longer inserts
- Switch to a higher infill percentage around insert locations
Pull-Out Strength: What to Expect
Properly installed heat-set inserts in 3D printed parts are surprisingly strong. Based on testing by CNC Kitchen and other makers:
- M3 in PLA (4 walls, 20% infill): 150-200N pull-out force
- M3 in PETG (4 walls, 20% infill): 180-250N pull-out force
- M3 in ABS (4 walls, 20% infill): 170-230N pull-out force
These numbers increase significantly with more walls, higher infill, and proper installation technique. For comparison, a self-tapping screw in PLA typically fails at 60-80N — inserts provide 2-3x the strength.
Advanced Tips
- Add chamfers to your holes — A 0.5mm chamfer at the top of the hole helps guide the insert in straight and gives displaced plastic a place to go.
- Use modifier meshes for local infill — In Cura or PrusaSlicer, add 100% infill around insert locations while keeping the rest of the part at normal infill.
- Consider insert orientation in your design — Inserts installed from the top of a print (into the Z-axis) are strongest because they’re gripping between layer lines.
- Test before committing — Print a small test block with your exact insert hole dimensions before printing the final part. It takes 5 minutes and saves hours of frustration.
Where to Buy Heat-Set Insert Installation Tips
Don’t try to install inserts with a bare soldering iron tip — it works poorly and you’ll get crooked inserts. Dedicated tips cost $10-30 and are worth every cent:
- CNC Kitchen insert tips — Available for M2-M6, designed specifically for their inserts
- Ruthex tips — Compatible with common soldering iron shanks
- Hakko/Weller compatible tips — Available on Amazon for standard soldering station shanks
Heat-set threaded inserts are one of those upgrades that, once you start using them, you’ll wonder how you ever built anything without them. They’re inexpensive, easy to install with a little practice, and they transform 3D printed parts from fragile prototypes into robust, functional assemblies. Start with an M3 assortment pack and a proper installation tip, and you’ll be putting them in everything you print.