3D Print Infill Patterns Compared: Which Is Strongest?
Walk into any 3D printing forum and ask “what infill pattern should I use?” and you’ll get twelve different answers, all delivered with absolute confidence. The truth is, infill pattern choice matters more than most people think — but not always in the ways they expect. Different patterns offer different trade-offs between strength, print speed, material usage, and the specific type of load your part needs to withstand.
I’ve tested the most commonly used infill patterns at multiple densities, documenting how they perform under compression, tension, and shear loads. Here’s what the data actually shows, not what internet wisdom assumes.
Understanding Infill: The Basics
Infill is the internal structure printed inside the solid walls of your model. It serves three primary purposes:
- Structural support for top layers: Without infill, top layers would sag and droop into the hollow interior, creating a rough or collapsed surface
- Mechanical strength: Infill contributes to how well your part resists compression, bending, and impacts
- Weight and material usage: Higher infill percentages use more material and take longer to print, but add diminishing returns in strength after about 40%

For most prints, infill density matters more than infill pattern. Going from 10% to 25% infill makes a dramatic difference in strength. Going from 25% to 50% helps, but less dramatically. Going from 50% to 100% wastes filament while adding minimal strength because the walls carry most structural loads anyway.
Infill Patterns Compared
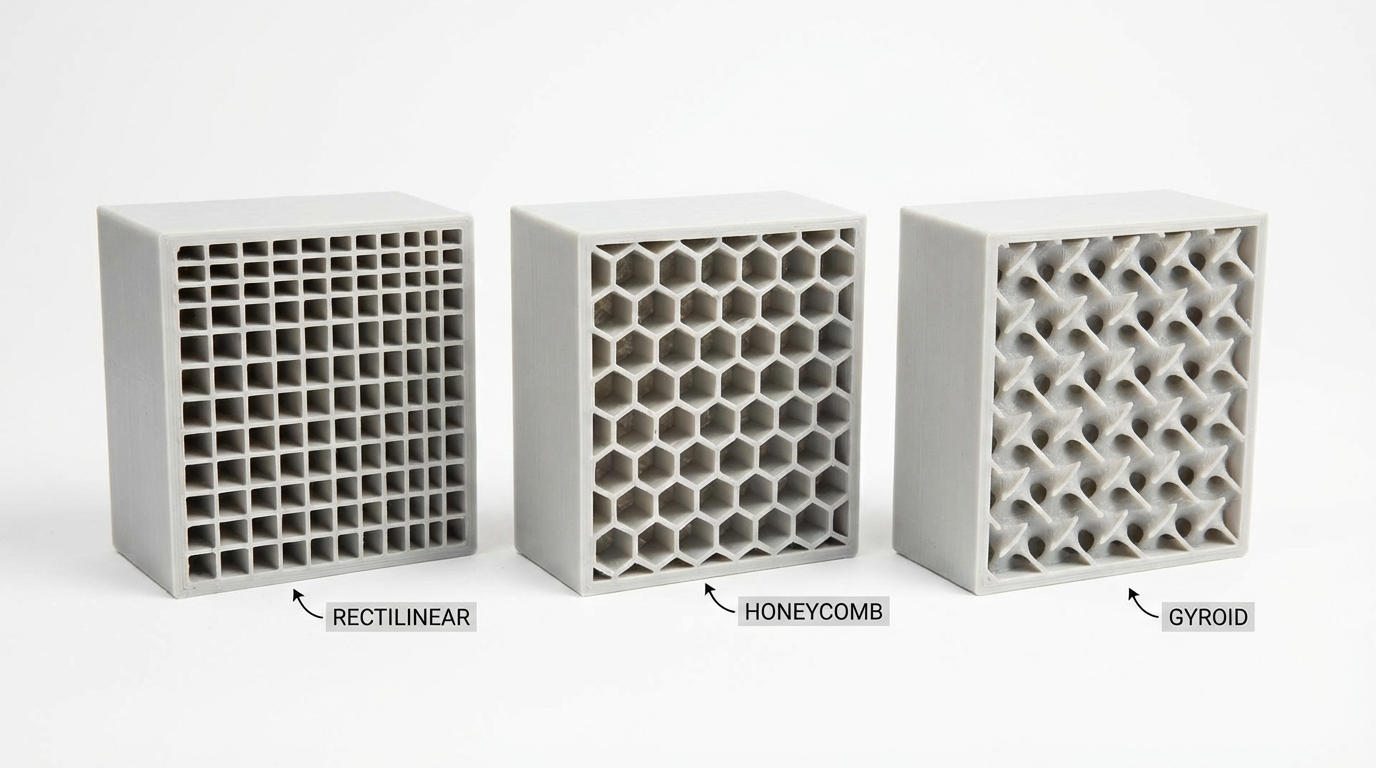
Grid (Rectilinear)
Grid is the simplest infill pattern — alternating perpendicular lines that form a crosshatch pattern. It’s the default in many slicers for good reason.
Strengths:
- Good omnidirectional strength (equal in X and Y)
- Fast to print — straight lines mean constant speed with minimal direction changes
- Excellent top layer support (many contact points for bridging)
Weaknesses:
- Lines cross at intersections, creating stress concentration points
- Not the strongest under any specific load type
- Higher material usage than some alternatives at the same effective strength
Best for: General purpose prints where you don’t know the load direction. Reliable default choice.
Lines (Linear)
Lines is a variant of grid where each layer’s lines run in the same direction (alternating 90° between layers), but lines don’t cross within the same layer. This eliminates the intersection stress points of grid pattern.
Strengths:
- Faster than grid (no crossing points = smoother motion)
- Lower material usage than grid at the same density
- Less visible through thin walls (fewer bumps on exterior)
Weaknesses:
- Slightly weaker than grid under compression
- Layer-to-layer connections are weaker (lines don’t directly stack)
Best for: Decorative parts, non-structural prints, rapid prototypes.
Triangles
Three sets of lines at 60° angles create a triangular grid pattern. This is one of the strongest patterns available per unit of material used.
Strengths:
- Excellent rigidity in all horizontal directions (true omnidirectional in XY)
- Strong under both compression and shear loads
- Triangles are inherently the most rigid 2D shape
Weaknesses:
- Slower to print (many direction changes = more acceleration/deceleration)
- Multiple crossing points create slight surface artifacts
- Uses more material than grid at the same density percentage
Best for: Structural parts that need maximum rigidity. Brackets, mounts, enclosure panels.
Gyroid
Gyroid is a continuous 3D curve that never self-intersects. It looks organic, almost biological, and has become the darling of the 3D printing community for good reason.
Strengths:
- True 3D strength — equal resistance in all three axes (X, Y, and Z)
- No straight lines means it handles multi-directional stress gracefully
- Continuous structure means no weak intersection points
- Excellent for parts that experience complex or unpredictable loads
Weaknesses:
- Slowest pattern to print (constant curved motion = lower effective speed)
- Can cause resonance and vibration on printers with less rigid frames
- Poor top layer support at low densities (curved shapes = fewer flat contact points for bridging)
Best for: Functional parts with complex load profiles. Handles, grips, anything that gets twisted or pulled in unpredictable directions.
Honeycomb (Hexagonal)
Hexagonal cells arranged like a beehive. Nature figured out this pattern is efficient for a reason — it encloses the maximum area with the minimum perimeter.
Strengths:
- Outstanding compression resistance for the amount of material used
- Good omnidirectional strength in the XY plane
- Visually impressive in cross-section (great for demonstration prints)
Weaknesses:
- Many direction changes = slower printing and potential vibration artifacts
- Higher material usage than grid or gyroid at the same density percentage
- Not significantly stronger than triangles despite using more material
Best for: Parts that need to withstand crushing forces. Protective cases, bumpers, spacers.
Cubic
3D cubes tilted at 45° so that each layer shows a different cross-section. This creates an internal structure of interlocking boxes oriented diagonally.
Strengths:
- Good 3D strength (resists loads in X, Y, and Z directions)
- Faster to print than gyroid (straight lines instead of curves)
- Good balance of strength and speed
Weaknesses:
- Can create pressure pockets during printing (the enclosed cells trap air)
- Top layer quality can suffer at lower densities
Best for: All-around functional parts. A solid alternative to gyroid when you want 3D strength but faster print times.
Lightning
Lightning is a newer, experimental pattern designed specifically to use the minimum amount of material needed to support top surfaces. It creates tree-like branching structures that only exist where they’re needed to prevent the top layers from sagging.
Strengths:
- Uses dramatically less material than any other pattern (40–70% less at the same “density”)
- Fastest to print (less material = less extrusion time)
- Top surface quality is surprisingly good
Weaknesses:
- Provides almost zero structural strength — this is purely a top-layer support pattern
- Parts with lightning infill are essentially hollow and crush easily
Best for: Decorative prints, display models, anything where weight and material cost matter more than strength. Don’t use for functional parts.
Infill Density: How Much Is Enough?
Here’s a rough guide to infill density based on application:
- 5–10%: Display models, decorative items. Just enough to support top layers
- 15–20%: Light-duty functional parts. Organizers, covers, non-load-bearing components
- 25–35%: Standard functional parts. The sweet spot for most mechanical applications
- 40–60%: Heavy-duty parts. Brackets, mounts, parts that bear significant load
- 80–100%: Very rarely needed. Maximum strength but massive print time and material use. Consider more walls instead — 6 walls at 20% infill is usually stronger than 2 walls at 100% infill
The Wall Thickness Secret
Here’s something that gets overlooked constantly: for most parts, increasing wall count is more effective at improving strength than increasing infill density. Walls (perimeters) carry the majority of structural loads in a 3D printed part. The infill mainly prevents the walls from buckling inward under compression.
A part with 4 walls and 20% infill is almost always stronger than a part with 2 walls and 50% infill — and it usually prints faster and uses less material too.
Which Pattern Should You Use?
If you want a simple answer: use grid at 20% for general purpose, gyroid at 25% for functional parts, and lightning at 10% for decorative items. That covers 90% of use cases.
If you’re engineering a specific part and know the load direction:
- Compression (crushing): Honeycomb or triangles at 25–40%
- Tension (pulling apart): More walls matter more than infill pattern
- Shear (sliding forces): Triangles or gyroid at 30%+
- Complex/unknown loads: Gyroid at 25–35%
- Bending: More walls + gyroid or cubic at 20–30%
Wrapping Up
Infill pattern selection is one of those areas where a little knowledge goes a long way. Most people pick grid or gyroid and never think about it again — and honestly, that’s a perfectly fine approach for 95% of prints. But when you’re designing functional parts that need to survive real loads, choosing the right pattern and density for your specific application can mean the difference between a part that lasts years and one that snaps on day two.
When in doubt, add more walls before adding more infill. Your parts will be stronger, print faster, and use less material. And if you really want to optimize, print test pieces and break them — nothing teaches infill behavior better than hearing the crack.