3D Printed Threads and Screws: Best Settings and Design Guide for Functional Parts
Can You Really 3D Print Functional Threads?
The short answer is yes — but not all threads are created equal when it comes to 3D printing. With the right design parameters and print settings, you can produce threads that screw together smoothly, hold reasonable loads, and survive repeated use. However, there are real limitations that no amount of slicer tweaking can overcome, and knowing those boundaries is what separates functional threaded parts from frustrating failures.
This guide covers everything from choosing the right thread profile to dialing in settings that produce threads you can actually use.

Thread Profiles for 3D Printing
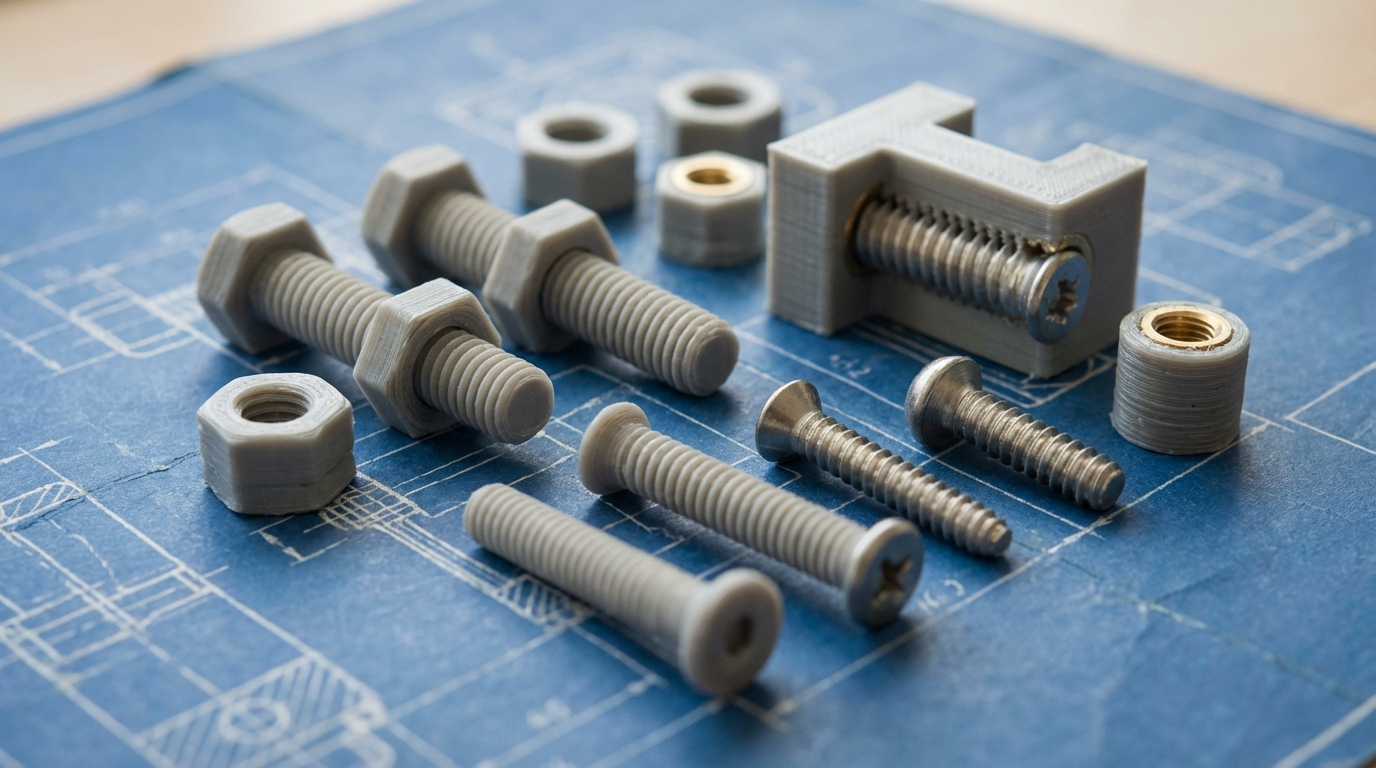
Metric Threads (M-series) — The Standard Choice
Standard metric threads (M6, M8, M10, etc.) can be 3D printed, but only at larger sizes. As a general rule:
- M8 and above: Printable with good results on most FDM printers
- M6: Possible with a well-tuned printer and 0.3mm nozzle
- M5 and below: Extremely difficult on FDM. Thread pitch is too fine for typical layer heights.
The reason is simple math: an M6x1.0 thread has a pitch of 1mm and a thread depth of about 0.6mm. With a 0.4mm nozzle and 0.2mm layer height, you only get 5 layers per thread pitch and the resolution isn’t enough to form a clean profile.
Trapezoidal Threads (ACME / Tr) — Best for 3D Printing
Trapezoidal threads are the sweet spot for FDM printing. The flat-topped profile is much easier to reproduce than the sharp V-shape of metric threads, and the wider tooth makes for stronger parts. Most 3D-printed lead screws, clamps, and vises use trapezoidal threads.
- Tr16x4: Great all-purpose size for 3D printing
- Tr20x4: Even more forgiving, excellent for vise mechanisms
- Profile angle: 30° (vs. 60° for metric), meaning shallower cuts that FDM handles better
Custom Threads Designed for FDM
Many designers create custom thread profiles specifically optimized for 3D printing. These typically feature:
- Larger pitch (2-4mm) for reliable layer reproduction
- Rounded or flat crests instead of sharp points
- Increased clearance between mating surfaces
- Chamfered entries for easy assembly
If you’re designing your own parts, a custom thread profile will almost always outperform trying to print a standard thread specification.
Critical Design Parameters
Clearance (The Most Important Factor)
The single biggest reason 3D-printed threads don’t work is insufficient clearance. FDM printing adds material to exterior surfaces and removes it from interior surfaces due to how perimeters are calculated. Without compensation:
- External threads (bolts): Come out slightly oversized
- Internal threads (nuts): Come out slightly undersized
The result? Parts that should screw together don’t fit.
Recommended clearance values:
- 0.2mm radial clearance per side (0.4mm on diameter) for a snug fit
- 0.3mm radial clearance per side (0.6mm on diameter) for easy assembly
- 0.4mm radial clearance per side (0.8mm on diameter) if dimensional accuracy is uncertain
Always apply clearance to the internal thread (nut) — enlarge the internal thread rather than shrinking the external thread. This maintains the bolt’s strength.
Minimum Thread Size
With a standard 0.4mm nozzle at 0.2mm layer height, the practical minimum thread specifications are:
- Pitch: 1.5mm minimum (2mm+ recommended)
- Thread depth: 0.8mm minimum
- Major diameter: 8mm minimum for reliable results
Want smaller threads? Switch to a 0.2mm or 0.3mm nozzle and reduce layer height to 0.1mm. You’ll get better thread resolution at the cost of much longer print times.
Thread Length and Engagement
Due to the lower strength of 3D-printed threads compared to machined metal threads, you need more thread engagement to achieve adequate holding force:
- Metal threads: 1x diameter engagement is typically sufficient
- 3D-printed threads: 1.5-2x diameter engagement recommended
- For an M10 bolt, use at least 15-20mm of thread engagement in the mating part
Print Settings for Best Thread Quality
Layer Height
Lower layer heights produce smoother thread profiles. The relationship is direct:
- 0.1mm: Best thread quality, very slow prints
- 0.15mm: Good compromise for most threaded parts
- 0.2mm: Acceptable for large threads (Tr16 and above)
- 0.3mm: Only for very large, coarse threads (Tr24+)
Print Orientation
Thread orientation relative to the build plate dramatically affects quality:
- Vertical threads (axis perpendicular to bed): Best results. Each thread revolution is built from many layers, creating a smooth spiral. This is the preferred orientation for both bolts and nuts.
- Horizontal threads (axis parallel to bed): Poor results. The thread profile is built as stair-steps between layers, resulting in rough surfaces and weak engagement. Avoid this orientation.
Perimeters and Walls
Threads are inherently thin features. Use:
- 4+ perimeters: Ensures the thread tooth is fully solid material, not infill
- For thin threads: Enable “detect thin walls” in your slicer to prevent gaps in the thread geometry
Speed
Slow down for threaded sections:
- External perimeters: 25-35 mm/s (even if your normal speed is 60+)
- Small perimeters (Cura: “Small Feature Speed Limit”): Enable and set to 25 mm/s
- Faster speeds cause ringing and dimensional inaccuracy that directly impacts thread fit
Cooling
Full cooling (100% fan) for threaded sections. Each thread crest is essentially a small overhang, and proper cooling prevents them from drooping.
Post-Processing Threaded Parts
Thread Chasing
After printing, run a matching metal bolt through internal threads (or a nut over external threads) to clean up any rough spots. This simple step dramatically improves thread feel and function. For metric threads, you can use a standard tap and die set.
Sanding
For external threads, lightly sanding with 400-grit sandpaper while rotating the part removes high spots and improves surface finish. Don’t overdo it — you can remove too much material and create a sloppy fit.
Lubricant
A small amount of white lithium grease or dry PTFE lubricant makes 3D-printed threads operate much more smoothly. This is especially important for parts that will be threaded and unthreaded repeatedly.
Filament Selection for Threaded Parts
- PLA: Good dimensional accuracy, but brittle. Threads can crack under load. Fine for light-duty applications like caps and covers.
- PETG: Best all-around choice. Good accuracy, slight flexibility prevents thread cracking, excellent layer adhesion.
- ABS/ASA: Good strength but tends to warp, which kills thread accuracy. Only use with an enclosure and well-tuned settings.
- Nylon: Excellent for heavy-duty threaded parts. Slight flexibility creates a natural thread-locking effect. But high shrinkage means you need to compensate in your model.
- TPU: Don’t even try. Flexible threads have no holding power.
Alternatives to Printed Threads
Sometimes, printing the threads isn’t the best approach. Consider these alternatives:
Heat-Set Inserts
Brass threaded inserts pressed into a hole with a soldering iron provide metal threads in a plastic part. Available from M2 to M8, they’re cheap ($0.05-0.20 each), easy to install, and infinitely more durable than printed threads for bolt-in applications.
Hex Nut Traps
Design a hexagonal pocket in your part that captures a standard hex nut. Pause the print, drop in the nut, and resume. This gives you metal threads with zero post-processing.
Self-Tapping Screws
For many applications, simply designing a pilot hole and using a self-tapping screw is faster and stronger than printing threads. Use a hole diameter 85-90% of the screw’s outer diameter.
Practical Applications
3D-printed threads work best for:
- Bottle caps and containers: Large diameter, coarse pitch, low load
- Vise mechanisms: Trapezoidal threads, turn linear motion into clamping force
- Adjustment screws: Fine positioning with printed lead screws
- Cable glands and connectors: Bayonet-style or coarse thread connections
- Replacement knobs and handles: Matching existing thread specifications
Key Takeaways
3D printing functional threads is absolutely doable with the right approach. Stick to larger thread sizes (M8+), use generous clearance (0.3-0.4mm per side), print vertically with low layer heights (0.15mm), and slow down your perimeters. For small or high-precision threaded connections, heat-set inserts and nut traps are almost always the better choice.
The sweet spot for 3D-printed threads is in custom mechanisms where standard hardware doesn’t fit — vises, clamps, adjustable mounts, and containers. That’s where the freedom to design any thread profile, pitch, and diameter makes 3D printing truly shine.