Capricorn Bowden Tube Upgrade: Is It Worth It and How to Install
If you’ve been 3D printing for any amount of time, you’ve probably heard someone recommend “just get Capricorn tubing.” It’s one of the most recommended upgrades in the hobby, especially for Bowden-style printers like the Ender 3 series, CR-10, and similar machines. But is it actually worth it? What does it do differently? And how do you install it properly?
Let me walk you through everything you need to know about upgrading your Bowden tube to Capricorn PTFE, including whether your specific printer will actually benefit from the swap.
What’s Wrong With Stock Bowden Tubes?
The white PTFE tubes that come with most budget 3D printers are made from standard virgin PTFE. They work, but they have several limitations:
- Wider inner diameter (ID) — Stock tubes have a ~2.0mm ID, which gives the 1.75mm filament too much room to move around
- Lower temperature tolerance — Standard PTFE starts degrading around 240°C and off-gasses toxic fumes above 260°C
- Higher friction — The surface finish isn’t as smooth, increasing drag on the filament
- Softens and deforms faster — The tube end that sits near the hotend can mushroom out over time, creating a gap where filament pools and causes clogs
For PLA-only printing at moderate speeds, stock tubes are fine. But if you’re pushing beyond basic settings — higher temps, faster retractions, PETG, or anything north of 240°C — the limitations become real problems.
What Makes Capricorn Tubing Different
Capricorn Premium PTFE tubing (the blue stuff) addresses every issue above:
- Tighter inner diameter — 1.9mm ID (vs. 2.0mm stock), reducing filament wobble by roughly 50%
- Higher temperature rating — Their XS series handles up to 300°C without degradation
- Lower friction coefficient — Smoother inner surface means less extrusion resistance
- Better material composition — Uses a proprietary PTFE blend that resists deformation at the hotend junction
That tighter ID is the real star of the show. Less room for filament to move sideways means more accurate retraction, less oozing, and better control over extrusion — especially with flexible filaments like TPU that tend to buckle in loose Bowden tubes.
Will You Actually See a Difference?
Honest answer: it depends on your printer and what you print.
You’ll see a meaningful improvement if:
- You use a Bowden setup and struggle with stringing or retraction
- You print PETG, ABS, or other materials above 230°C regularly
- You’ve experienced mid-print clogs that seem random
- You want to print TPU or other flexible filaments on a Bowden printer
- Your stock tube has been in use for 6+ months and shows wear
You probably won’t notice much difference if:
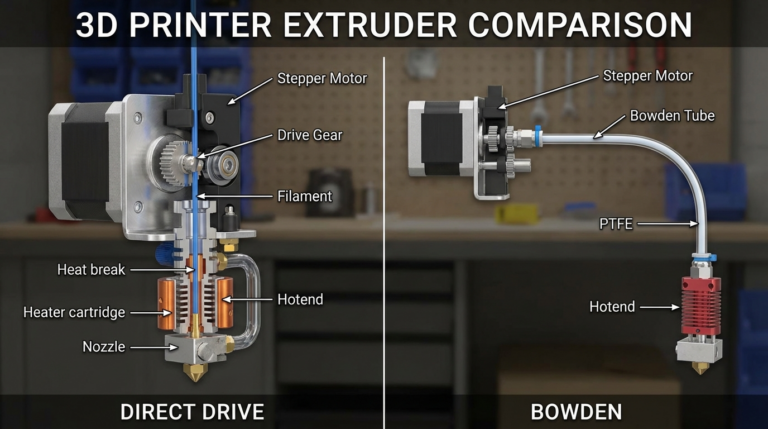
- You have a direct drive extruder (short tube path = minimal benefit)
- You only print PLA at standard temperatures
- Your current setup is already dialed in with no quality issues
Installation Guide: Step by Step
Installing Capricorn tubing is straightforward, but getting the cut and fitment right matters a lot. A poorly installed tube can cause more problems than the stock one.
What You’ll Need
- Capricorn Premium PTFE tube (1 meter is usually enough)
- A sharp tube cutter or razor blade (Capricorn sells a dedicated cutter)
- New pneumatic fittings (optional but recommended — they’re often included with Capricorn kits)
- Calipers or a ruler
- A small wrench for the pneumatic fittings
Step 1: Measure Your Current Tube
Before removing anything, measure the length of your current Bowden tube. You want the replacement to be exactly the same length. Too short creates a gap inside the hotend (causes clogs). Too long adds unnecessary friction and reduces retraction effectiveness.
Step 2: Remove the Old Tube
- Heat the hotend to printing temperature (helps free any stuck filament)
- Retract the filament completely
- Press down on the pneumatic fitting’s release collar at the extruder end
- Pull the tube out of the extruder fitting
- Repeat at the hotend end
- Inspect the old tube — if the hotend end is mushroomed or discolored, that was definitely causing problems
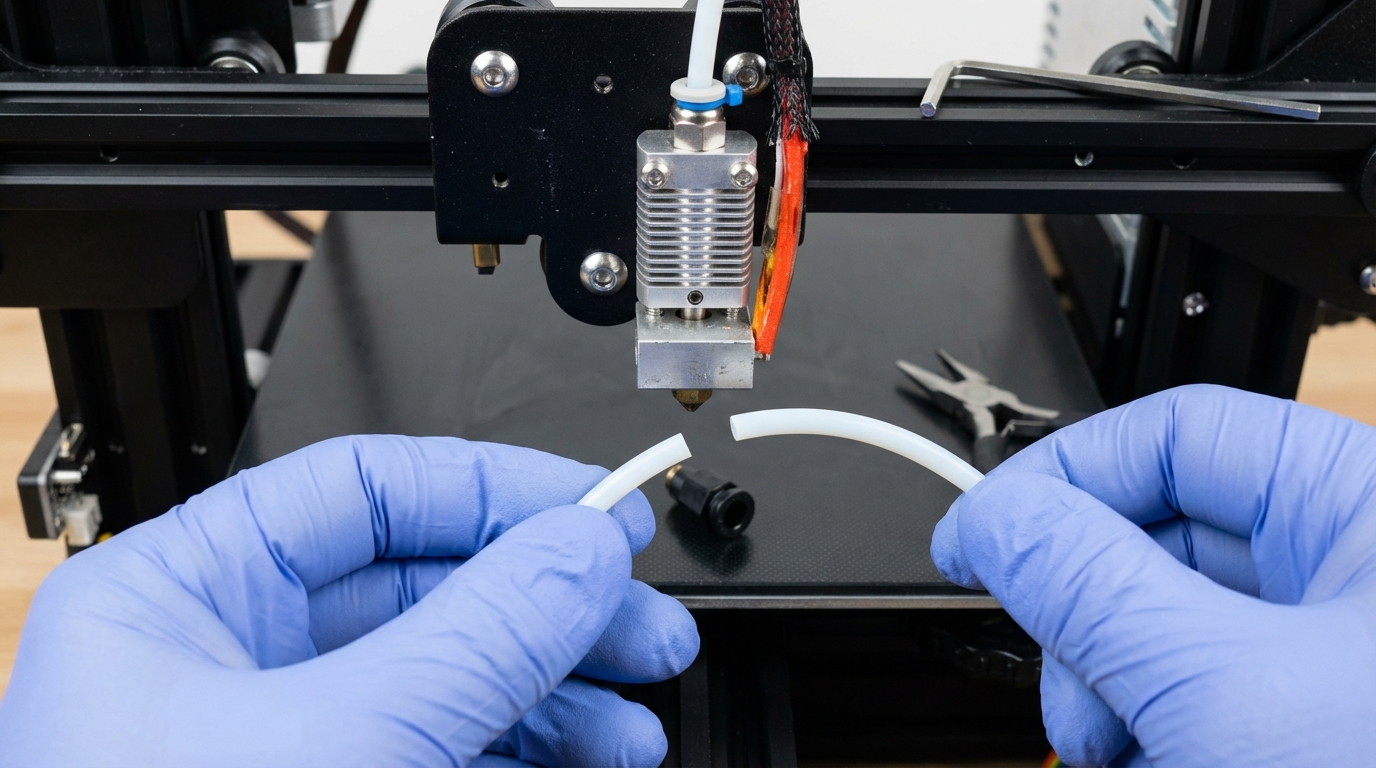
Step 3: Cut the New Tube
This is the most critical step. A clean, square cut is essential. The tube end must sit perfectly flat against the nozzle inside the hotend — any gap creates a pocket where filament accumulates and causes clogs.
- Use the Capricorn tube cutter if you have one — it guarantees a perpendicular cut
- If using a razor blade, roll the tube slowly while cutting. Don’t crush it.
- Inspect the cut end — it should be flat and round, not oval or angled
- Cut your tube 1-2mm longer than the old one (the fittings will compress it slightly)
Step 4: Replace Pneumatic Fittings (Recommended)
If your fittings are original, replace them. Worn fittings are the most common cause of the tube slipping during printing, which creates the dreaded hotend gap. When replacing:
- Use fittings rated for the tighter Capricorn OD if your kit includes them
- Apply a tiny drop of threadlocker on the fitting threads (optional but smart)
- Tighten firmly but don’t overtighten — you can crack the mounting hole
Step 5: Install the New Tube
- Push the tube into the hotend fitting first — push it all the way down until it bottoms out against the nozzle
- Pull the tube gently to make sure the fitting grips it (it shouldn’t slide out)
- Route the tube to the extruder, avoiding sharp bends
- Push the extruder end into the extruder fitting
- Load filament and do a test extrusion before printing
Step 6: Adjust Retraction Settings
With the tighter ID tube, your retraction settings may need adjustment. The reduced slop means retraction is more effective, so you can often:
- Reduce retraction distance by 0.5-1mm
- Slightly increase retraction speed (the lower friction allows it)
- Reduce priming amount if you notice blobs after travel moves
Run a retraction test print after installation to dial in the new settings.
Common Installation Mistakes
I’ve seen (and made) these mistakes. Don’t repeat them:
- Angled cut — Creates a gap at the nozzle. Filament pools there. You get intermittent clogs days later.
- Tube too short — Same problem. The tube doesn’t reach the nozzle, leaving a gap.
- Tube too long — Creates a bow in the tube path, adding friction. Can also prevent the extruder gear from gripping properly if it pushes the tube outward.
- Reusing old fittings — Worn teeth don’t grip the new tube properly. It slips during retraction, creating an intermittent gap.
- Not seating the tube fully in the hotend — Push hard. You should feel it bottom out against the nozzle.
Capricorn vs. Other Premium Tubes
Capricorn isn’t the only premium Bowden tube option, though it’s the most popular. Here’s how it compares:
- Capricorn XS — The gold standard. 1.9mm ID, rated to 300°C. About $10-15 for 1 meter.
- Capricorn TL — Translucent version. Same performance, lets you see the filament path. Slightly more expensive.
- TriangleLab PTFE — Decent budget alternative. Not quite as tight tolerance as Capricorn.
- Generic “Capricorn-style” blue tubes from Amazon — Hit or miss. Some are genuine Capricorn, some are knockoffs with wider tolerances. Buy from authorized sellers.
Maintenance Tips
Even premium tubes need periodic attention:
- Replace every 6-12 months if printing frequently, especially with higher-temp filaments
- Check the hotend end periodically — Pull the tube and inspect. If it’s mushroomed, discolored, or deformed, replace it
- Clean with a filament change — When swapping filaments, push a piece of cleaning filament through to clear debris
- Don’t print above rated temp — Even Capricorn XS shouldn’t be used for extended printing above 260°C. For higher temps, switch to an all-metal hotend and ditch the PTFE-lined heatbreak entirely
The Bottom Line
Capricorn PTFE tubing is one of the best value-for-money upgrades you can make to a Bowden-style 3D printer. At $10-15, it improves retraction performance, reduces clogs, extends the temperature range, and makes flexible filament printing possible. The installation takes 15 minutes, and the results are noticeable immediately.
If you’re on a direct drive setup, save your money — you won’t see enough improvement to justify it. But for anyone running a Bowden setup, especially on a budget printer like the Ender 3 or CR-10 series, it’s practically a must-have upgrade. Do it once, do it right, and enjoy months of better prints.