Z Banding in 3D Printing: Causes and Fixes
Z Banding in 3D Printing: Causes, Fixes, and How to Get Smooth Walls
Z banding—those repeating horizontal lines that show up on vertical walls—is one of the most frustrating surface issues. I’m Mike Reynolds, and in most cases, Z banding isn’t a slicer problem at all. It’s mechanical. Something in the Z-axis motion isn’t smooth, and the print shows it.
This guide explains the root causes of Z banding, how to diagnose which one you’re dealing with, and what actually fixes it. We’ll also cover some slicer tweaks that can hide minor banding, but the goal here is real mechanical stability.
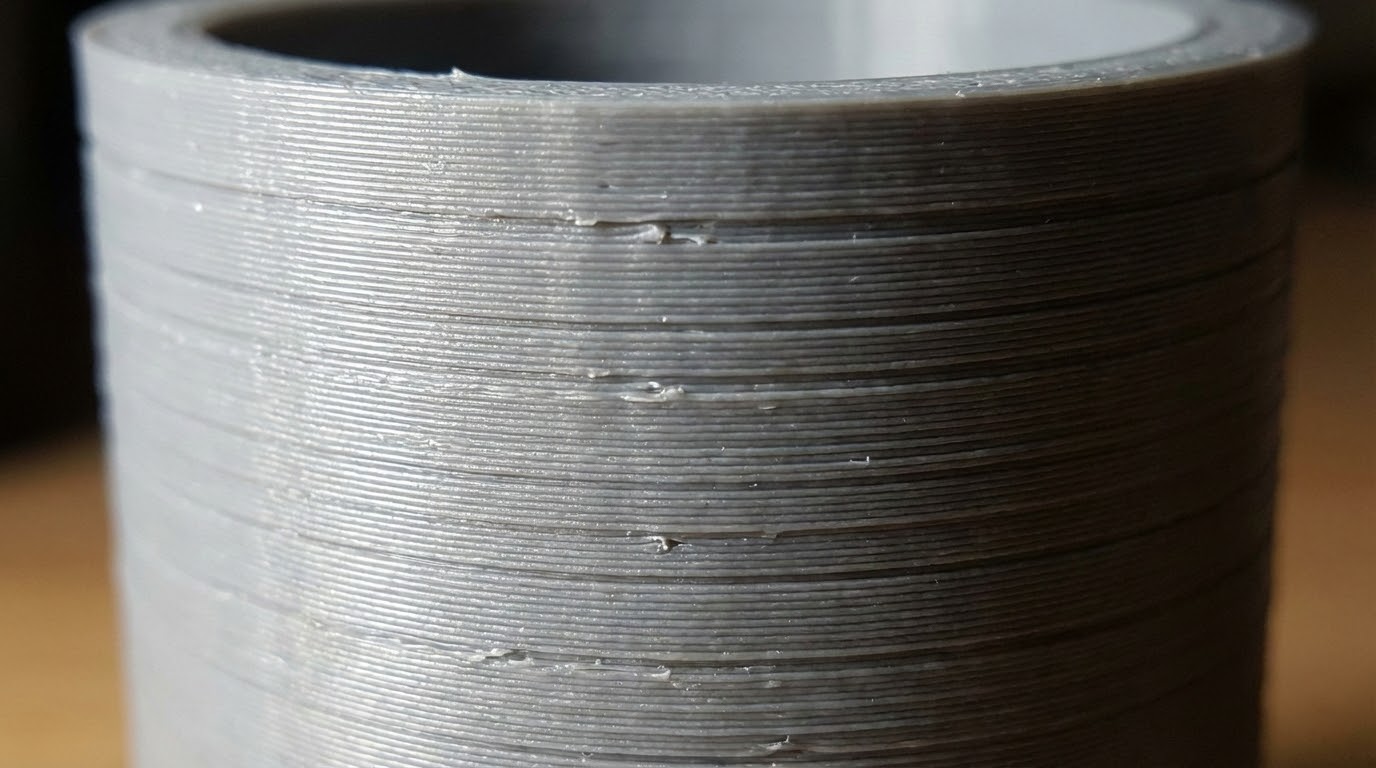
What Z Banding Looks Like
- Horizontal lines repeating at regular intervals
- Visible ridges you can feel with your fingernail
- Patterns that repeat every few millimeters
Step 1: Identify the Banding Interval
Measure the distance between bands. If it matches your lead screw pitch (often 8 mm on common printers), the lead screw is likely the culprit. If it matches a smaller interval, it may be coupler misalignment or a bent screw.
Step 2: Check the Lead Screw
- Remove and roll the lead screw on a flat surface to check for bends.
- Inspect threads for debris or damage.
- Lubricate with light machine oil or PTFE grease.
Step 3: Inspect the Coupler
A misaligned coupler can transmit wobble to the Z axis. The motor shaft and lead screw should be aligned and seated correctly. If the coupler is tight on one side and loose on the other, it can cause periodic banding.
Step 4: Check Z-Axis Guides and Bearings
If the Z rails or V-wheels are too tight or too loose, you’ll see uneven layer height. Adjust wheel tension or linear bearings so the carriage moves smoothly without play.
Step 5: Stabilize the Frame
Loose frame screws or an unstable table can amplify Z-axis imperfections. Make sure the frame is square and all bolts are tight. A small wobble in the base can show up as banding in tall prints.
Slicer Tweaks That Can Reduce the Appearance
- Use a slightly higher layer height to reduce band visibility.
- Reduce print speed to minimize vibration.
- Enable “outer wall before inner wall” for cleaner surfaces.
Common Causes in Order of Likelihood
- Dirty or bent lead screw
- Misaligned coupler
- Z-axis binding in rails or wheels
- Loose frame or gantry
Z Banding vs Z Wobble vs Layer Inconsistency
These issues look similar, but they’re different:
- Z banding: regular, repeating lines caused by cyclic mechanical issues.
- Z wobble: a spiral or diagonal pattern from a bent lead screw transferring motion to the print.
- Layer inconsistency: random changes in layer thickness often tied to extrusion or temperature fluctuations.
Knowing which one you have helps you focus on the right fix.
Single Z vs Dual Z Systems
On single Z printers, the gantry can sag slightly on the opposite side, creating uneven layer heights and banding. If your printer has dual Z, make sure both sides are synchronized. If it’s single Z, check that the wheels or linear bearings on the free side are properly tensioned and not binding.
Lead Screw Nut Alignment
The brass lead screw nut should move freely without binding. If it’s misaligned, it can force the gantry to move unevenly. Loosen the mounting screws slightly, run the Z axis up and down to center the nut, then re-tighten.
Microstepping and Z Resolution
Some printers have Z resolution settings that don’t divide cleanly into the lead screw pitch. That can create a repeating error pattern. If your firmware allows it, verify that your microstepping and steps/mm are set correctly. Incorrect Z steps can create a very consistent banding pattern that no lubrication will fix.
Test Prints That Reveal the Problem
Print a simple 20x20x100 mm tower at slow speed. If banding shows up at consistent intervals, measure them and compare to lead screw pitch. If banding changes with speed, it’s likely vibration or resonance instead of a lead screw issue.
Practical Fixes You Can Do in an Hour
- Clean the lead screw with isopropyl alcohol and re-lube.
- Loosen and re-seat the coupler so it isn’t forced off-axis.
- Adjust V-wheels so the carriage moves smoothly with light resistance.
- Tighten frame bolts and confirm the printer is level on a solid surface.
These steps solve the majority of Z banding issues without replacing any hardware.
Alignment Procedure (Quick and Effective)
- Disable steppers and move the Z axis up and down by hand.
- Feel for any tight spots or grinding.
- Loosen the lead screw nut, move the axis, then re-tighten to center it.
- Re-check movement; it should be smooth end-to-end.
Lubrication Tips
Use a light machine oil or PTFE grease on the lead screw. Too much grease attracts dust, too little creates binding. A thin, even coat is best. Wipe the screw clean every few months and reapply.
When to Replace Hardware
Replace the lead screw if it’s visibly bent or the threads are damaged. Replace the coupler if it’s warped or the set screws won’t hold. If your Z axis uses V-wheels, replace wheels that have flat spots or wobble.
Case Study: Banding Every 8 mm
I once saw a printer that produced perfect layers except for a ridge every 8 mm. That interval matched the lead screw pitch exactly. The fix was simple: clean the screw, re-lube, and replace a slightly bent coupler. After that, the ridges vanished entirely. The lesson: measure the interval—it tells you where to look.
Quick FAQ
Is Z banding always mechanical? Mostly, yes. Slicer settings can make it more visible, but if the pattern is regular and repeating, the Z axis is the primary suspect.
Can a wobbling spool cause banding? Indirectly. If the filament path adds uneven drag, it can cause minor extrusion fluctuations that look like banding. That’s why a smooth spool holder matters.
Does switching to a smaller nozzle help? It can reduce the visibility of banding, but it doesn’t remove the underlying cause.
Extended Checklist
- Measure banding interval and compare to lead screw pitch.
- Clean and lubricate the lead screw.
- Inspect coupler alignment and set screw tension.
- Check Z wheels/bearings for binding or play.
- Tighten the frame and ensure a stable surface.
This checklist catches most Z banding cases without needing new hardware.
When to Add Hardware Upgrades
If you’ve done all the basic fixes and still see banding, consider upgrades:
- Stabilized Z rod support: Helps on tall printers where the lead screw can flex.
- Quality lead screw and nut: Cheap screws can have inconsistent pitch.
- Linear rails: Improve Z movement consistency on some designs.
These are optional, but they can be worthwhile if you print large, tall parts regularly.
Preventive Habits
- Keep Z rails and screws clean and lightly lubricated.
- Check coupler set screws every few months.
- Make sure the printer stays on a stable, flat surface.
Slicer Tweaks to Hide Minor Banding
Once the mechanical issues are under control, you can reduce the visibility of any remaining banding with slicer settings:
- Use a smaller layer height for smoother surfaces.
- Reduce outer wall speed for a cleaner finish.
- Enable ironing on top surfaces (where applicable).
These tweaks won’t fix a bent screw, but they can improve surface quality on already-healthy printers.
Environmental Factors
Temperature swings and vibrations can exaggerate Z banding. If your printer sits on a shaky desk or near a washer, the vibration can imprint on the walls. A sturdy table, foam pad, or anti-vibration feet can make a noticeable difference in surface quality.
Lead Screw Pitch Reference
Most common printers use an 8 mm lead screw pitch. If your bands repeat every 8 mm, that’s a strong sign the screw or coupler is at fault. Measuring that interval is one of the fastest diagnostics you can do.
Also check the Z motor mount screws. If the motor shifts slightly under load, it can create repeating artifacts that look like banding.
A quick re-tighten of those screws is often overlooked and surprisingly effective.
It takes minutes and can remove a repeating pattern entirely.
If you want the cleanest walls, treat Z banding as a maintenance issue, not a mystery. The smoother the motion, the cleaner the print.
A little routine care beats chasing settings later.
Clean mechanics always print better than perfectly tuned slicers.
That’s why maintenance wins.
Keep it smooth, and the walls will show it.
Small fixes add up fast overall.
Final Thoughts
Z banding is usually mechanical. Clean and align the Z axis, lubricate the lead screw, and make sure the frame is rigid. Those steps fix the majority of cases. Slicer tweaks help, but they’re not a substitute for smooth motion.
If you want the shortest fix list: clean the screw, check the coupler, and verify the Z carriage moves smoothly by hand. That’s the fastest path to clean walls.