How to Fix Wet PETG: Bubbling, Popping, and Poor Surface Quality
Why Does PETG Bubble and Pop During Printing?
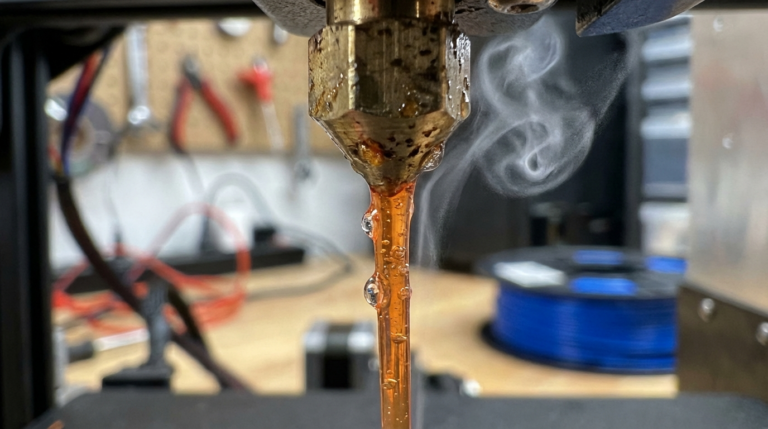
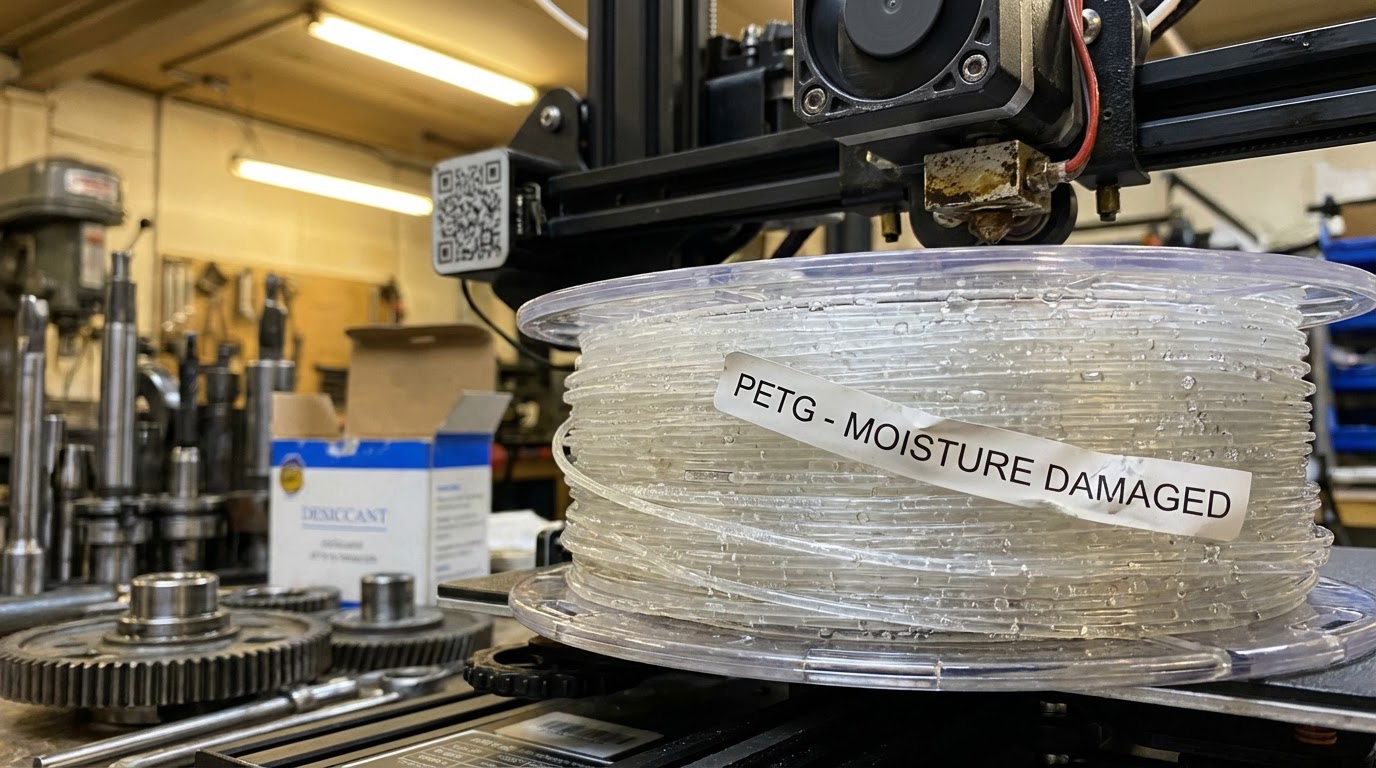
If you’ve ever heard your 3D printer making snapping, popping, or hissing sounds while printing PETG, you’re dealing with moisture contamination. PETG is one of the most hygroscopic filaments in common use — it absorbs water from the air like a sponge, and that absorbed moisture turns to steam inside your hotend, creating bubbles in the extruded plastic.
The result? A rough, pitted surface that looks nothing like the smooth, glossy finish PETG is known for. Worse, moisture-laden PETG produces weaker parts with poor layer adhesion. I’ve seen prints that looked fine from a distance fall apart under minimal stress because the moisture created micro-voids throughout the structure.
But here’s the good news: wet PETG is completely fixable. In this guide, I’ll walk you through how to identify moisture damage, dry your filament properly, and keep it dry so you never deal with this problem again.
How to Tell If Your PETG Is Wet
Before you start drying filament, you need to confirm moisture is actually the problem. Here are the telltale signs:
Audible Popping and Hissing
This is the most obvious symptom. When wet filament enters the hotend, the water boils and creates steam pockets. You’ll hear distinct popping or crackling sounds during extrusion. Some people describe it as sounding like frying bacon — and once you’ve heard it, you’ll recognize it immediately.
Bubbles on the Surface
Look closely at your printed walls. Wet PETG produces tiny craters, bumps, or rough patches on what should be smooth surfaces. These are caused by steam bubbles escaping through the molten plastic as it’s deposited. The severity ranges from subtle roughness to obvious pockmarks.
Excessive Stringing
Moisture changes the viscosity of molten PETG, making it stringier than normal. If you’ve dialed in your retraction settings and suddenly see strings everywhere, moisture could be the culprit.
Poor Layer Adhesion
Steam pockets between layers create weak points. If your PETG prints are delaminating or breaking easily along layer lines, moisture is a likely suspect — especially if the problem appeared gradually over time as the spool sat in open air.
Foggy or Matte Finish
Dry PETG produces a characteristic glossy, slightly translucent finish. Wet PETG looks foggy, matte, or cloudy. This is particularly noticeable with transparent or translucent colors.
How to Dry Wet PETG Filament
Once you’ve confirmed moisture is your problem, it’s time to dry. There are several methods, each with trade-offs between cost, effectiveness, and convenience.
Method 1: Dedicated Filament Dryer
A purpose-built filament dryer is the easiest and most reliable option. Popular choices include the Sunlu FilaDryer S2, EIBOS Cyclopes, and PrintDry Pro. These devices are designed to hold a full spool and maintain consistent temperature for extended periods.
Settings for PETG:
- Temperature: 65°C (149°F)
- Duration: 4-6 hours for moderate moisture, 8-12 hours for severely wet filament
- Some dryers let you print directly from the unit, keeping the filament dry during the entire print
The advantage of a dedicated dryer is simplicity. Set it and forget it. The downside is the upfront cost — expect to spend $40-80 for a decent unit.
Method 2: Kitchen Oven
Your kitchen oven can work as a filament dryer, but it requires caution. PETG has a glass transition temperature around 80°C, and some ovens have poor temperature accuracy or hot spots that could warp your spool.
Settings for PETG:
- Temperature: 65°C (149°F) — use an oven thermometer to verify
- Duration: 4-6 hours
- Place the spool on a baking sheet or oven-safe surface
- Leave the oven door slightly cracked to allow moisture to escape
Warning: Never exceed 70°C for PETG in a conventional oven. Temperature overshoot is common, especially in cheaper ovens. A $10 oven thermometer is essential — don’t trust the dial.
Method 3: Food Dehydrator
A food dehydrator is a budget-friendly alternative that works surprisingly well. Models like the Nesco FD-75A can accommodate most filament spools if you remove a few trays.
Settings for PETG:
- Temperature: 60-65°C
- Duration: 6-8 hours
- Remove the center column if your spool doesn’t fit
The gentle air circulation in a dehydrator actually makes it more effective than a static oven for moisture removal.
Method 4: DIY Desiccant Box (Prevention, Not Cure)
A sealed container with silica gel desiccant won’t actively dry wet filament very well — it’s too slow. But it’s excellent for keeping already-dry filament in good condition. I use large cereal containers with rechargeable silica gel packs from Amazon. Total cost: about $15 for a setup that holds 4-5 spools.
How Long Does Drying Take?
This depends on how wet your filament is and what method you’re using. Here’s a general guide:
- Slightly moist (minor surface roughness): 2-4 hours at 65°C
- Moderately wet (audible popping, visible bubbles): 4-8 hours at 65°C
- Severely saturated (constant popping, terrible surface quality): 8-12+ hours at 65°C
You can test if your filament is dry by extruding a few centimeters by hand (or with a short test print). If you hear any popping, it needs more time.
How to Test Your PETG After Drying
Don’t jump straight into a big print after drying. Run this quick test first:
- Heat your hotend to normal PETG temperature (230-245°C)
- Manually extrude 50-100mm of filament
- Listen for any popping or crackling sounds
- Inspect the extruded strand — it should be smooth and glossy, not rough or bubbly
- If it passes, print a small test cube and check the surface quality
If you still hear popping after 8+ hours of drying, your filament might be beyond saving — or your drying temperature is too low. Try bumping up to 70°C for another round.
Preventing Moisture Absorption in PETG
Drying is a reactive fix. The real solution is prevention. Here’s how to keep your PETG dry in the first place:
Store in Sealed Containers with Desiccant
The moment you’re done printing, put the spool back in an airtight container with fresh desiccant. Vacuum-sealed bags with desiccant packs work too, though they’re less convenient for frequent use.
Use a Dry Box While Printing
A dry box feeds filament to your printer while keeping the spool sealed. You can buy purpose-built ones (Sunlu, EIBOS) or make your own from a large food storage container with PTFE tube fittings. This is especially important in humid climates where PETG can absorb noticeable moisture in just a few hours of open-air printing.
Monitor Humidity
Throw a cheap hygrometer into your storage container. PETG should be stored below 15% relative humidity for long-term storage. If your desiccant can’t maintain that level, it’s time to recharge or replace it.
Rotate Your Stock
Don’t buy 20 spools and let them sit for a year. PETG has a shelf life, even in good storage conditions. Buy what you’ll use in 3-6 months.
PETG Drying Temperature Reference Table
Different sources recommend slightly different temperatures. Here’s what works based on extensive testing:
- Safe range: 60-65°C — conservative, takes longer but zero risk of spool warping
- Optimal: 65°C — best balance of speed and safety
- Aggressive: 70°C — faster drying but monitor for spool deformation
- Never exceed: 75°C — PETG glass transition is ~80°C, and you need margin
Can Severely Wet PETG Be Saved?
Usually, yes. I’ve recovered spools that sat in open air in a humid workshop for months. The key is patience — severely wet PETG might need 12-16 hours of continuous drying. Run a test extrusion, and if it’s still popping, dry for another 4 hours.
The exception is filament that’s been wet for so long it has degraded chemically. Signs include brittleness (filament snaps when bent) and discoloration. At that point, it’s recycling material, not printing material.
Common Mistakes When Drying PETG
- Temperature too low: Drying at 40-50°C barely does anything for PETG. You need at least 60°C.
- Not drying long enough: Two hours isn’t enough for moderately wet PETG. Plan for at least 4-6 hours minimum.
- Drying but not storing properly: Drying your filament and then leaving it out defeats the purpose. Have your storage solution ready before you dry.
- Trusting the spool color indicator: Some silica gel packs change color to indicate saturation, but they’re not always accurate. Replace or recharge on a schedule, not just by color.
- Using a microwave: Just… don’t. Microwaves heat unevenly and can melt, warp, or catch your spool on fire.
Final Thoughts
Wet PETG is one of the most frustrating problems in 3D printing because it sneaks up on you. A spool that printed perfectly last week can sound like a bowl of Rice Krispies today. But with a proper drying setup and good storage habits, it’s entirely preventable.
If you’re serious about printing PETG, invest in a filament dryer and some airtight storage. The $50-100 upfront cost pays for itself quickly in saved filament and eliminated troubleshooting time. Your prints — and your sanity — will thank you.