ABS Cracking Between Layers: The Six-Step Fix List That Actually Works
Why ABS cracks even when nothing else does
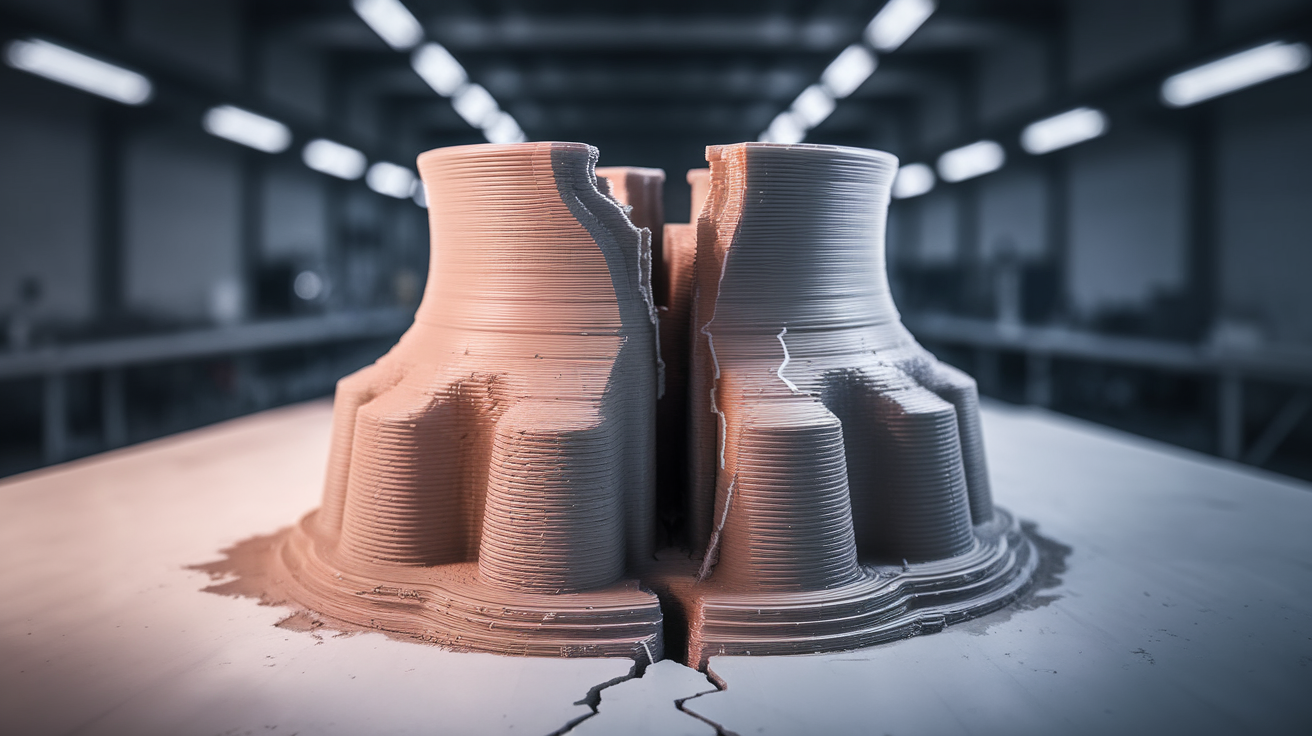
If your ABS prints split horizontally between layers but PLA, PETG, and ASA all print fine on the same machine, you have not found a printer problem. You have found ABS doing what ABS always does: contracting strongly as it cools, and tearing itself apart along the weakest interface — which is almost always the layer line.
This article is about that specific failure: clean horizontal cracks between layers, sometimes during the print, sometimes hours after. It is not the same as the visible delamination you get from under-extrusion or wet filament. ABS interlayer cracking has its own fix list, and most of the items are environmental rather than slicer-side.
What is actually happening
ABS shrinks about 0.8% as it cools from print temperature to room temperature. PLA shrinks about 0.3%. PETG sits between them. That is a known number, but it is also misleading because it averages across the whole part. What matters for cracking is the differential shrinkage between layers that have already cooled and layers being printed now.
When the new layer goes down at 240°C onto a layer that has cooled to 80°C, the new layer sticks. Then the new layer cools and tries to contract — but the layer below has already done its contracting and resists. The shear stress accumulates at the layer boundary. If the bond strength of that boundary exceeds the stress, the layers stay joined. If it does not, you get a crack — usually visible as a faint horizontal line at first, growing over hours as more layers add stress.
This is not a phenomenon you can defeat by printing harder. You defeat it by reducing the temperature gradient between layers so the differential contraction stays below the bond strength.
The first thing to fix: chamber temperature
ABS interlayer cracking is overwhelmingly a chamber temperature problem. If your printer is open or sits in a 20°C room, your ABS prints will crack on anything taller than about 60 mm. Period. Not because your slicer settings are wrong — because the lower layers cool too fast.
The target chamber temperature for ABS is 50-60°C measured at the part. Not at the bed, not at the wall, at the part. A standard cardboard-and-tarp enclosure around an open printer typically gets to 35-40°C from waste heat alone, which is not enough. You need either a heated chamber or a passive enclosure with reflective interior insulation.
Practical chamber options, from cheapest to best:
- Cardboard box around the printer: Gets you 35-40°C. Reduces cracking on parts under 80 mm tall. Better than nothing.
- Sealed enclosure (acrylic or insulated panel): 45-55°C from waste heat. Eliminates cracking on most parts under 150 mm.
- Sealed enclosure with chamber heater: 60°C+ on demand. Eliminates cracking on any part size.
If you are printing ABS in an open Ender 3 you are fighting physics. The fix is the enclosure, not the slicer.
Bed temperature
ABS bed temperature should be 100-110°C. Lower than 100°C and the lower layers cool below the glass transition before the next layer arrives, locking in their shape and forcing the new layer to do all the contracting. The classic Ender 3 stock bed maxes out at 110°C — perfect for ABS in principle, often unable to actually hit that with a stock heater on a cold day.
If your bed reads 110°C but the build plate is at 95°C (measured with an IR thermometer), you have a stock heater on its limits. A silicone bed heater upgrade is a $30 fix. Insulating the bed underside with a self-adhesive cork or fiberglass mat is a $5 fix.
Print temperature and layer adhesion
Once chamber and bed are right, print temperature controls how strongly each new layer bonds to the one below. For ABS the working window is 235-260°C. Lower temps in that window give cleaner prints; higher temps give stronger layer adhesion at the cost of stringing and surface finish.
For tall parts where cracking risk is high, push print temp to the upper end of the filament’s spec sheet. eSun ABS+ is rated to 260°C; printing at 250°C buys 15-20% more interlayer bond strength compared to printing at 235°C. Your nozzle and hotend need to be capable of holding that temperature stably — most all-metal hotends are fine, PTFE-lined hotends should not run above 250°C.
Cooling fan: less is more
Part cooling fan should be 0% for ABS. Not 10%, not 20% — zero. Active cooling fights the chamber temperature you worked hard to establish, and on tall parts every degree of differential cooling adds to interlayer stress.
The exception: very short layer times. If a small detailed feature is printing in under 5 seconds per layer, the layer can sag before cooling. In that case enable fan at 20-30% only for that feature, ideally as a per-region setting in the slicer rather than a global setting.
Wall and infill choices that reduce cracking
Number of perimeters matters more than infill density. Three or four walls add hoop stress that helps the part resist contraction-driven cracking. Two walls is enough for PLA but marginal for ABS on tall parts. The model size matters here too — small parts can get away with 2 walls, parts over 100 mm in any axis benefit from 4.
Infill pattern matters less than people think for cracking specifically. Honeycomb and gyroid both perform well; concentric and lines do not. Infill density at 25-30% is plenty — going higher does not improve crack resistance and adds print time.
One unintuitive trick: avoid 100% perimeters with no infill. A solid-walled part contracts uniformly and concentrates stress at the weakest layer. A part with 25% infill has internal structure that distributes the stress.
The role of filament drying
ABS is hygroscopic but less aggressively so than nylon or PVA. A spool sitting in average indoor humidity for two weeks will absorb enough moisture to print badly. Wet ABS shows up as poor surface finish, popping sounds at the nozzle, and — relevant here — weakened layer adhesion that turns into cracking.
Dry ABS at 65-75°C for 4-6 hours before any tall print. A filament dryer is the easy way; a food dehydrator works; an oven on its lowest setting works if you trust your oven’s lowest setting. After drying, store the spool in a sealed bag with desiccant. ABS that prints fine on day one out of the dryer often prints poorly on day three if left exposed.
Designing parts that do not crack
If you are designing the part, two rules dramatically reduce cracking risk on ABS. Avoid sharp internal corners on tall parts — a 2 mm fillet on every internal corner spreads stress that would otherwise concentrate at the crack initiation point. And avoid abrupt cross-section changes; transitioning from a 6 mm wall to a 2 mm wall in a single layer creates a stress concentrator that ABS will find and exploit.
This is true for any contracting plastic but it shows up most aggressively in ABS because the contraction force is the largest.
When to switch to ASA
ASA is ABS-with-the-ABS-problems-fixed. Same temperature range, similar mechanical properties, much better UV resistance, and significantly less interlayer cracking on tall parts. If you have followed the chamber-temperature, bed-temperature, dry-filament fixes and your ABS still cracks on parts over 150 mm, switch to ASA. The price premium is small and the failure rate drops by an order of magnitude.
For functional outdoor parts, ASA is simply the better material. ABS made sense when ASA was twice the price; the price gap has closed and there are few cases where ABS is the right pick today.
Quick checklist when a print cracks
If a print just cracked and you want to know what to fix:
- Chamber temperature reading at the part — should be 45°C+. If colder, that is the fix.
- Bed temperature reading with an IR thermometer — should be 100°C+. If colder, that is the fix.
- Print temperature — should be in the upper third of the filament spec. If lower, raise it 5-10°C.
- Part cooling fan — should be 0%. If higher, drop it.
- Wall count — should be 3-4 for parts over 80 mm. If 2, raise it.
- Filament dryness — when did you last dry the spool? More than two weeks ago, dry it.
Going through this list resolves 90% of ABS cracking. The remaining 10% is design problems or filament quality issues that no amount of slicer tuning will fix.
Cracking after the print finishes
One particularly frustrating scenario: the print completes successfully, you remove it from the bed, and an hour later you hear a crack from your shelf. The part has split along a layer line on its own.
This is the classic delayed thermal-stress failure. The part finished printing while the chamber was warm and contracted slowly while still in the chamber. Pulling it out put it into a cold room where final contraction happened fast enough to overload the weakest layer interface. The crack initiates hours later because polymer relaxation is a time-dependent process.
Two preventions. First, leave finished ABS prints in the chamber with the heater off but the door closed for at least an hour after the print finishes. Letting it cool with the chamber drops the cooling rate from minutes to hours. Second, design parts to have stress-distributing geometry — fillets at corners, gradual cross-section changes, no sharp transitions. ABS that does not have a stress concentrator to crack at usually does not crack.
Brand differences in cracking behavior
Not all ABS is equally crack-prone. Polymaker PolyLite ABS and eSun ABS+ are both formulated with impact-modifier additives that improve interlayer bond strength compared to commodity ABS. Cheap unbranded ABS sold on marketplace listings is the worst — same shrinkage, weaker layer bonds, much higher crack rate.
If you have followed the chamber and bed temperature fixes and your ABS still cracks, brand might be the issue. ABS+ formulations from Polymaker, eSun, or 3DXTech sit roughly between vanilla ABS and ASA in crack resistance. The price premium is small relative to print failure cost.