Best 3D Print Surface Finish Techniques Compared: Sanding, Priming, Vapor Smoothing and More
A 3D print straight off the build plate is just the beginning. Raw FDM prints have visible layer lines, rough surfaces, and a distinctly “printed” look that’s fine for prototyping but falls short when you need parts that look professional, feel smooth, or match a specific aesthetic. That’s where surface finishing comes in.
In this comprehensive comparison, I’ll cover every major surface finish technique for 3D prints — from basic sanding to advanced coating methods — with honest assessments of the results, effort required, and best use cases for each approach.
Why Surface Finish Matters
Beyond aesthetics, surface finish affects functionality. Smoother surfaces reduce friction in moving parts, improve hygroscopicresistance by sealing layer gaps, and can significantly increase the strength of painted or coated components. For consumer products, cosplay props, and display pieces, a good surface finish is the difference between “that’s 3D printed” and “how was this made?”
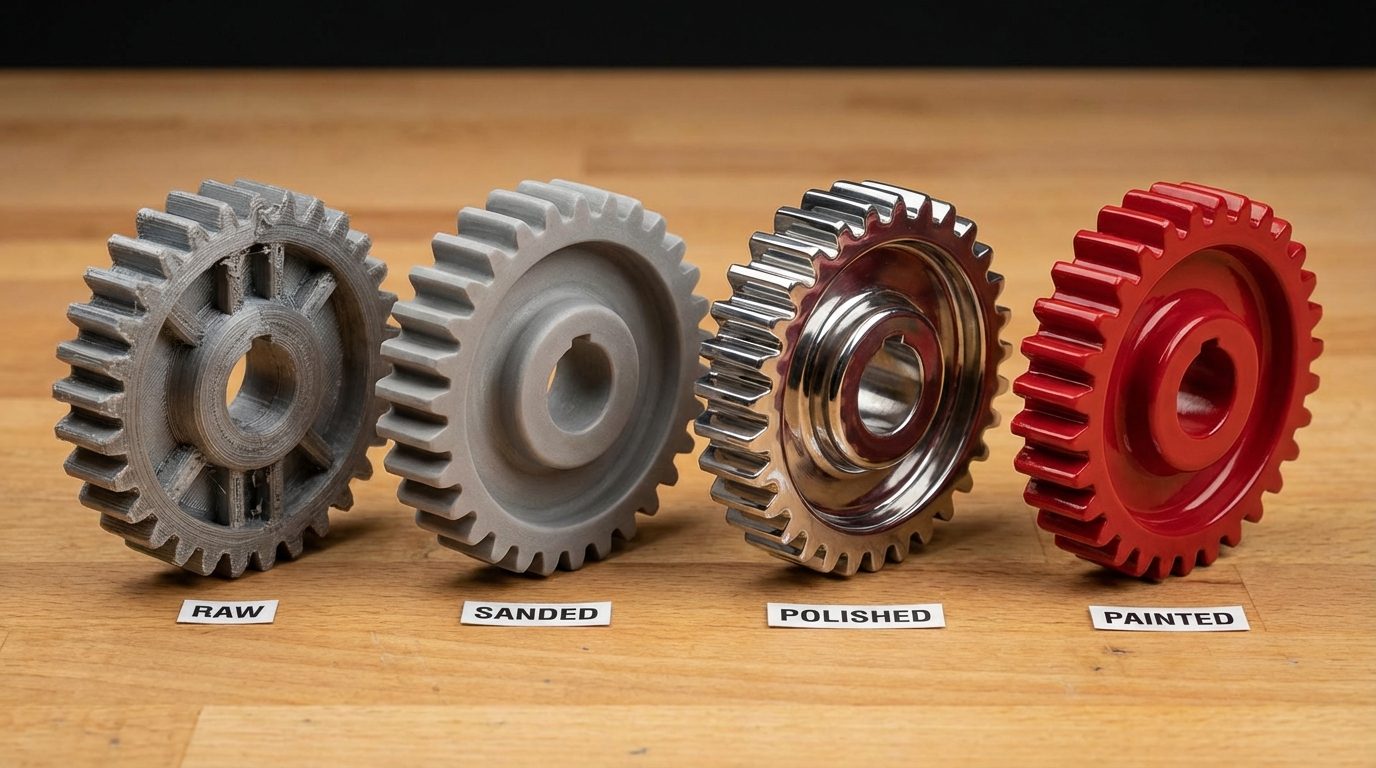
1. Sanding: The Foundation Technique
Sanding is the most accessible and widely used finishing method. It works on virtually all FDM materials and requires nothing more than a few sheets of sandpaper and patience.
Process:
- Start with 120-grit sandpaper to remove the worst layer lines and imperfections
- Progress to 240-grit, then 400-grit for a smoother surface
- For a near-polished finish, continue to 800-grit and 1000-grit wet sanding
- Wipe between grits with a damp cloth to remove dust
Results: Excellent. With patience, sanding can completely eliminate layer lines. Wet sanding to 1000+ grit produces a surface smooth enough to paint without primer (though primer still helps).
Effort: High. A medium-sized part (10-15cm) takes 30-60 minutes to sand through the full progression. Complex geometry with recesses and undercuts is tedious to reach.
Best for: PLA, ABS, PETG. Works on all rigid filaments. Not recommended for TPU or other flexible materials.
Pro tip: Use a sanding sponge for curved surfaces — it conforms better than flat sandpaper. Wet sanding produces less dust and a finer finish at higher grits.
2. Filler Primer: The Quick Smoothing Shortcut
Filler primer (also called high-build primer or sandable primer) is a thick spray paint designed to fill small surface imperfections. Applied in 2-3 coats with light sanding between coats, it can dramatically smooth a 3D print with far less effort than sanding alone.
Process:
- Lightly sand the print with 220-grit to improve adhesion
- Spray 2-3 thin coats of filler primer, waiting 10-15 minutes between coats
- After the final coat dries fully (1-2 hours), wet-sand with 400-600 grit
- Apply a final coat of regular primer if painting, or clear coat for a finished look
Results: Very good. Fills minor layer lines without much manual sanding. Two coats typically hide 0.2mm layer height lines completely. Won’t fill deep gouges or major print defects — those need sanding or body filler first.
Effort: Low to medium. Mostly waiting for coats to dry. Active work time is 15-20 minutes per part.
Best for: Parts that will be painted. Cosplay pieces, display models, anything where appearance matters and the part won’t flex.
Recommended products: Rust-Oleum Filler Primer, Tamiya Surface Primer, Montana GOLD Filler Primer.
3. Acetone Vapor Smoothing (ABS Only)
Acetone dissolves ABS plastic. By exposing an ABS print to acetone vapor in a sealed container, the surface melts slightly and re-solidifies into a smooth, almost injection-molded finish. It’s the closest thing to a “magic button” for surface finishing — but it only works with ABS (and ASA to some extent).
Process:
- Place the print on a raised platform inside a sealed glass or metal container
- Add a small amount of acetone to paper towels lining the container walls
- Seal the container and wait. Check every 5-10 minutes.
- Remove when the surface looks glossy but before fine details dissolve (usually 15-30 minutes)
- Let the part dry in open air for several hours
Results: Stunning on simple shapes. The surface becomes glossy and nearly layer-line free. However, it rounds sharp edges and can dissolve fine details. Thin walls may deform or weaken.
Effort: Very low active effort. The vapor does the work. Setup and monitoring take about 10 minutes total.
Best for: ABS and ASA prints without fine details. Vases, enclosures, display pieces with simple geometry.
Warning: Acetone is flammable and produces harmful vapors. Always work in a well-ventilated area, away from ignition sources. Do not use a heated container — the vapors are explosive.
4. Epoxy Coating (XTC-3D and Alternatives)
Epoxy coating involves brushing a thin layer of self-leveling epoxy resin over the print surface. The epoxy fills layer lines and cures into a smooth, hard shell. XTC-3D by Smooth-On is the most popular product specifically designed for this purpose.
Process:
- Mix epoxy components according to instructions (XTC-3D is 2:1 by volume)
- Brush a thin coat over the entire surface, working quickly before the epoxy begins to gel (you have about 10 minutes)
- Use a heat gun briefly on low to pop any surface bubbles
- Let cure for 4+ hours at room temperature
- Optional: wet-sand with 400+ grit and apply a second coat for a mirror finish
Results: Excellent. One coat fills most layer lines from 0.2mm layer heights. Two coats can hide 0.3mm layers. The finish is hard, glossy, and paintable. The downside is that it adds 0.2-0.5mm of material thickness, which can affect dimensional accuracy and small features.
Effort: Medium. Mixing and applying takes 15-20 minutes. Mainly limited by cure time.
Best for: Display pieces, cosplay props, anything where adding slight thickness doesn’t matter. Works on PLA, ABS, PETG, and most other materials.
5. Body Filler (Bondo)
Automotive body filler is the heavy artillery of surface finishing. It fills deep layer lines, print defects, and even structural gaps. If your print has major surface issues that sanding and primer can’t handle, body filler is the answer.
Process:
- Rough-sand the surface with 80-120 grit
- Mix body filler with hardener per instructions (small batches — it sets fast)
- Apply thin layers with a spreader, building up low spots
- Let cure for 15-30 minutes
- Sand smooth with 120 → 240 → 400 grit progression
- Apply filler primer over the sanded surface before painting
Results: Can fix anything. Deep grooves, missing sections, visible seams from multi-part assemblies. The sanded surface accepts paint beautifully.
Effort: High. This is messy, dusty work that requires patience and multiple cycles of fill-sand-inspect.
Best for: Large props, cosplay armor, assembled multi-part prints, parts with significant print defects.
6. Heat Gun Smoothing
A heat gun can gently melt the surface of PLA prints, reducing layer lines without chemicals or sanding. It’s fast and requires no consumables, but it demands a steady hand and careful temperature control.
Process:
- Set the heat gun to low (about 200-250°C for PLA)
- Hold the gun 10-15cm from the surface
- Move constantly — never hold in one spot
- Watch the surface: layer lines should soften and blend, not bubble or deform
Results: Moderate. Reduces but doesn’t eliminate layer lines. Can create a slightly wavy surface if not careful. Good as a quick first pass before sanding or priming.
Effort: Low. Takes 5-10 minutes for a medium part. But the risk of deformation is real.
Best for: Quick smoothing of PLA parts that don’t need a perfect finish. Not recommended for parts with fine details, thin walls, or dimensional requirements.
7. Spray Paint and Clear Coat
Sometimes the simplest approach is the right one. Multiple thin coats of spray paint can hide minor layer lines while adding color and protection. A clear coat on top adds durability and the finish of your choice (matte, satin, or gloss).
Process:
- Light sanding with 320-400 grit
- Apply 1 coat of adhesion promoter or filler primer
- Apply 3-4 thin coats of color paint, waiting 10 minutes between coats
- Apply 2 coats of clear coat for protection
Results: Good for hiding minor imperfections. Won’t mask heavy layer lines (you’ll see the texture through the paint). Works best when combined with at least light sanding or filler primer.
Effort: Low. Mostly spray-and-wait. Active time is under 15 minutes.
Best for: Quick color finishes on reasonably smooth prints (0.1-0.15mm layer height). Household items, gifts, decorative pieces.
Comparison Table
Here’s how the techniques stack up against each other:
Sanding — Quality: ★★★★★ | Effort: ★★★★★ | Cost: ★☆☆☆☆ | Materials: All rigid
Filler Primer — Quality: ★★★★☆ | Effort: ★★☆☆☆ | Cost: ★★☆☆☆ | Materials: All rigid
Acetone Vapor — Quality: ★★★★★ | Effort: ★☆☆☆☆ | Cost: ★☆☆☆☆ | Materials: ABS/ASA only
Epoxy (XTC-3D) — Quality: ★★★★★ | Effort: ★★★☆☆ | Cost: ★★★☆☆ | Materials: All
Body Filler — Quality: ★★★★★ | Effort: ★★★★★ | Cost: ★★☆☆☆ | Materials: All rigid
Heat Gun — Quality: ★★★☆☆ | Effort: ★★☆☆☆ | Cost: ★☆☆☆☆ | Materials: PLA mainly
Spray Paint — Quality: ★★★☆☆ | Effort: ★★☆☆☆ | Cost: ★★☆☆☆ | Materials: All
My Recommended Workflow
For most projects, I use a three-step process that balances effort and results:
- Quick sanding with 120 and 240 grit to knock down the worst layer lines (10 minutes)
- Two coats of filler primer with light sanding between coats (30 minutes total including dry time)
- Paint and clear coat (20 minutes active time)
Total active time: about 45 minutes for a professional-looking result. This workflow works for 90% of projects. Reserve epoxy coating and body filler for showpiece parts where perfection matters.
For ABS prints, I skip all of that and go straight to acetone vapor smoothing. Nothing beats it for ABS — 15 minutes and done.
Final Thoughts
There’s no single “best” surface finish technique — the right choice depends on your material, your patience, and what the part needs to look like. But every 3D printer owner should be comfortable with at least sanding and filler primer. Those two tools alone will transform your prints from obviously-3D-printed to genuinely impressive.
Start simple, experiment with different methods, and find the workflow that matches your projects. The results are worth the effort.