How to Vapor Smooth 3D Prints with Acetone: ABS Finishing Guide
What Is Vapor Smoothing?
Every FDM 3D print has visible layer lines. It’s the nature of the technology — you’re building objects one layer at a time, and those layers leave their mark. For functional parts, nobody cares. But for display pieces, props, cosplay helmets, or anything that needs to look injection-molded, those layer lines are a problem.
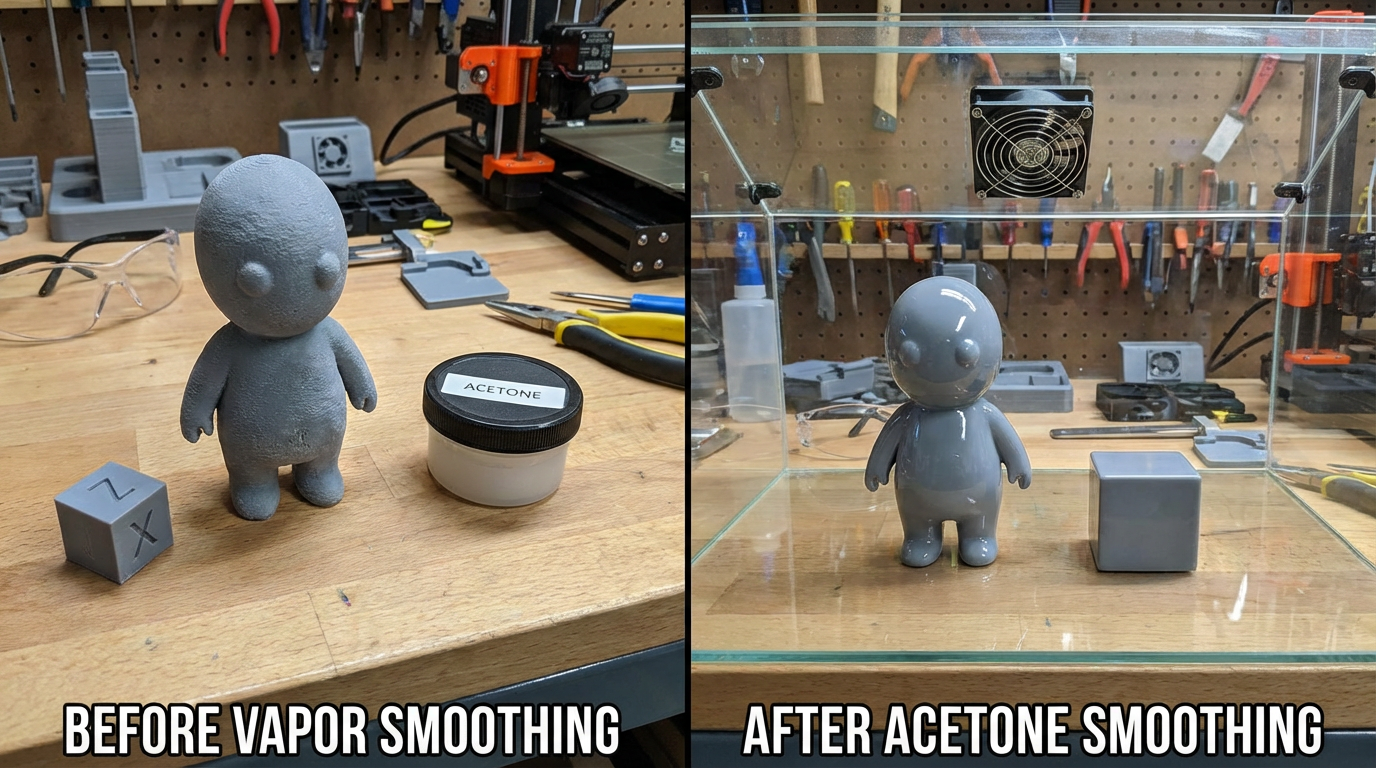
Vapor smoothing is a chemical finishing technique that melts the outer surface of a 3D print just enough to flow together, filling in layer lines and leaving a smooth, glossy finish. The most common method uses acetone vapor on ABS prints, though other solvent-material combinations exist. When done right, the results are dramatic — a rough, layered print transforms into something that looks professionally manufactured.
How Acetone Vapor Smoothing Works
ABS (Acrylonitrile Butadiene Styrene) is soluble in acetone. When ABS is exposed to acetone vapor, the surface layer begins to dissolve and soften. The softened plastic flows under surface tension, filling in the gaps between layers. When you remove the print from the vapor, the surface re-hardens into a smooth, glossy finish.
The key word here is “vapor.” You’re not dunking your print in liquid acetone — that would dissolve it unevenly and destroy fine details. Instead, you’re creating a controlled environment where acetone evaporates into a gas that gently softens the surface. The exposure time determines how much smoothing occurs: a few minutes for light smoothing that preserves details, or longer for a high-gloss finish that sacrifices sharp edges.
Materials That Work (And Don’t Work)
ABS + Acetone (The Classic Combo)
This is the gold standard for vapor smoothing. Acetone is cheap, widely available, and works predictably on ABS. You can buy it at any hardware store in the paint thinner aisle. Results are consistent and well-documented by thousands of makers.
ASA + Acetone
ASA (Acrylonitrile Styrene Acrylate) is chemically similar to ABS and responds to acetone vapor the same way. Since ASA is increasingly popular as a UV-resistant alternative to ABS, this is good news if you’re smoothing outdoor parts.
PLA — Not Compatible
PLA does not dissolve in acetone. Full stop. If you see online tutorials claiming you can acetone-smooth PLA, they’re wrong or using a PLA blend that contains other polymers. Pure PLA requires different solvents (ethyl acetate or THF) that are harder to find and more dangerous to work with. For most hobbyists, sanding and painting is a better finishing option for PLA.
PETG — Not Recommended
PETG has very limited solvent options. Some people report results with MEK (methyl ethyl ketone) or dichloromethane, but these are seriously toxic solvents that require proper lab-grade ventilation. Not worth the risk for hobby use.
The Cold Vapor Method (Recommended)
This is the safest and most controlled approach. No heat, no open flames near volatile solvents, and easy to monitor.
What You’ll Need
- A glass jar or airtight container large enough to hold your print with space around it
- Acetone (hardware store grade is fine)
- Paper towels or shop rags
- A raised platform (a small piece of aluminum foil bent into a stand works)
- Nitrile gloves
- Safety glasses
- Well-ventilated workspace or outdoor area
Step-by-Step Process
1. Prepare the container. Line the inside walls of your glass jar with paper towels. Soak the paper towels with acetone — they should be wet but not dripping. The paper towels create a large surface area for acetone to evaporate from, filling the container with vapor quickly and evenly.
2. Wait for vapor to build. Seal the container and let it sit for 10-15 minutes. The acetone will evaporate from the paper towels and fill the container with vapor. You’ll see the air inside become slightly hazy.
3. Place your print inside. Put your ABS print on the raised platform (you don’t want the bottom sitting in liquid acetone that may pool). Place it in the container and seal the lid. Start a timer.
4. Check every 5-10 minutes. The smoothing happens faster than you’d expect. After 15-20 minutes, you’ll see a noticeable change in surface texture. After 30-45 minutes, layer lines should be significantly reduced. After 60+ minutes, you’ll get a high-gloss finish but may lose fine details.
5. Remove and cure. Take the print out (wearing gloves — the surface is soft and sticky) and place it somewhere well-ventilated to cure. Don’t touch it for at least 2-3 hours. The acetone needs to fully evaporate from the surface before the print hardens. Rushing this step leaves a tacky surface that picks up fingerprints and dust.
The Heated Method (Advanced)
Some tutorials suggest heating acetone on a hot plate or electric stove to speed up vapor production. This works but comes with a serious warning: acetone vapor is extremely flammable. Its flash point is -20°C (-4°F), meaning it can ignite at room temperature if exposed to a spark or open flame.
If you choose to use heat, never exceed 56°C (113°F) — acetone’s boiling point. Use only an electric heat source (never gas). Work outdoors or in a space with explosion-proof ventilation. Keep a fire extinguisher within arm’s reach. Honestly, the cold method works just as well with a little more patience, and I strongly recommend it over heated methods for home use.
Tips for Perfect Results
Print Quality Matters
Vapor smoothing softens the surface — it doesn’t fix structural problems. If your print has under-extrusion gaps, blobs, or major layer adhesion issues, smoothing will make them look different but not better. Start with the best print quality you can achieve, then smooth for the finishing touch.
Orientation Planning
The bottom of your print (the surface sitting on the platform) won’t smooth as evenly since vapor can’t circulate underneath it. Plan your print orientation so the most visible surfaces face upward or outward during smoothing. For tall prints, rotate them halfway through for even exposure.
Controlling the Amount of Smoothing
Short exposure (15-20 min) preserves details like text, small features, and sharp edges while reducing layer visibility. Long exposure (45-60+ min) creates a glass-like finish but rounds over edges and can fill in small details. For mechanical parts with tight tolerances, use minimal smoothing — even a light treatment can add 0.1-0.2mm to dimensions.
Multiple Short Sessions vs. One Long Session
Two 15-minute sessions with a 30-minute cure between them gives more control than one 30-minute session. You can check the progress and stop when you’re happy with the result. This approach also reduces the risk of over-smoothing, which makes the surface look melted and bubbly.
Post-Smoothing Painting
Vapor-smoothed ABS takes paint beautifully. The smooth surface eliminates the need for filler primer in most cases — a light coat of spray primer followed by your paint of choice gives professional-looking results. If you’re finishing cosplay props or display models, vapor smoothing before painting saves hours of sanding.
Common Mistakes to Avoid
- Using too much liquid acetone: You want vapor, not a pool. Excess liquid on the bottom of the container will dissolve the base of your print if it comes in contact.
- Touching the print too soon: The surface stays soft for hours after removal. Handling it before it’s fully cured will leave fingerprints permanently embedded in the surface.
- Smoothing thin-walled prints: Walls thinner than 2mm can soften all the way through, losing structural integrity. Stick to prints with wall thickness of 3+ perimeters.
- Ignoring ventilation: Acetone vapor isn’t acutely toxic in small amounts, but prolonged inhalation causes headaches, dizziness, and irritation. Work outdoors or near an open window with a fan pulling air away from you.
- Using a plastic container: Acetone dissolves many plastics. Use glass or metal containers only. That cheap plastic storage bin from the dollar store? It’ll melt.
Alternative Smoothing Methods
If acetone vapor isn’t right for your situation, consider these alternatives:
- Sanding + filler primer: Works on any material. Labor-intensive but gives you complete control. Start with 120 grit, work to 400, apply filler primer, sand to 800, paint.
- XTC-3D epoxy coating: A brush-on epoxy that self-levels and fills layer lines. Works on PLA, ABS, PETG, and most other materials. Adds a glossy, hard shell. Downside: adds thickness and requires mixing two components.
- Heat gun smoothing: A heat gun can soften PLA’s surface, but it’s very easy to overdo it and warp the part. Not recommended for beginners.
- Polymaker PolySher: A specialized polishing chamber designed for Polymaker’s PolySmooth filament (a PVB-based material). Works great but locks you into one specific filament brand.
Is Vapor Smoothing Worth the Effort?
For display pieces, cosplay props, and any print where surface finish matters, absolutely. The transformation from a rough, layered FDM print to a smooth, glossy part is remarkable, and it takes less time than sanding by hand. The material cost is negligible — a quart of acetone costs a few dollars and lasts for dozens of smoothing sessions.
The key is understanding that vapor smoothing is a finishing technique, not a fix for bad prints. Get your ABS printing dialed in first, then use vapor smoothing as the cherry on top. And always, always prioritize safety — proper ventilation, no heat sources near acetone vapor, and protective equipment are non-negotiable.